Conversion Funnels in Google Analytics for [Non-Transactional] Goals
Let’s face it tracking digital marketing funnels for non-transactional conversions (i.e. non-Ecommerce goals not part of a purchase funnel) in Google Analytics is anything but straightforward.
However, there are some workarounds such as:
Building goal funnels in data studio.
Using the Funnel Visualization report.
Tweaking Google Analytics Ecommerce funnel (Checkout Behavior report) to track non-transactional conversions.
But, Google Analytics does not provide a simple and intuitive out of the box solution unless you are tracking a customer purchase funnel using the Enhanced-Ecommerce Checkout Behavior report reports for transactional reporting.
First, let’s take a step back and answer what is a Sales Funnel. (aka conversion funnel) Then we can look at building conversion funnels in Google Analytics to track and visualize non-transactional Events or Goal Funnels.
What is a Conversion Funnel?
Macro and micro customer conversion funnels allow marketers to track users through various steps of a purchase funnel as they get closer to becoming a converted user be that a lead, signup or purchase.

Source: Smart Revenue
For the sake of this post, I will bucket funnels into macro purchase funnels and micro conversion funnels.
Note: Keep in mind that in this post we will be focusing on building micro digital marketing funnels in Google Analytics for conversion funnel analysis and optimization.
Macro Consumer Purchase Funnel
Broader cross channel (offline and online) purchase funnel help brands and advertisers understand the user journey and better identify how to reach them. These macro funnels take into account reach, exposure and awareness from branding through to consideration, purchase intent and ultimately to purchase.
Micro Digital Marketing Conversion Funnel
You can also create more specific on-site conversion funnels. In this case, you would want to understand how a user interacts with your landing page or website. When they reach your site the first time (consideration) and how they behave on returning the second or third time (purchase intent).
Conversion funnels are extremely valuable in identifying any bottlenecks in a user journey. Once identified you can start testing hypothesis that can improve each step of the funnel and in turn improve sales, sign-ups or leads.
How do I define a Conversion Funnel?
First, you need to be clear on the business goal. Are you looking to increase brand awareness, educate the consumer about the brand or a product, generate leads for future follow-ups or generate sales?
Once you have the goal defined tracking conversion funnels can start answering questions such as:
Is your content strategy driving sales?
Are you including a clear and concise value proposition on your landing page?
Is there continuity throughout your ad copy, visuals and messaging?
Do you have next steps clearly defined once users reach the landing page?
Are you generating relevant traffic so that you can close the sale with a well placed retargeting ad?
Now that we have covered the conversion funnel definition lets take a closer look at creating micro on-site conversion funnels in Google Analytics. Doing this will help us to better understand users on site path to purchase or path to conversion funnel.
Default Google Analytics Conversion Funnels
Google Analytics provides three conversion funnel reports.
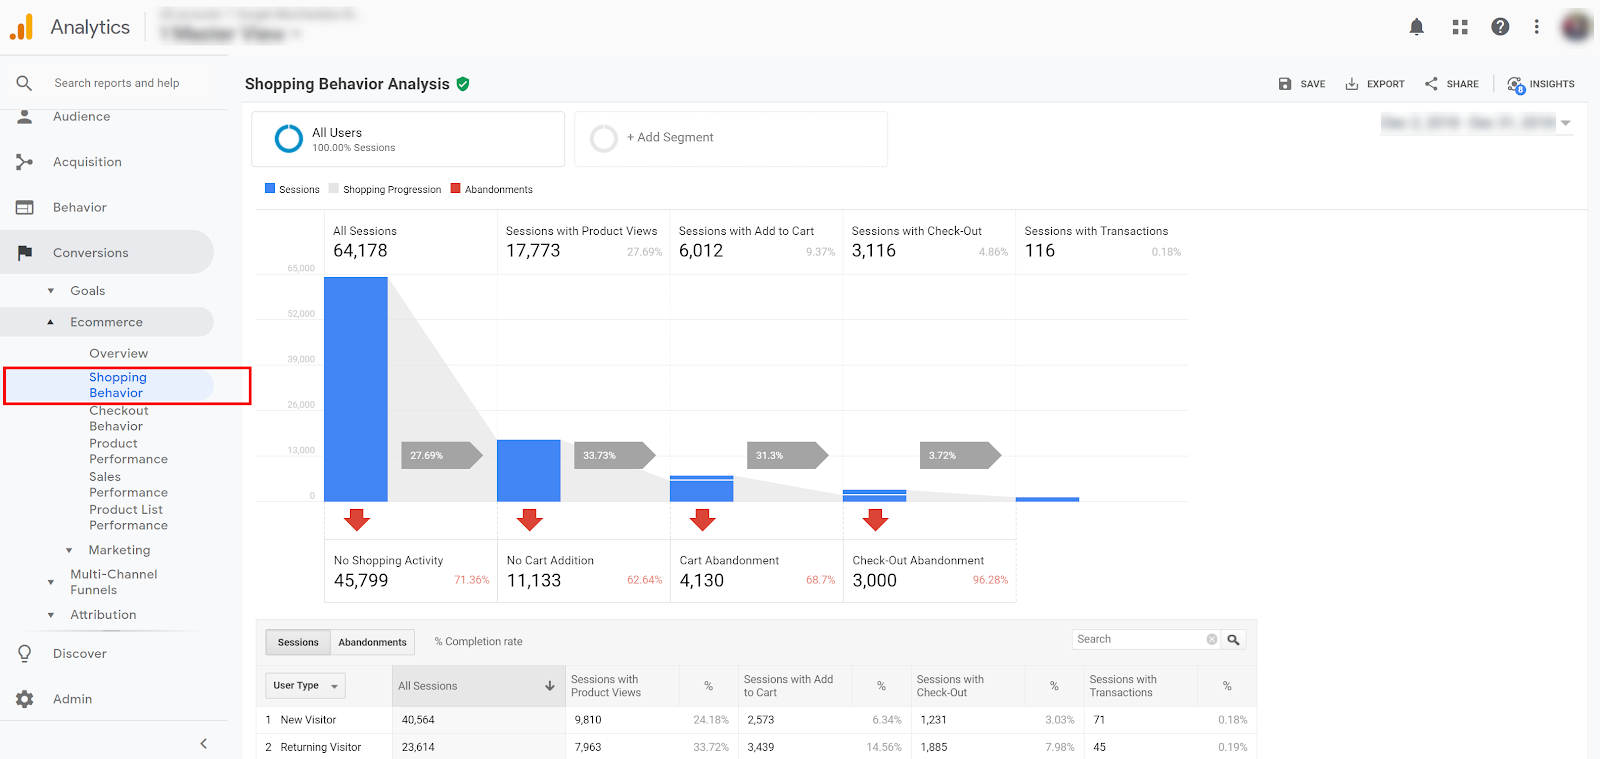
Ecommerce Funnels – Checkout Behavior Report
Ecommerce Funnels – You can find these under Conversions > Ecommerce > Shopping Behavior
Note: You need to have enhanced Ecommerce set up on your site to access this report.
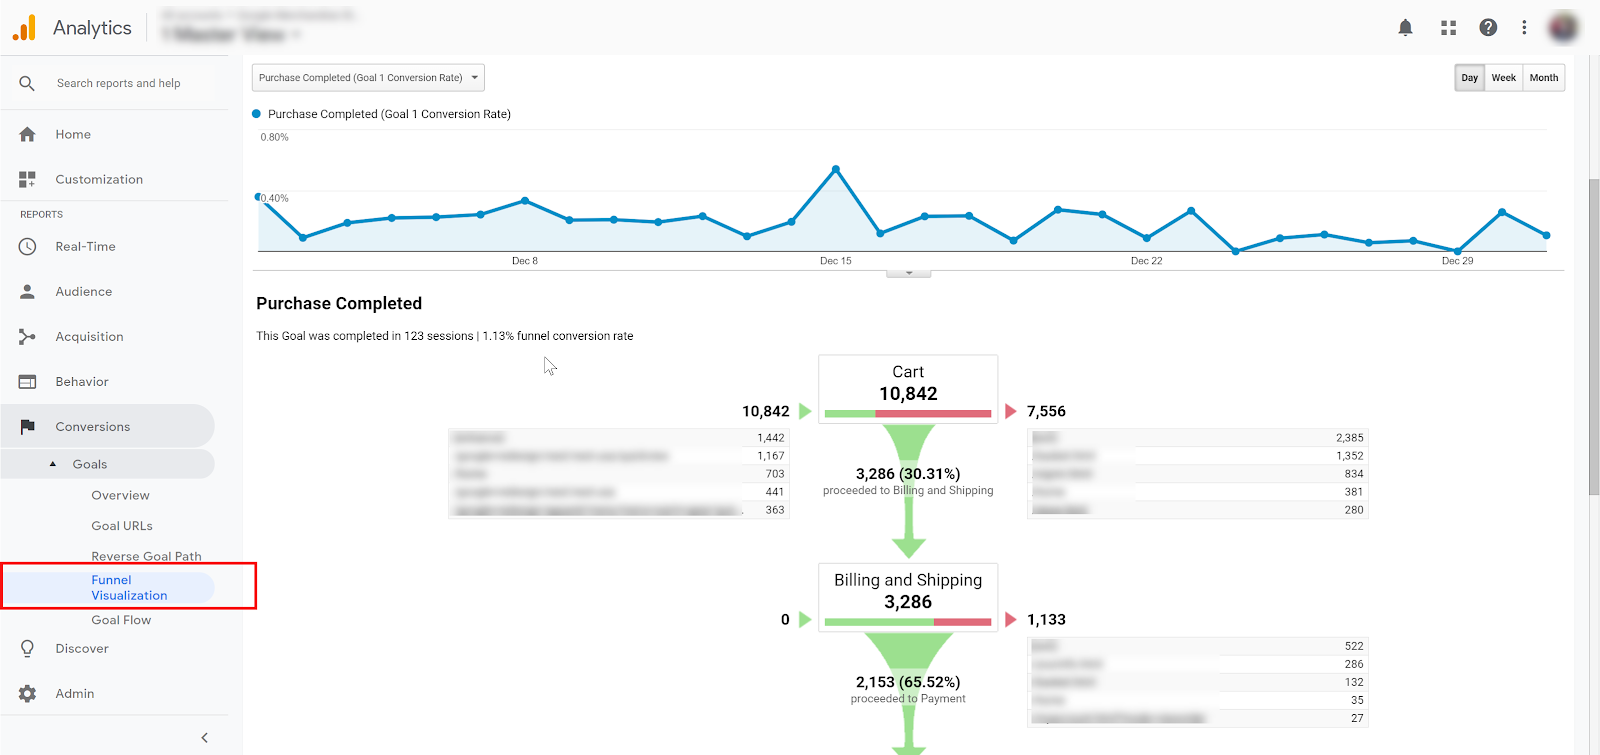
Goal Funnels – Funnel Visualization Report
Goal Funnels – You can find these under Conversions > Goals > Funnel Visualization
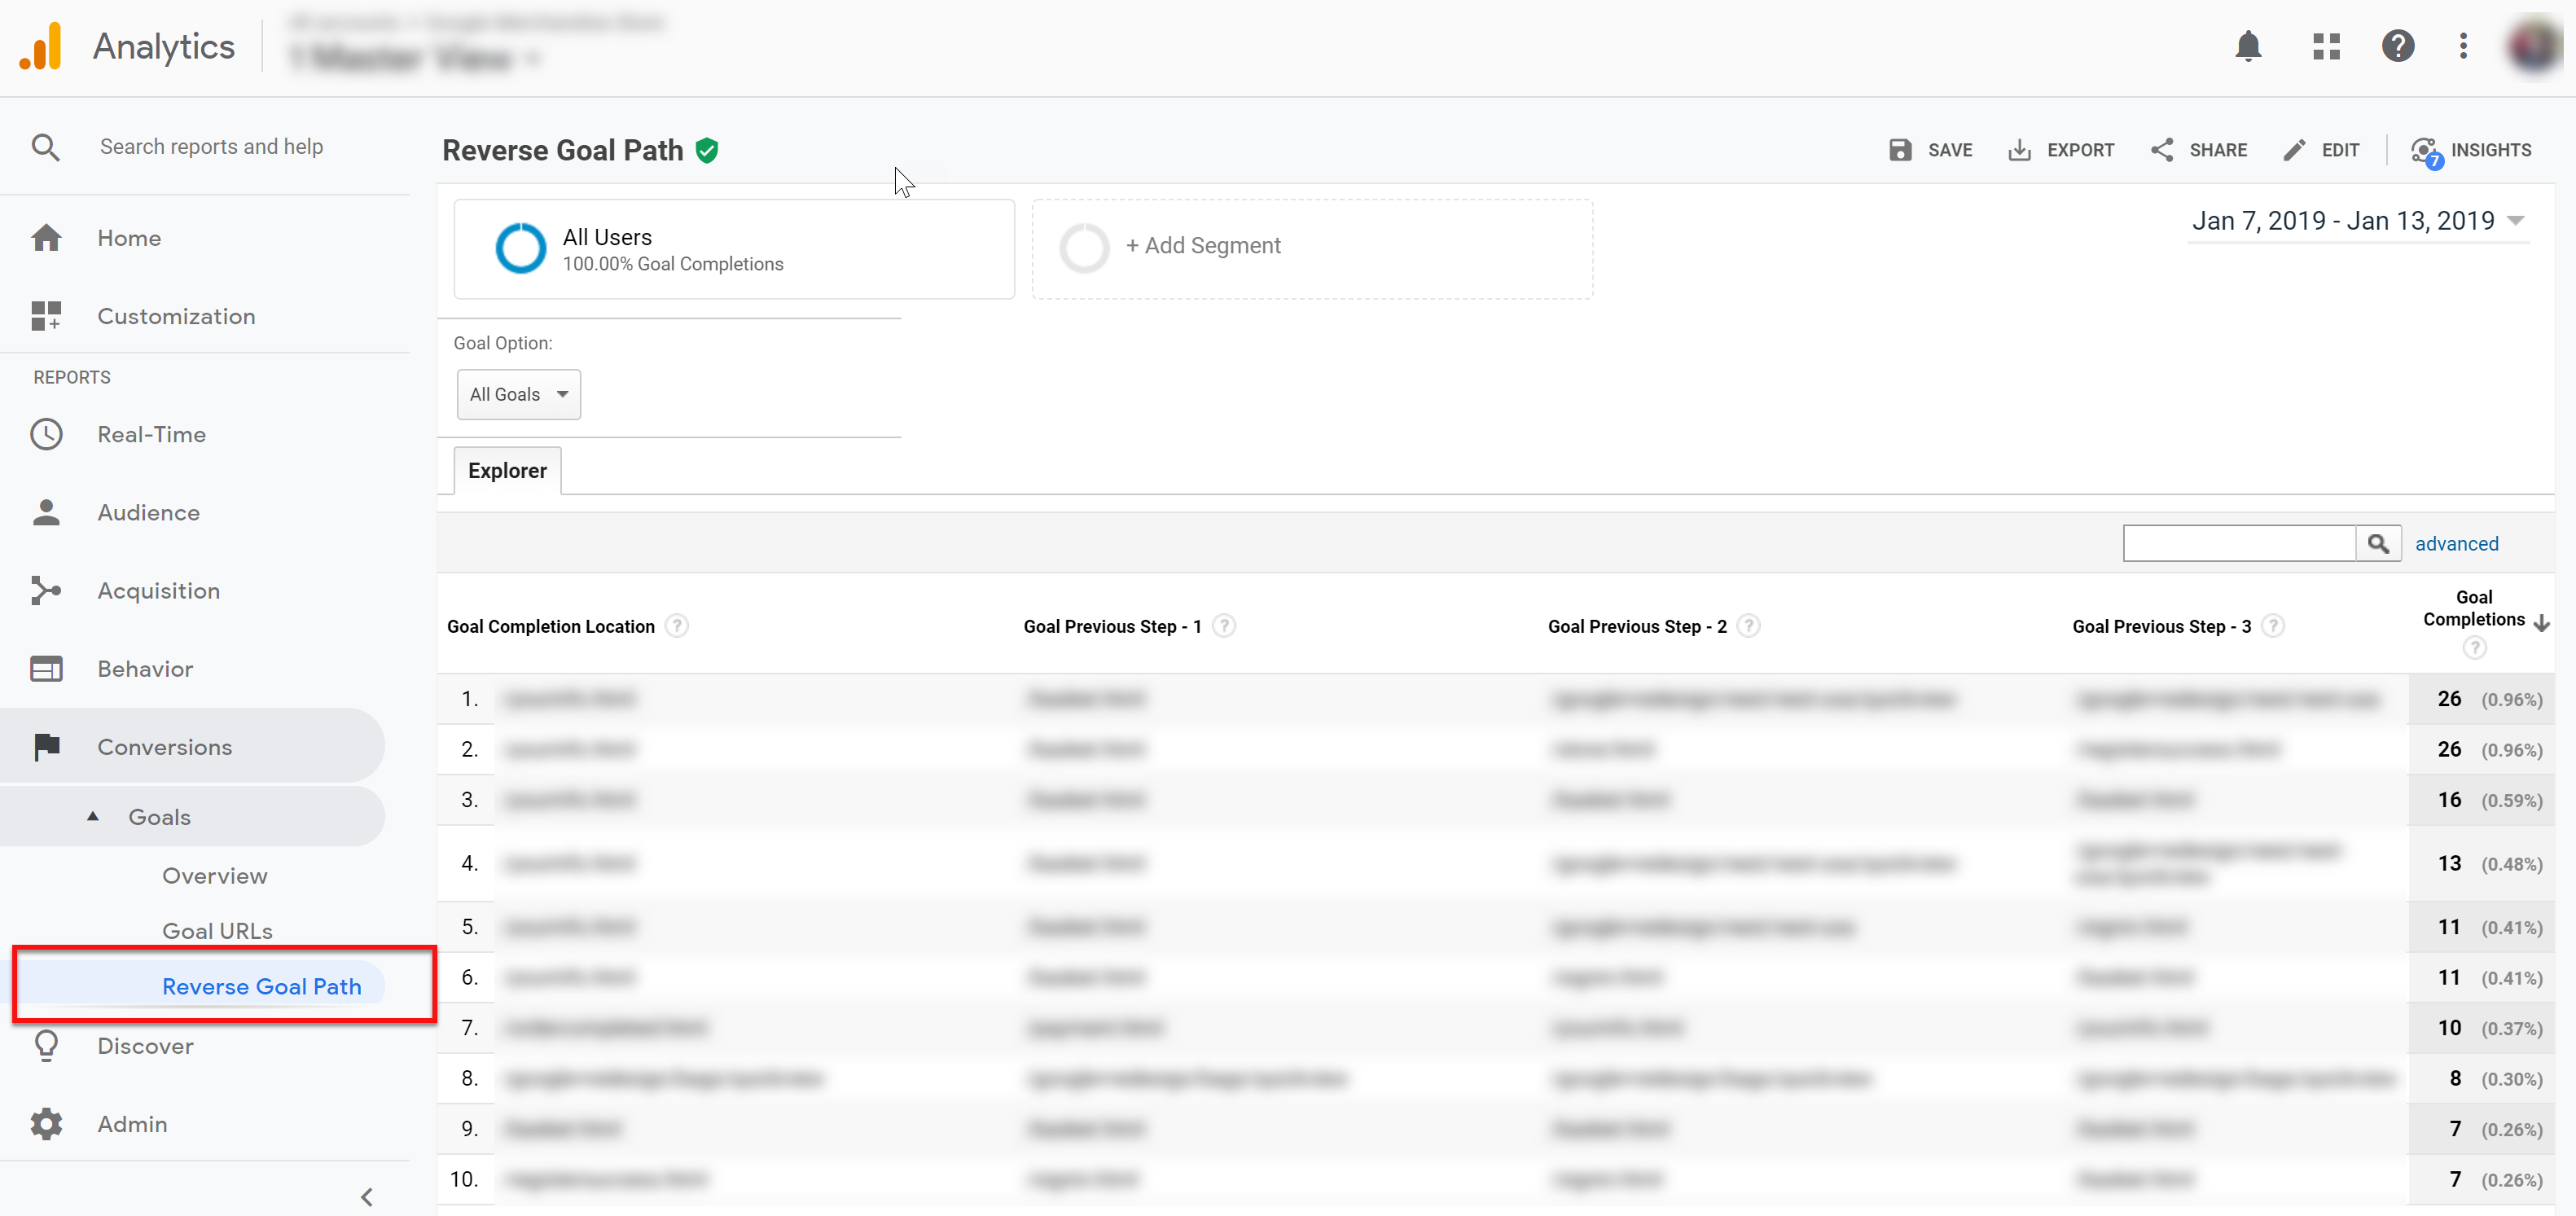
Reverse Goal Path Report
Reverse Goal Path – You can find this under Conversions > Goals > Reverse Goal Path
Note: Before I get started I want to point out that this article focuses on two specific approaches.
- The detailed set up of firing virtual pageviews to leverage Funnel Visualization.
- Applying Enhanced Ecommerce objects to non-transactional events so that you can utilize the Ecommerce Funnel Report.
I do include a brief overview of the default enhanced ecommerce report with a link to a reference. I also included an overview of creating goal funnels in Data Studio with a link to a past article I wrote on how to set this up.
Enhanced Ecommerce Conversion Funnels [Overview]
Ok, let’s start with looking at what Google Analytics provides out of the box for Ecommerce sales funnels.
Enhanced Ecommerce Conversion Funnels are great if you are running an ecommerce site.
To set these up make sure you have enhanced ecommerce enabled and are tracking all the necessary elements. I am not going to go into the technical set up of enhanced ecommerce in this article since I want to focus on non-transactional funnels. (further down the post)
If you need help setting up Enhanced Ecommerce you can reference this comprehensive post by Aaron Agius on Neil Patel’s site which provides a A Step-by-Step Guide to Using Google Analytics’ Enhanced Ecommerce Features.
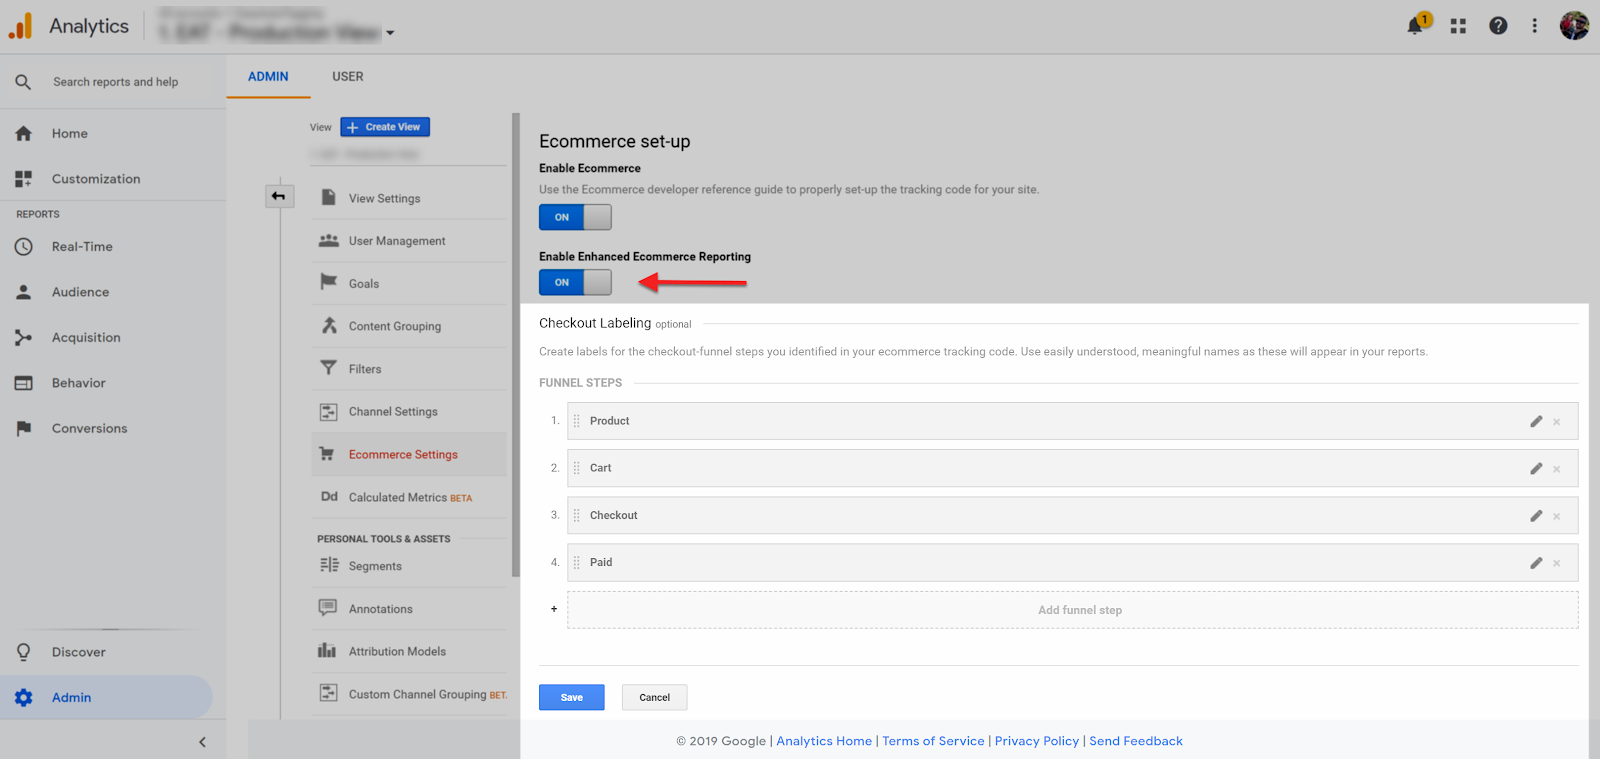
Once you have set up Enhanced Ecommerce tracking navigate to Admin > View > Ecommerce Settings

Make sure Enhanced Ecommerce is enabled and add your funnel steps.
With Enhanced Ecommerce in place, you can get a clear visual of how your purchase funnel is performing across all users and segments of users and also make this data actionable by creating segments of users lost in the funnel to remarket to.
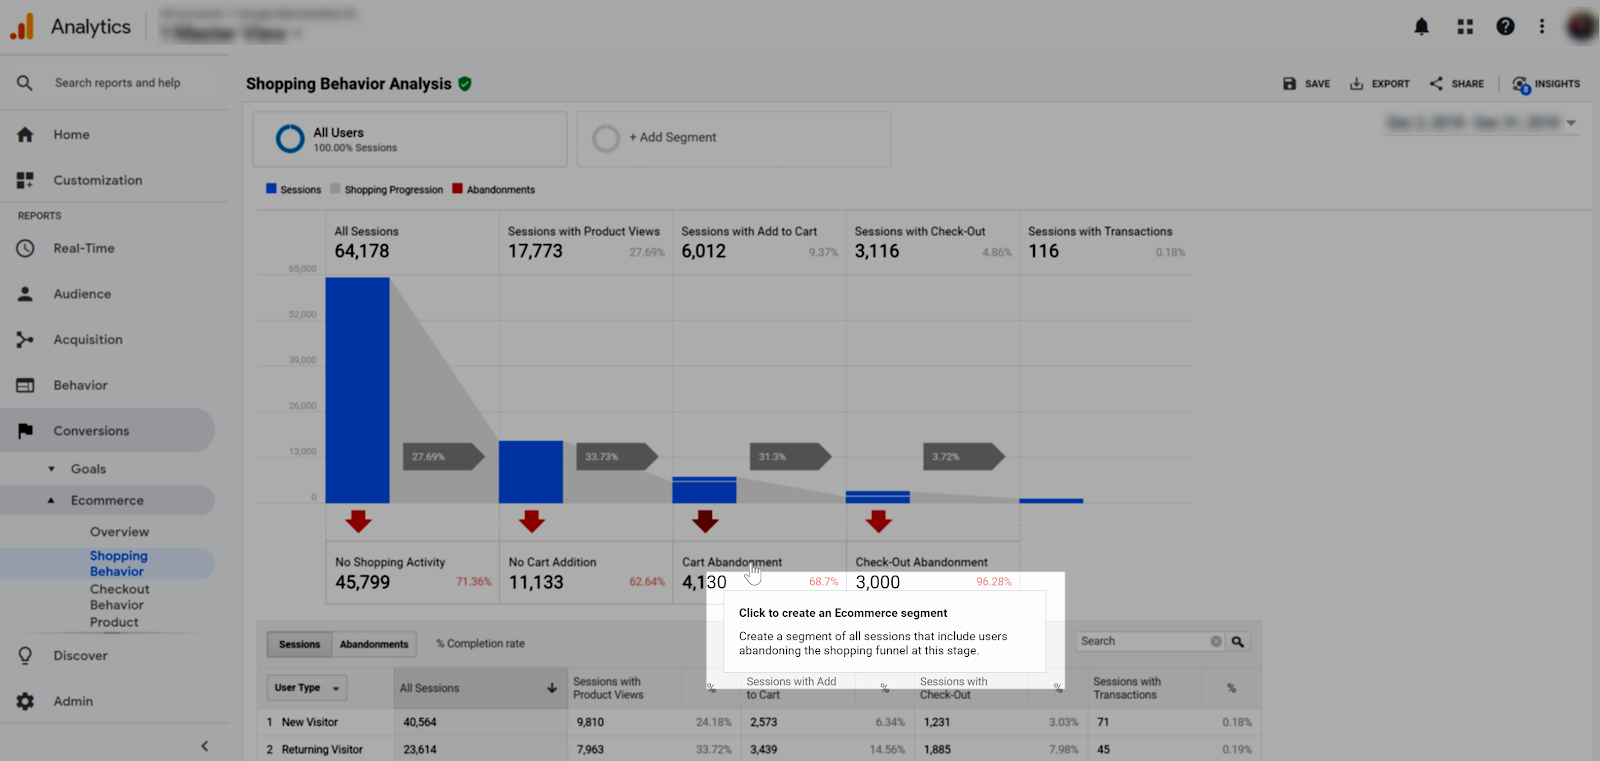
Tip: To get a better understanding of how long it takes a user to purchase after visiting your site for the first time reference the Time Lag report under Conversions > Multi-Channel-Funnels > Time Lag and compare this to the average number of sessions per users.
However, how can you track goal or event funnels for non-transactional conversions such as leads and/or sign-ups?
Let’s take a look at our available options.
Non-Transactional Goal Funnels – Business Objective
Before we look at the specific set up let’s create a use case for our conversion funnel.
In this case, let’s take a SaaS product with the goal of understanding how many visitors a. sign up b. Take an action after signing up c. Become a paid user. The second step is key to understanding the value of users actually signing up for the product. This is also great for identifying any bottlenecks in the onboarding process.
If you are working with a SaaS platform that provides many features look at the existing users base and determine a commonality among paid users. The key is to identify early actions they took which pushed them far enough into the product to become a paid customer.
Now that we have a solid understanding of what we want to measure there are two things we are going to want to do with this data:
- Look at segments of users based on entry point and or traffic source so that we can tie funnels back to a landing page and channel effectiveness.
- Create custom audiences off of users that drop out of funnel steps so that we can provide personalized follow-ups and remarketing campaigns to encourage platform usage.
Let’s look at and go over the set up of non-transactional goal funnels.
Non-Transactional Goal Funnels – Types
As stated above Google Analytics by default does not provide a simple out of the box solution. You have to resort to a third party tool or get creative with ‘hacking’ GA to build non-transactional conversion funnels.
Having said that there are three methods I have used in the past to build, track and analyze funnels.
- Building Goal Funnels in Data Studio.
- Firing Virtual Pageviews to Leverage Funnel Visualization.
- Leveraging Ecommerce Funnels for non-product sales goals.
Let’s review each method in detail covering implementation and workarounds to make up for Google Analytics platform limitations.
Note: If you want to skip right to a specific funnel type you can jump to each section by clicking on the link above.
Non-Transactional Goal Funnels in Data Studio [Oveview]
To create Goal Funnels in Data Studio you can create and rename custom metrics within Data Studio as each funnel step. Then use bar charts to build visual funnels mapping each step in a user journey.
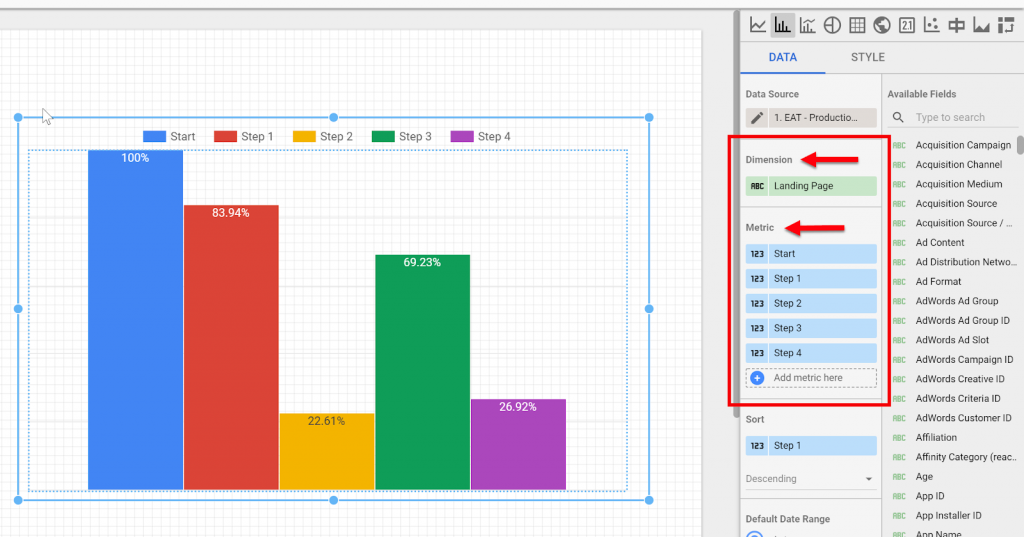
The initial set up is a bit more involved. But once in place, you have a live Funnel dashboard to visually measure your funnel effectiveness.
You can filter these funnels down to specific segments within data studio. For example users coming from a specific channel or users with a targeted entrance (Landing) page.
Since this method requires a goal for each step you can create custom audiences of people that are dropping out of specific steps to remarket to. For example, you can create a custom audience of users that have signed up for a trial but have not taken an action in the platform.
To learn how to set this up in detail you can reference How To Create Behavior Flows [Using Goal Funnels In Data Studio].
Non-Transactional Goal Funnels using the Funnel Visualization Report [Detailed Set Up]
This method will fire virtual page views on events and use the default out of the box Google Analytics goal funnel visualization report to build the conversion funnel.
You can only add steps in the Funnel Visualization report by using destination goals and adding each step in the form of a URL. This will display how a user navigates through each step (pageview or virtual pageview) in the conversion funnel.
The biggest limitation here is that you cannot add steps from events or goals and are restricted to URLs to define steps. To circumvent this limitation you can fire events as virtual pageviews and then use these defined ‘URLs’ as steps in the funnel.
Let’s look at how to set this up.
Requirements: Google Analytics and Google Tag Manager.
Funnel Visualization Report Caveat
Segmentation and Traffic Source
The first caveat is that you cannot segment the Funnel Visualization report. This means you cannot filter the funnel down to a specific source of traffic i.e. google / cpc or down to users reaching the site from a specific entrance page i.e. Home Page. You would have to create one funnel for each entrance page by defining and requiring the entrance page in the goal settings.
Note: If that is the case which report would you use to determine where users start or exit the conversion funnel? To get a better understanding of how users start or exit the conversion funnel use the Goal Flow and Reverse Goal Path report. However, this is not an ideal option since you are now looking at funnel entrance and exit data in two different places.
Redundant Data
Virtual pageviews will also show in behavior and acquisition reports. You can easily filter these out in reporting views but it can skew your overview user and session data. If you do not want this visible in your default production view the only workaround is to apply filters on the production view level excluding all virtual pageviews and then creating a separate view (without filters) for your funnel visualization reports.
Funnel Visualization – Setting up Virtual Page Views
First, we want to go to the Google Tag Manager and set up virtual pageviews to fire for specific events that are not page views within the funnel.
For this conversion funnel to goal is to measure site visitors > sign up > action > paid user
Since the funnel visualization report does not allow you to apply segments I am going to create a conversion funnel tracking all users that start with the home page.
Note: If you have a custom landing page you can set up multiple funnel visualization reports changing the first step to its respective landing page and making the first page ‘required’.
To track this conversion funnel we will use the following events:
- Page View (For this instance we will use the home page)
- Sign Up CTA
- Sign Up (A user signed up)
- Action (A user took a key action within the platform)
- A trial user becomes a paid user
Notice that the above is combining a mix of page views and events to complete the funnel.
For Page View Funnel steps we do not have to do anything since we can input a URL for those steps so our focus is going to be on setting up virtual pageviews for all events in the conversion funnel steps.
We also do not have to do anything for the final goal since funnels are looked at respective to a specific goal.
Note: In this case, I do not have a unique thank you page to send a user to once they signed up so I will need to create a virtual page view. However, if you do you have unique confirmation page URL you can skip this step.
This leaves us with the following events to track as virtual pageviews:
- Sign Up CTA
- Signed Up
- Action
Funnel Visualization – Setting up Virtual Page Views for Events
To get started go to the Google Tag Manager and enable the built-in the Pages, Clicks and Forms variables
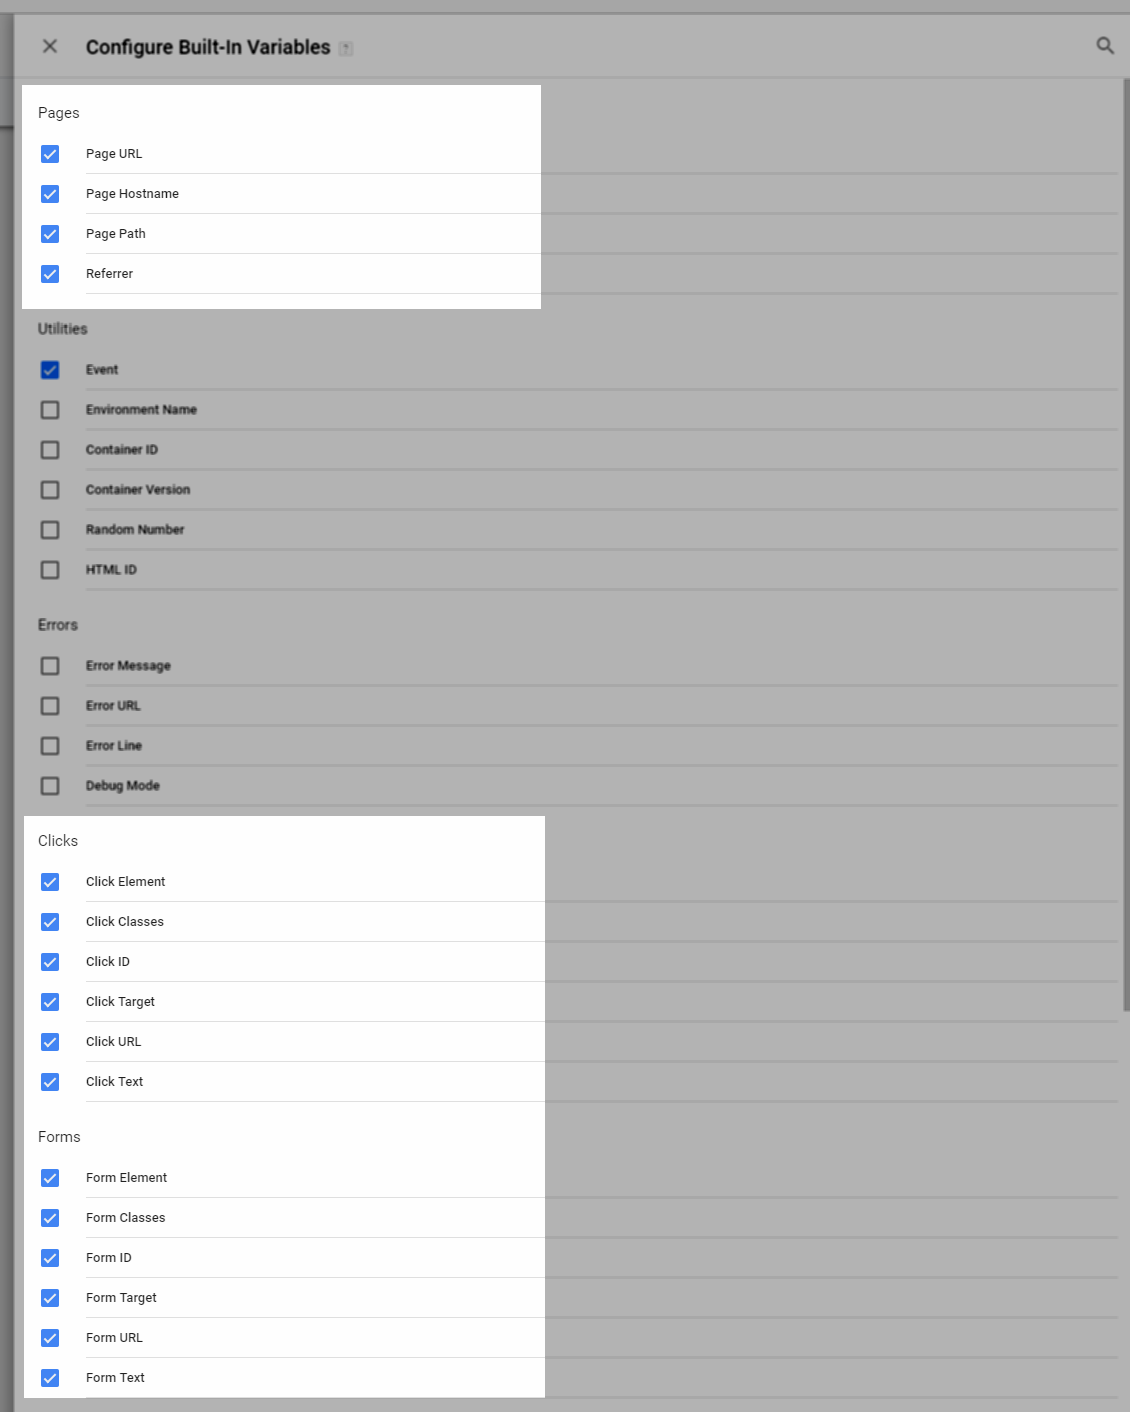
Next, go to Tags and create a new tag
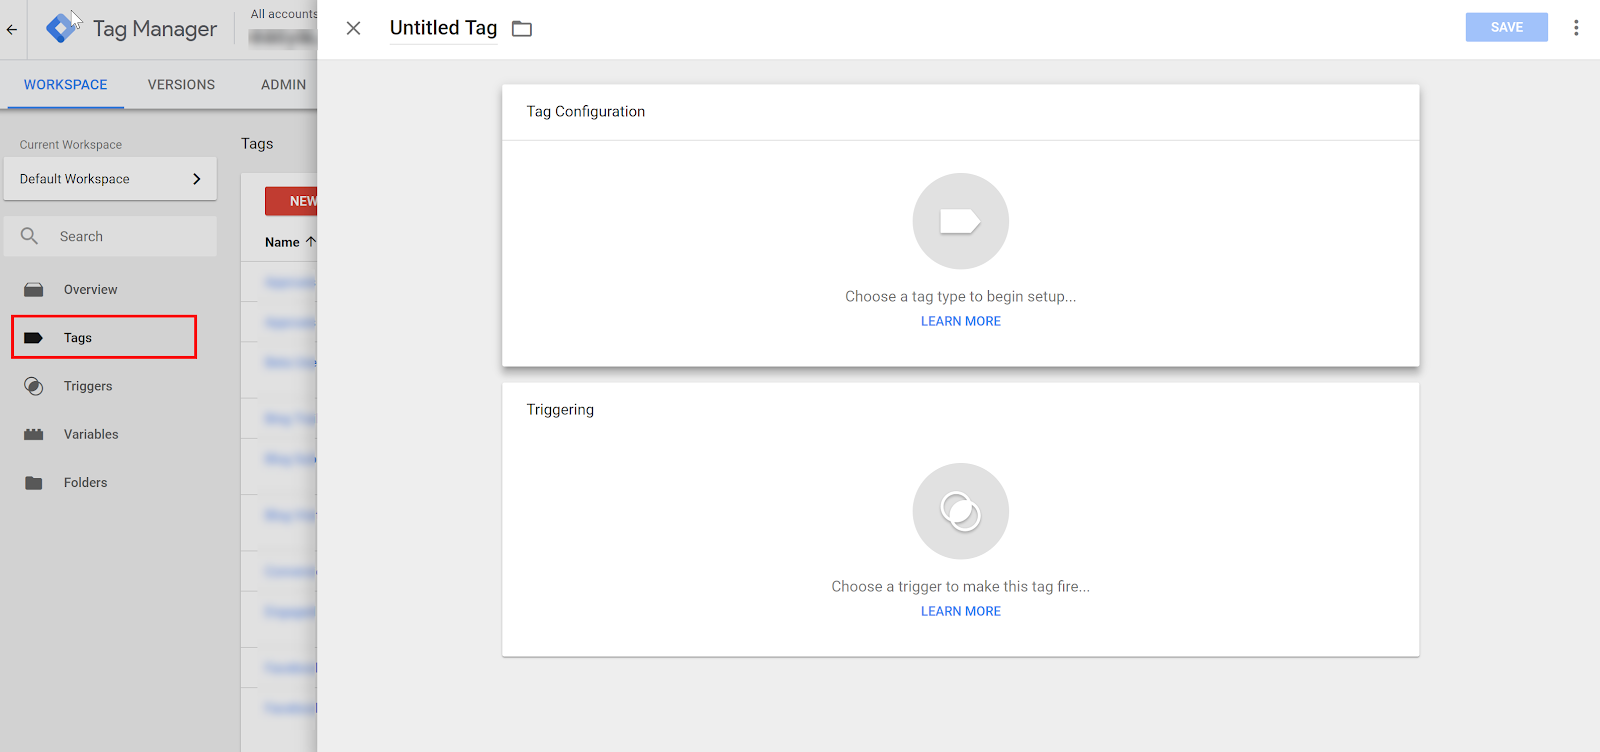
Click on Tag Configuration and under Choose Tag Type select Google Analytics
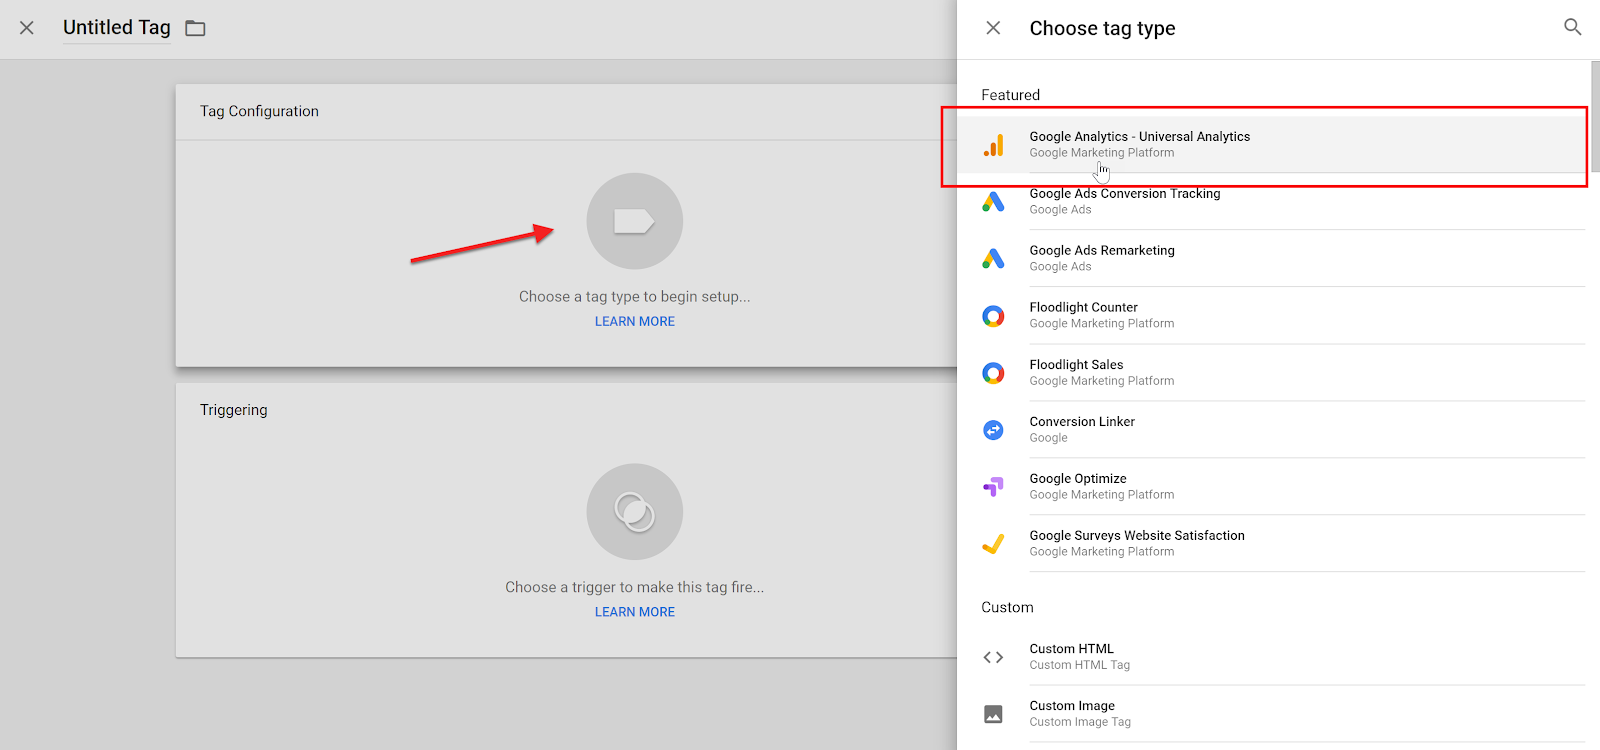
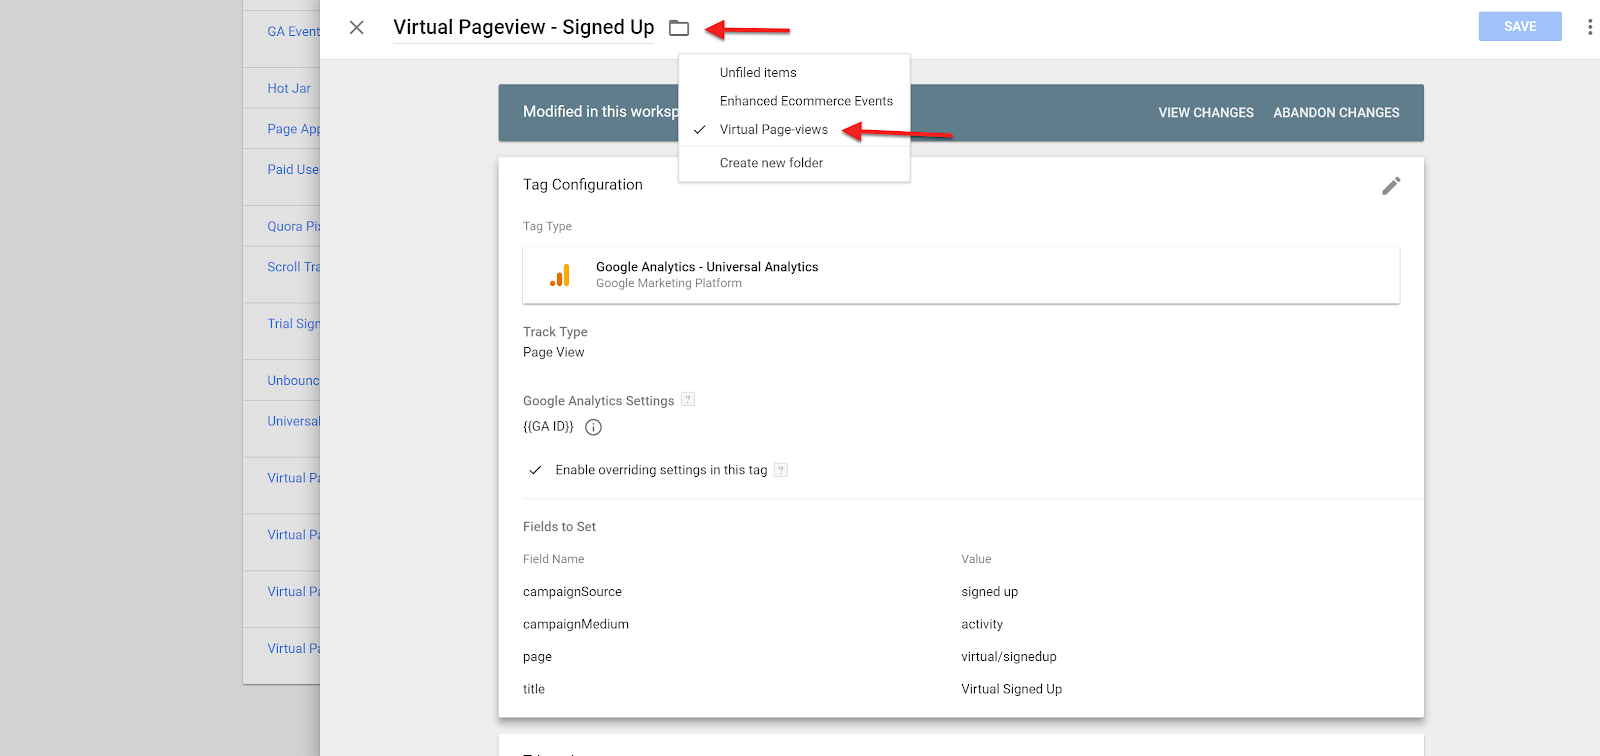
Under Track Type choose Page View enter your Property ID in Google Analytics Settings select Enable overriding settings in this tag
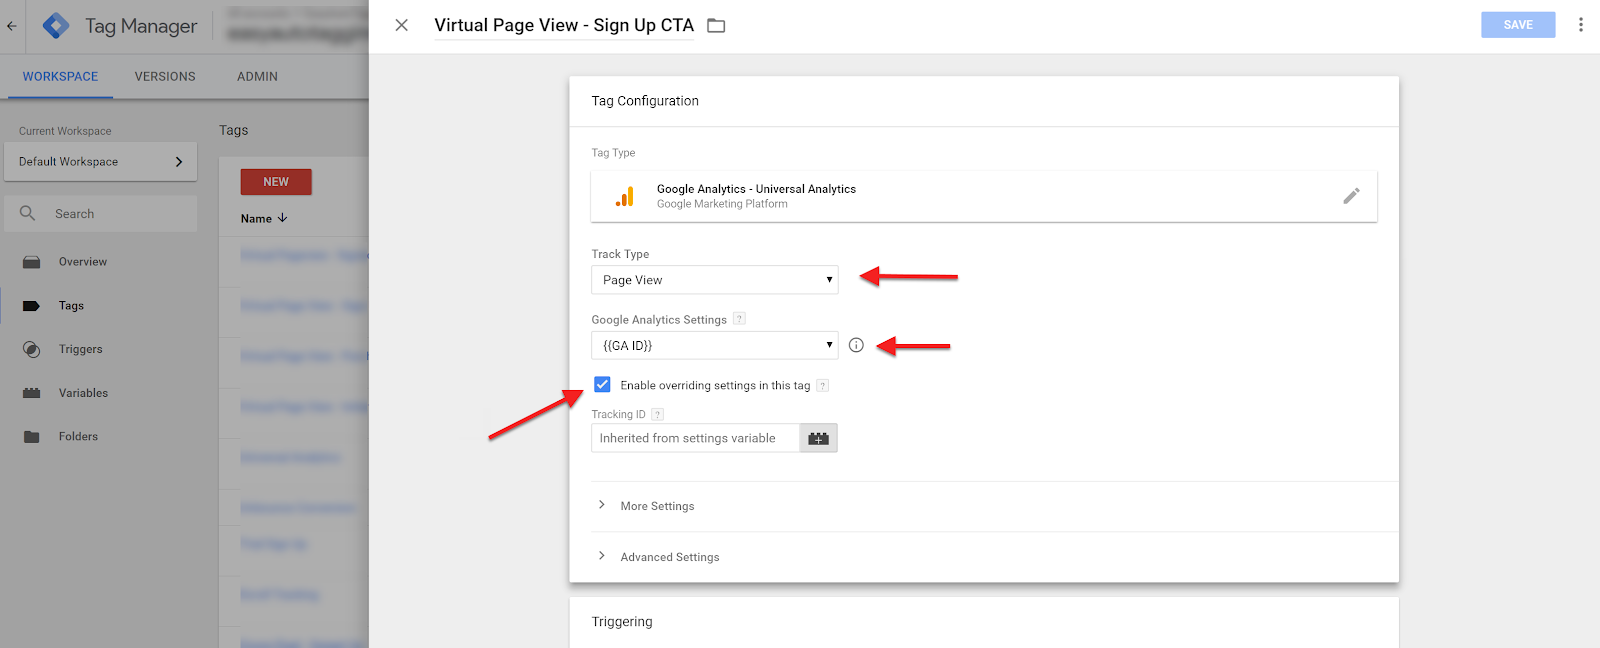
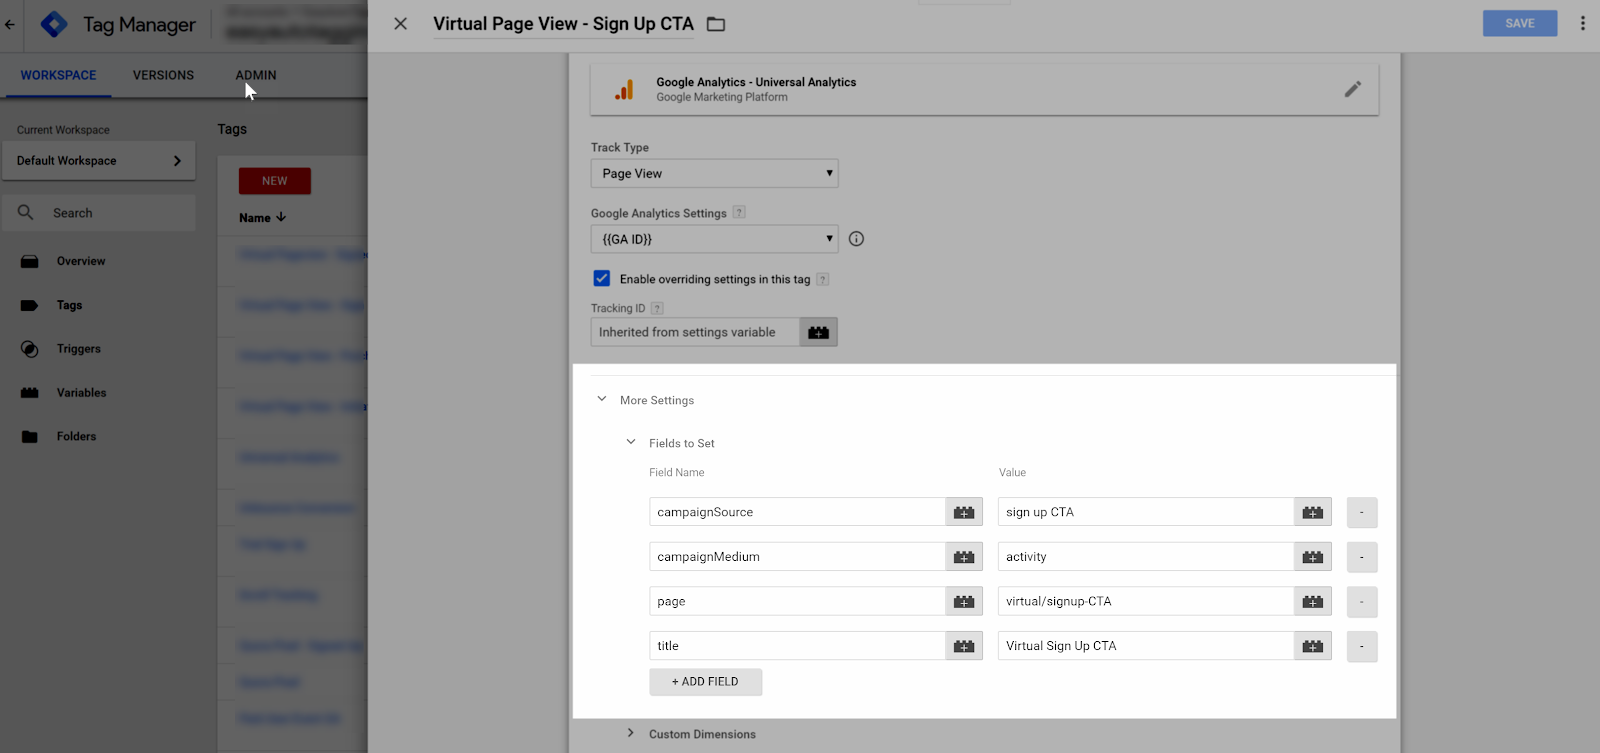
Expand More Settings and then expand Fields to set.
We are going to set four fields. You can select all four fields from the drop-down since these are variables built into GTM.
Funnel Visualization – Virtual Pageview Fields to Set
Campaign Source – this is typically used to identify the source i.e. Facebook but in this case, we can use it to identify what source ‘activity’ triggered the pageview. We also want to make sure that the source value has a unique identifier so that it does not get mixed in with other source values in our reporting (especially channel grouping).
Note: If you do not set this it will default to direct.
Campaign Medium – medium is used to identify the medium of a marketing channel i.e. cpc again in this case we want to give it a unique identifier so that we can segment and identity that these are coming from user activity and do not get mixed in our reporting with other medium values.
Note: If you do not set this it will default value will be ‘not set’.
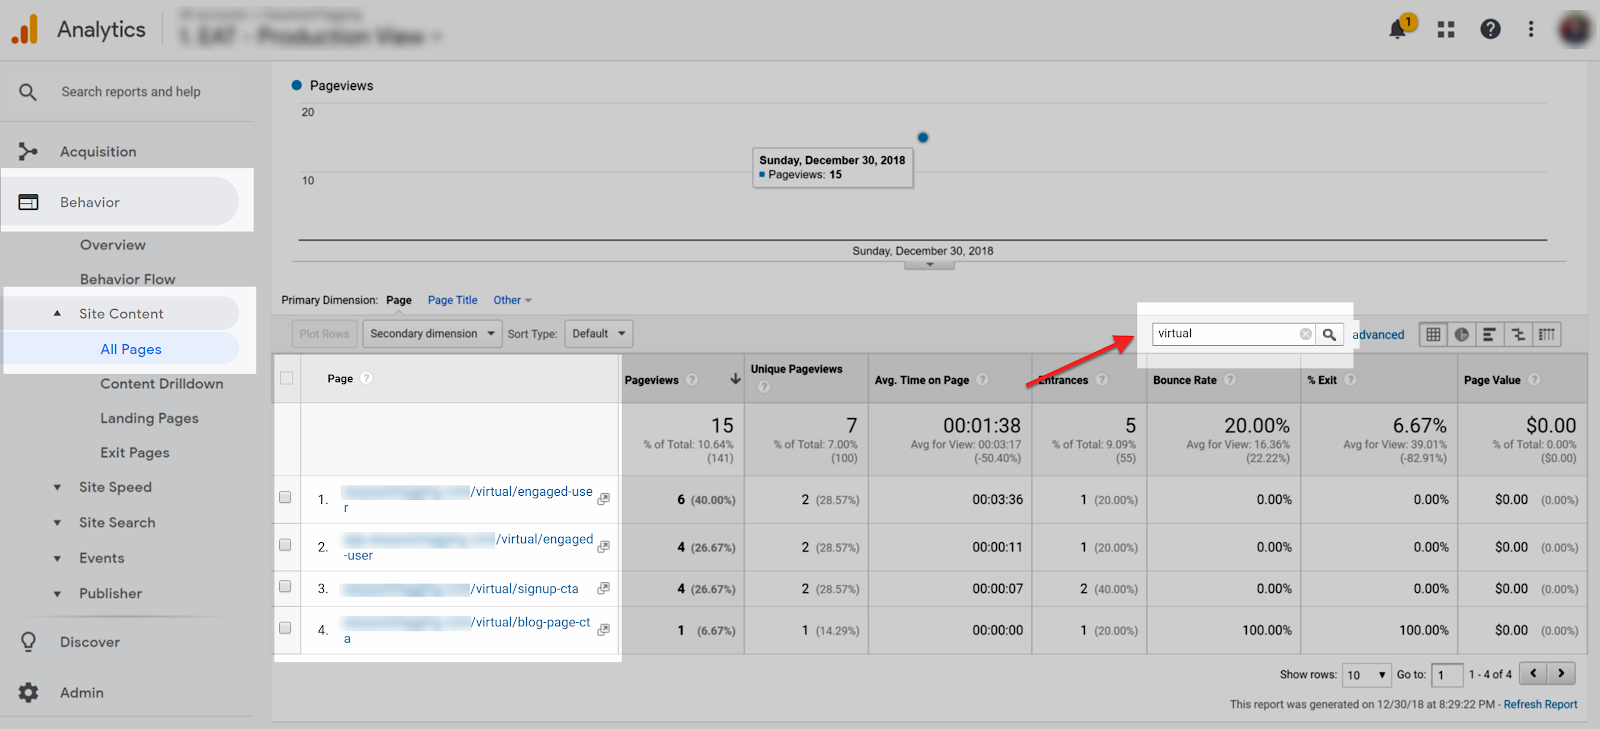
Page – this will pull in the virtual page view page path. You can label this anything you want it is just important to include an identifier so that you can filter out virtual pageviews i.e. virtual/action
Note: This value will be used to set up your Funnel Visualization
Title – This again is a free form field that populates the page title. Again include an identifier so that you can filter out virtual pageviews.
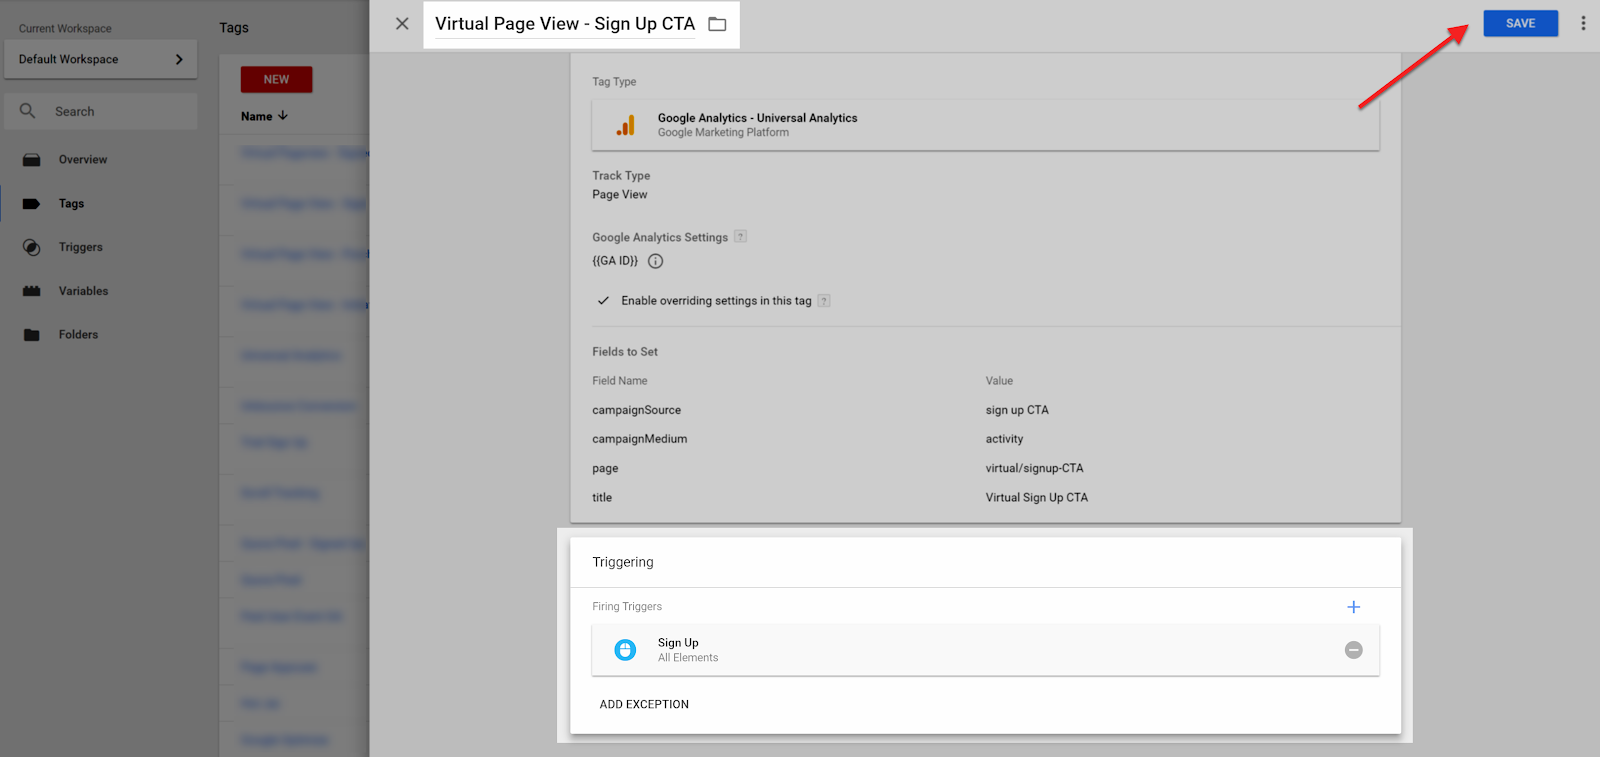
Now set the Trigger for your event. In this case, I am using an already created trigger for Sign Up CTA.
Give the tag a name and save it.
Note: If you need to learn more about setting up tags, triggers and previewing your configuration you can reference the Beginner’ Guide to Google Tag Manager Triggers and Variables from Himanshu Sharma.
Now you can do the same for the Signed Up and Action events.
Funnel Visualization – Verifying Virtual Page Views
Next, go to Google Analytics Behavior > Site Content > All Pages and make sure that the virtual pageviews are properly populating in Google Analytics.
Tip: Organize your tags in Folders for less clutter in the Google Tag Manager.
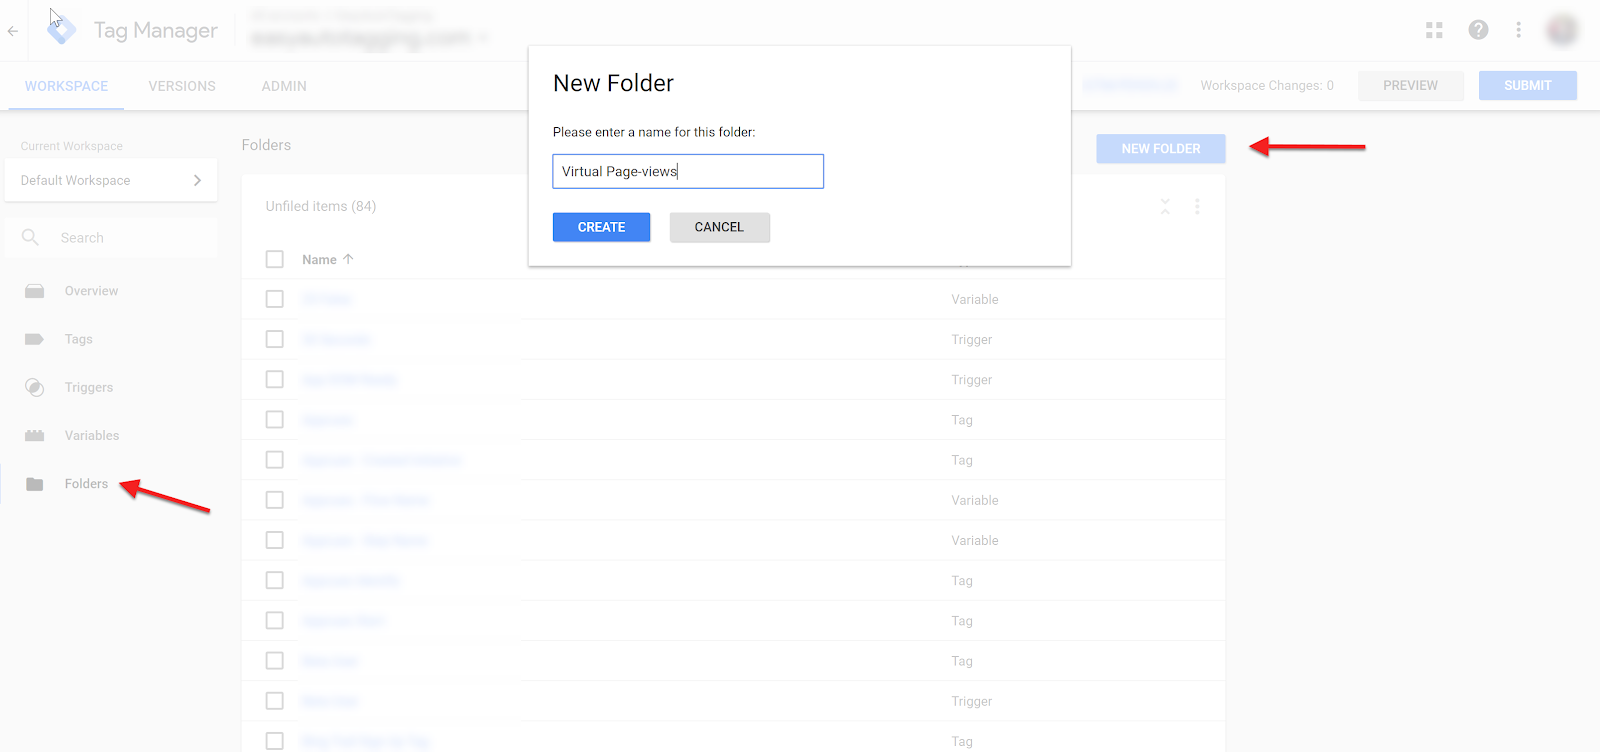
You can also add tags to folders when editing a tag.
Now that Virtual Pageview tags are created you are ready to set up your goal funnel visualization.
Funnel Visualization – Configuring Funnel Visualization
Remember how you set the Page Path field for each tag in the Google Tag Manager? We are going to need these for our next step.
virtual/signup-CTA
virtual/signedup
virtual/action
Go the Admin section in your Google Analytics account and look for Goals under the third (View) column.
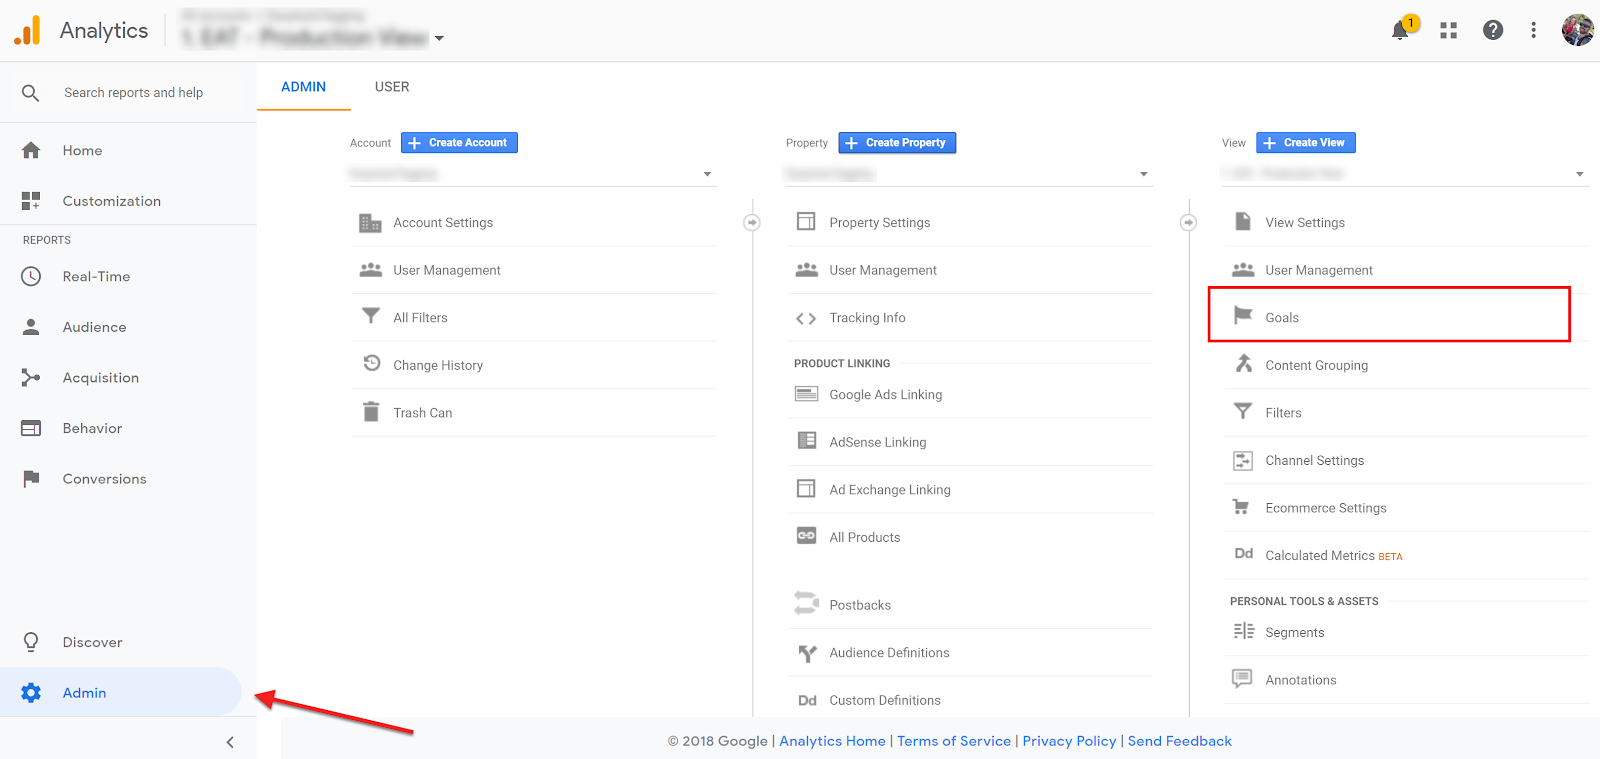
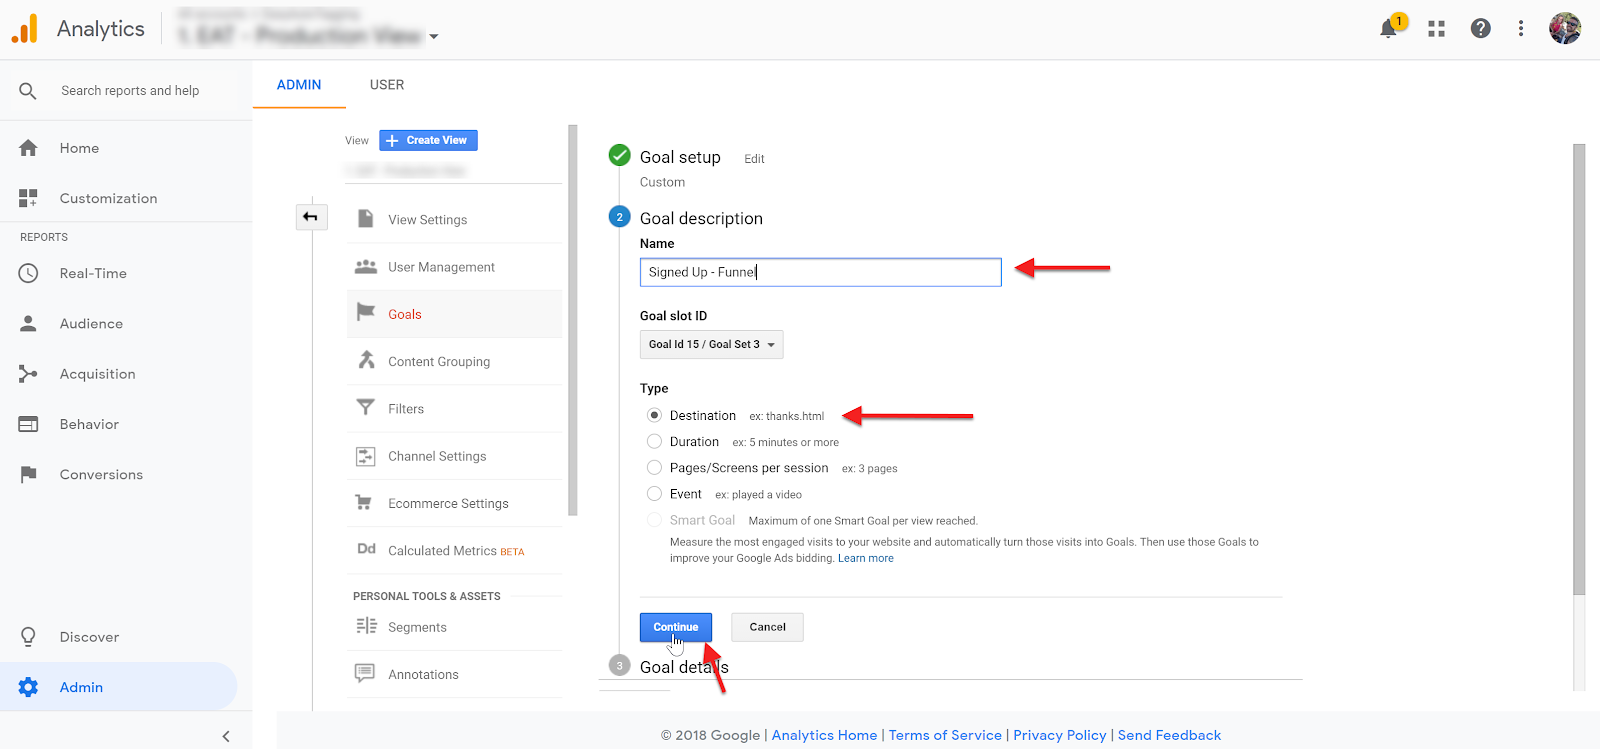
Now create a new Custom Goal and click Continue.
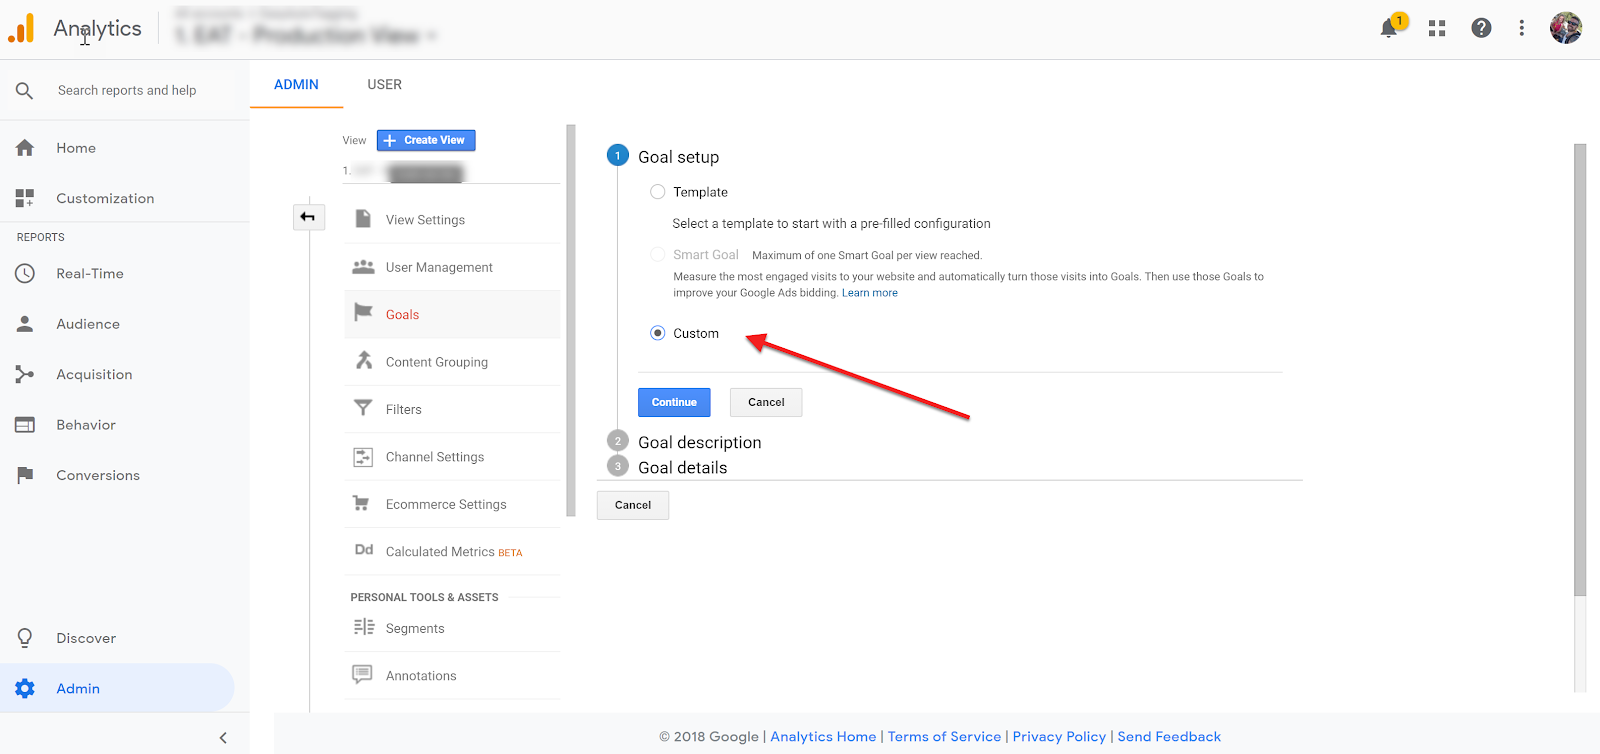
Give the goal a name select Destination and click Continue.
Note: In this case since I am not building the funnel visualization report in its own view and I am already tracking Sign Ups with an existing event goal so I am adding Funnel to the Goal Name so that I can differentiate between the two in my reporting.
Funnel Visualization – Setting Up the Funnel Steps
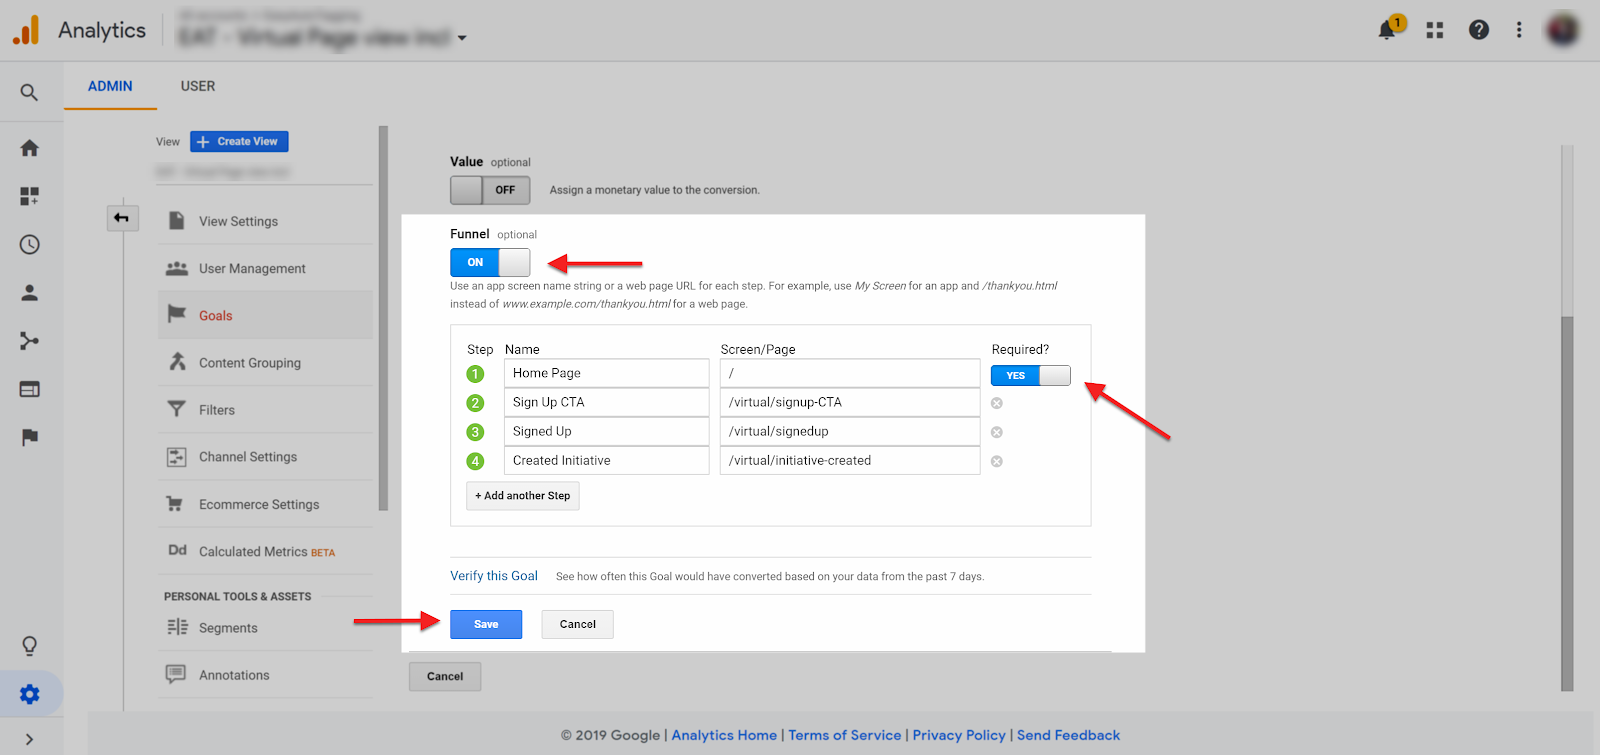
For the next step, we will need to use the virtual page view page paths we created and the actual page paths so that we can build the goal funnel.
- Page View = /
- Sign Up CTA = /virtual/signup-CTA
- Sign Up = /virtual/signedup
- Action = /virtual/action
- Converted = /virtual/signedup
First we add the goal in this case signed Up destination URL under Goal Details > Destinations.
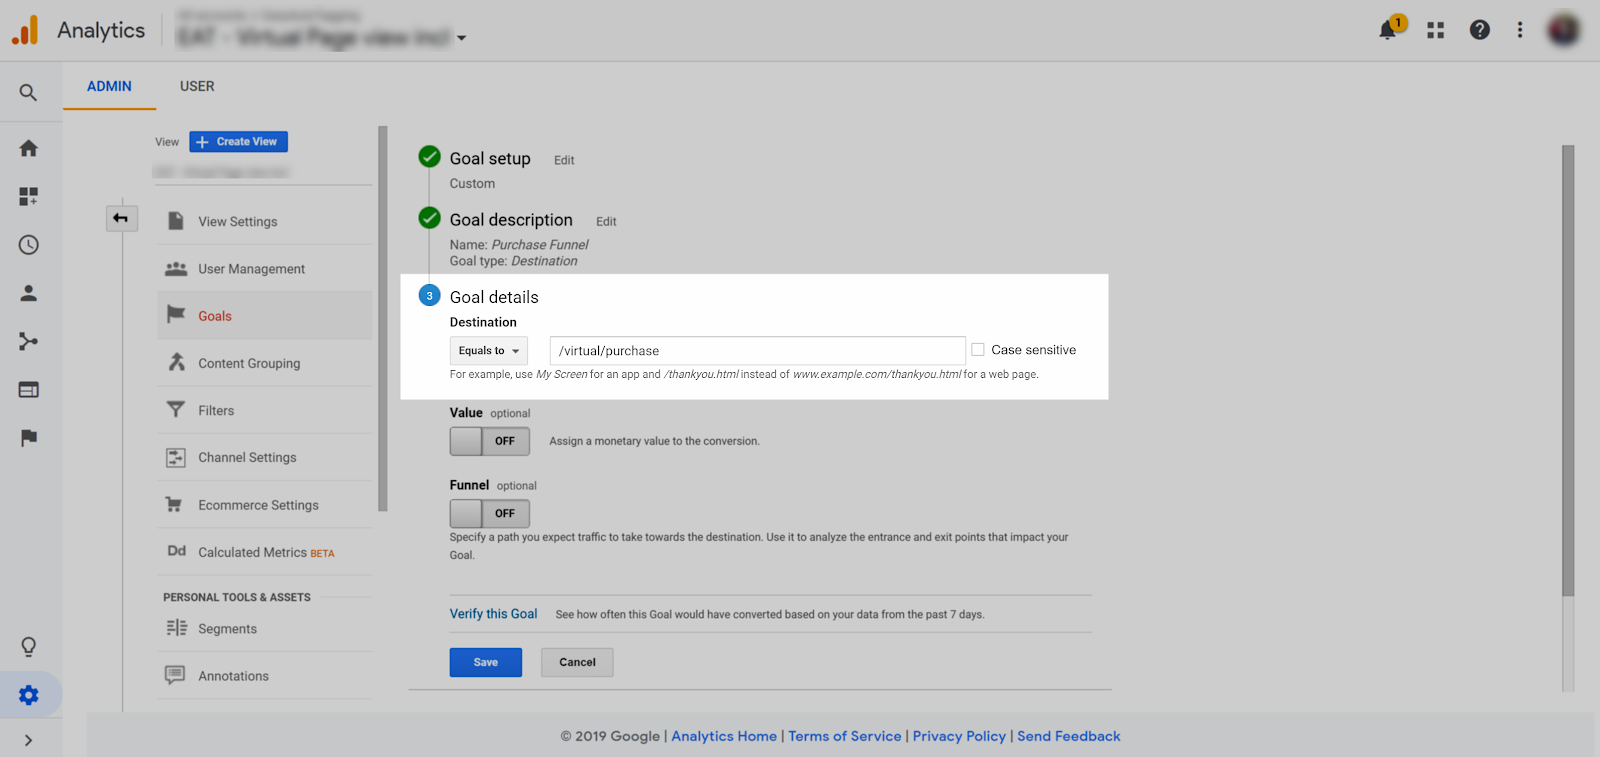
Now enable Funnel and add the additional steps.
In this case, I want to create a visual funnel for users coming from the home page so I will make the first step required. This means that users have to first visit the home page to enter into the funnel.
Caveat: Ok so we all know Google Analytics is not perfect and here is another reason why. Google Analytics will backfill previous steps even if the user did not complete it. This ensures that the funnel will always follow a funnel sequence of more to less. This means that if a user completed step 1 (visiting the home page) and step 3 (signing up for a trial) but did not complete step 2 by clicking on the Sign-Up CTA Google Analytics will backfill step 2 even though the event was not completed.
Once your funnel steps have been added click save
To see your funnels you can go to Conversions > Goals > Funnel Visualization and under Goal Options select you recently created Goal Funnel.
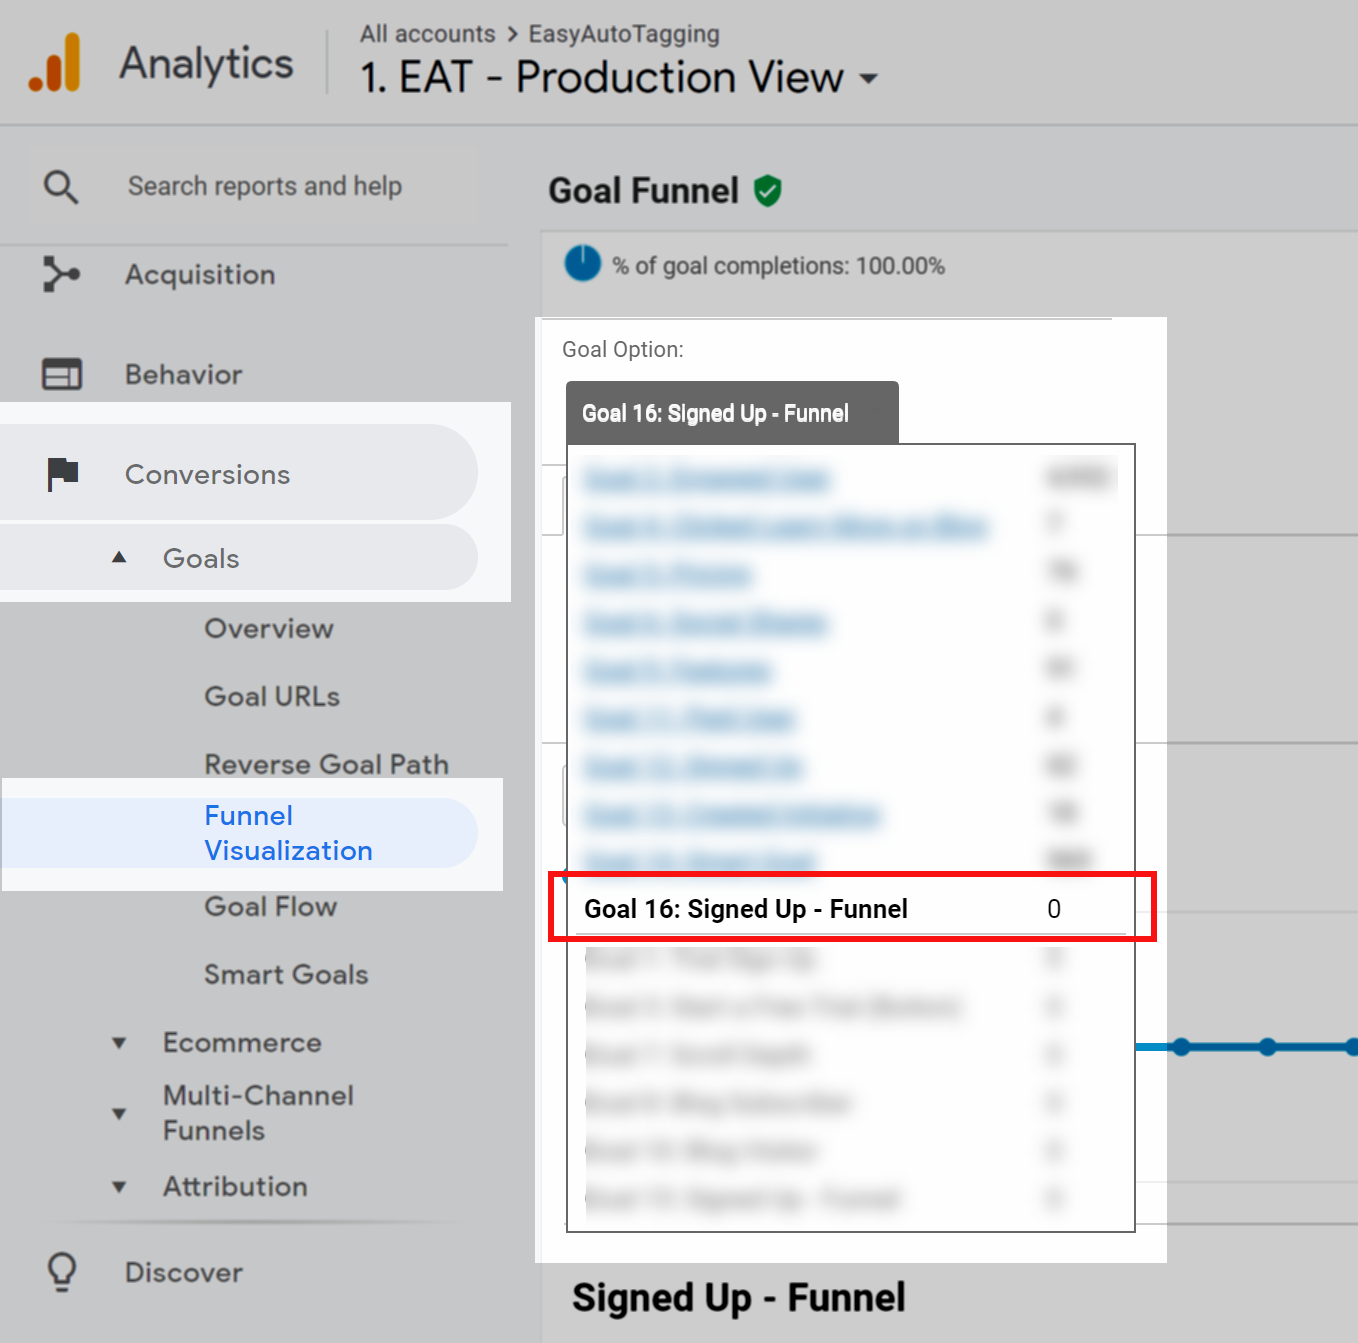
Now Google Analytics will give you a clear view of how your funnel is performing making it easy to identify any bottlenecks in the user journey for conversion funnel optimization.
Non-Transactional Goal Funnels Using Enhanced Ecommerce [Detailed Installation]
We are going to tweak Google Analytics to create customized funnels and leverage the Ecommerce Check Out Behavior report.
Since enhanced ecommerce funnels only work for transactional data we will need to push Ecommerce objects using data layers and attach these to non-transactional events.
By doing this Google Analytics will treat events as Ecommerce transaction that will then allow us to define funnel steps and leverage Enhanced Ecommerce Funnel reports.
Ok, let’s get started.
Requirements: Google Tag Manager and Google Analytics.
Enhanced Ecommerce – Setting Up Funnel Steps as ‘Events’
The first thing we need to do is create one Google Analytics event for each step. Going with the virtual pageview use case we will need to set up a tag for each one of the following events.
- Sign Up CTA
- Signed Up
- Action
- Converted
Note: There is no need to create an event for page views since we will be able to segment the Enhanced Ecommerce funnel report.
Enhanced Ecommerce – Page View Event Tag [Sign Up CTA]
Go to google tag manager and create a new Google Analytics Tag for Sign Up CTA
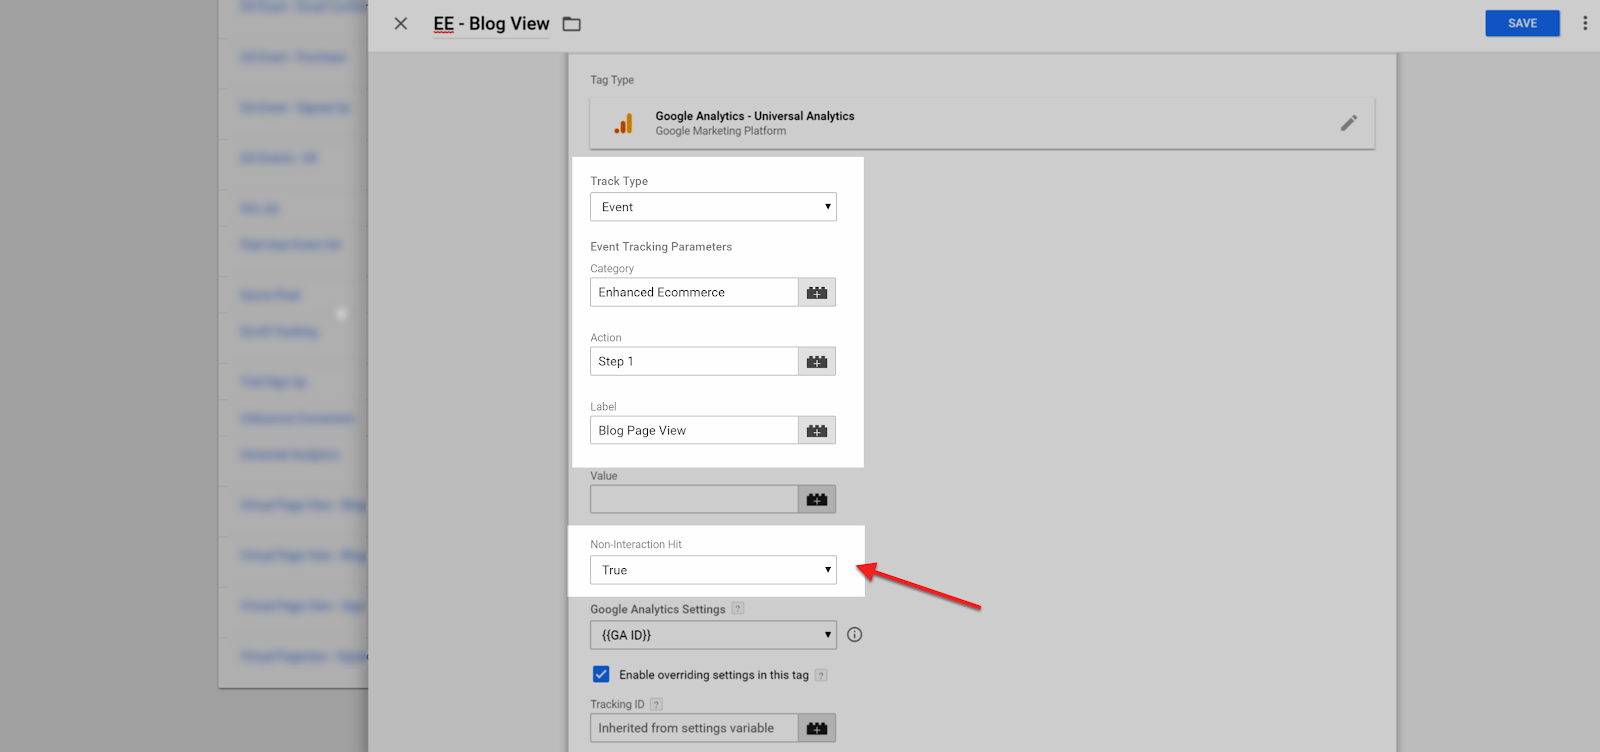
When configuring the tag change the Tag Type to Event and fill in the following values:
Category = Enhanced Ecommerce
Action = Step 1
Label = Sign Up CTA
Note: Make sure to set the non-interaction to False since this is an interaction that we would want to affect the bounce rate.
Click save and preview the tag.
Now do the same for the Signed Up, Action and converted events.
Enhanced Ecommerce – Preparing Your Google Analytics Account
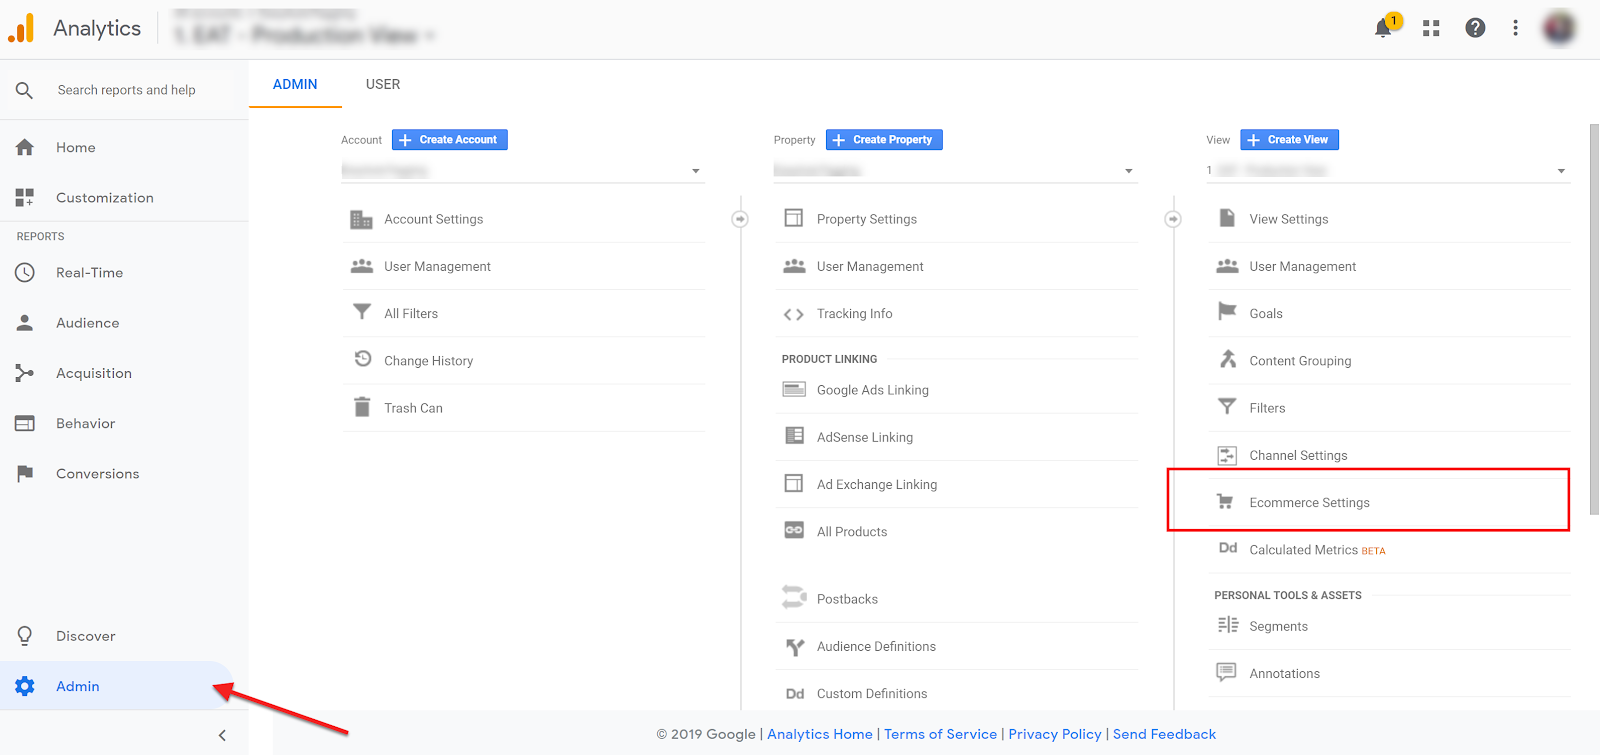
To prepare your Google Analytics account go to the Admin section and in the third View column click on Ecommerce Settings.
Make sure Enhanced Ecommerce is enabled and add each Step of the funnel. These fields are free from but use names that make it easy to identify since these will appear in your reports.
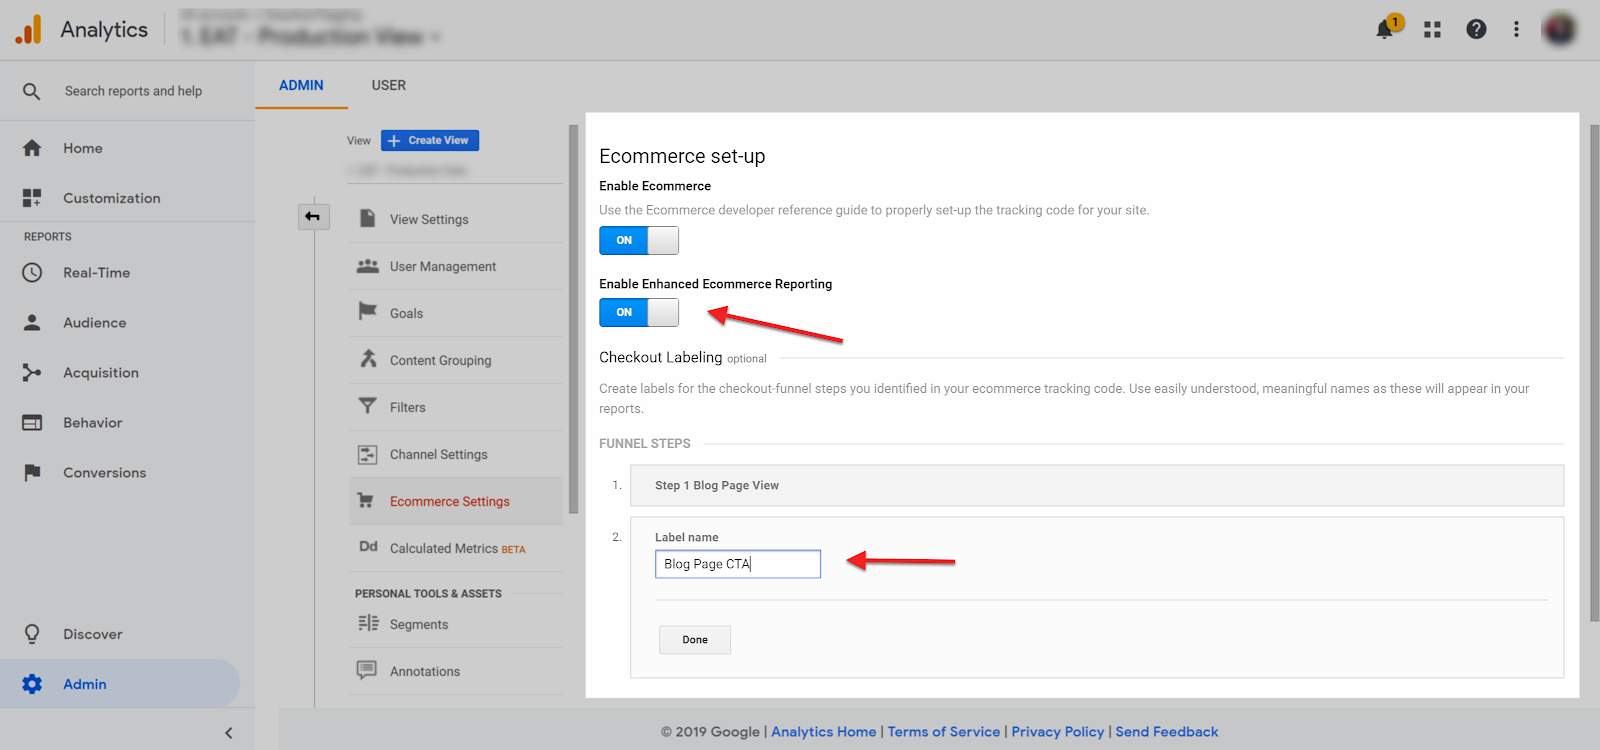
You do not need to define the final conversion step since we will be identifying this as a conversion.
Enhanced Ecommerce – Creating Variables to Write Objects to Data Layers – Steps
First, we will need to create user-defined variables in Google Tag Manager. This allows us to add Enhanced Ecommerce objects, in this case, checkout action step via a data layer so that these can get passed to Google Analytics.
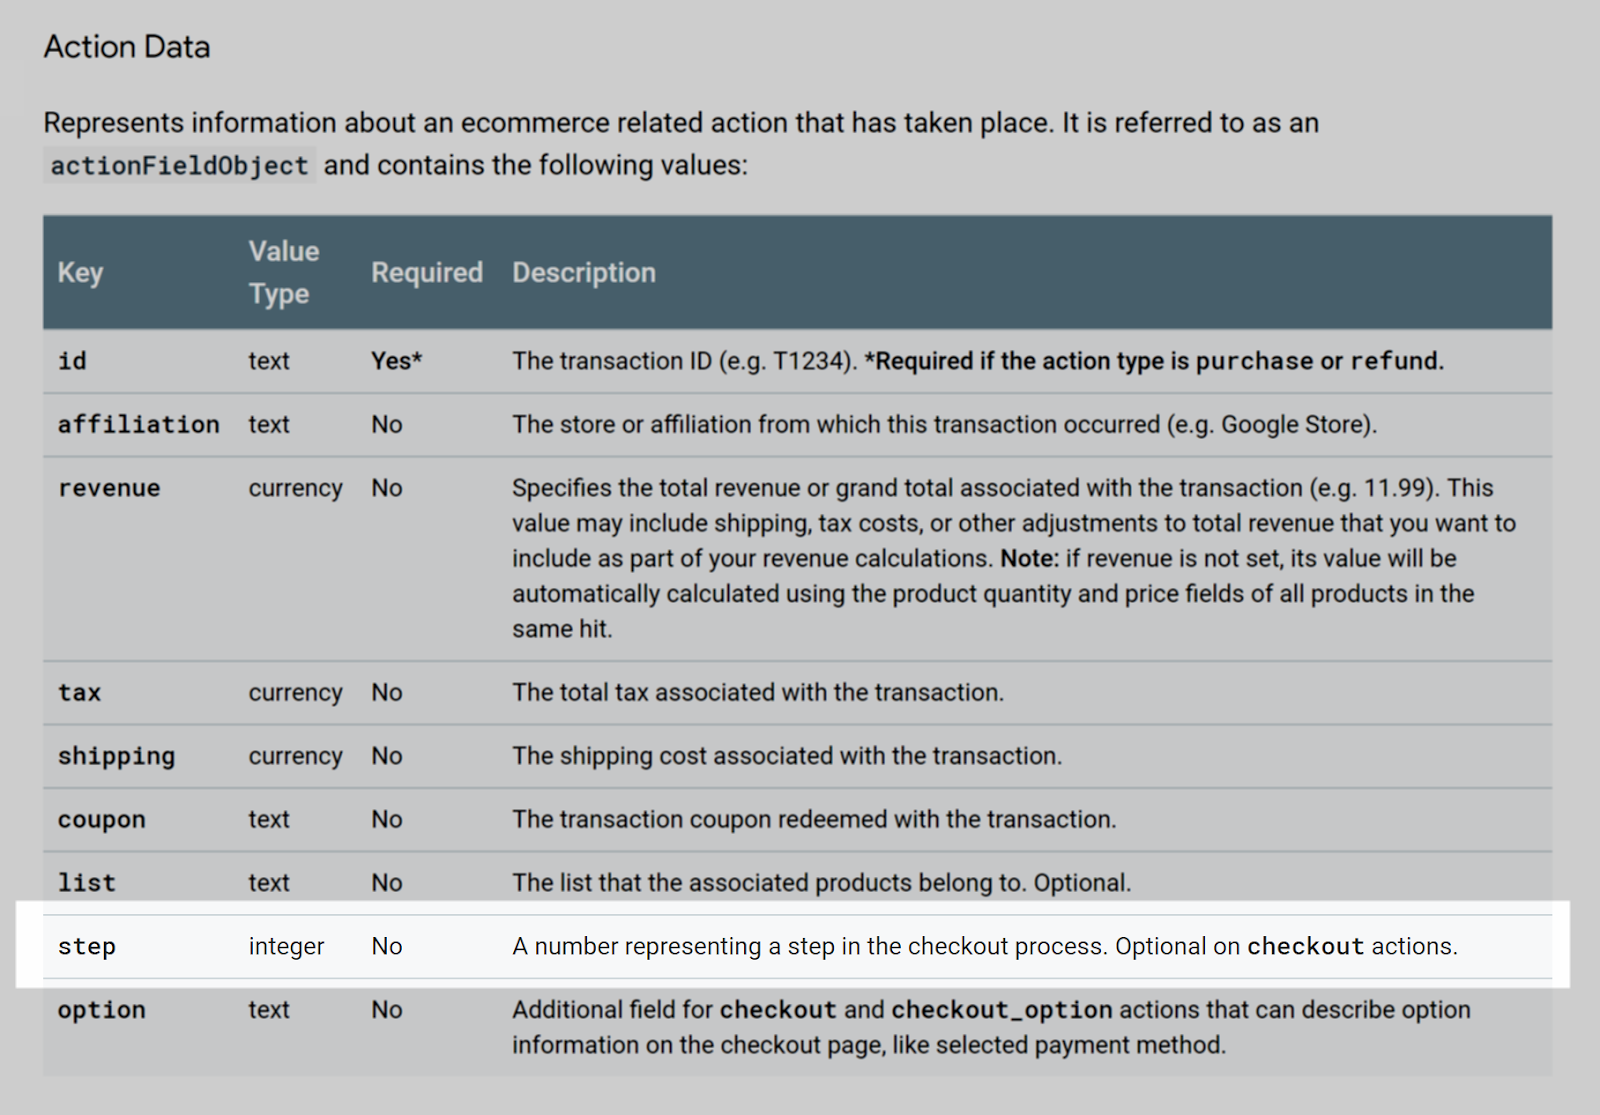
We will want to create one custom Variable for each step using the checkout actionFieldObject to indicate which stage of the checkout process or in this case which step in the funnel is being measured and in turn, will get pulled into the Enhanced Ecommerce funnel report.
We are going to have write the step field object to the data layer for each event.
To do this go to the Google Tag manager and click on Variables.
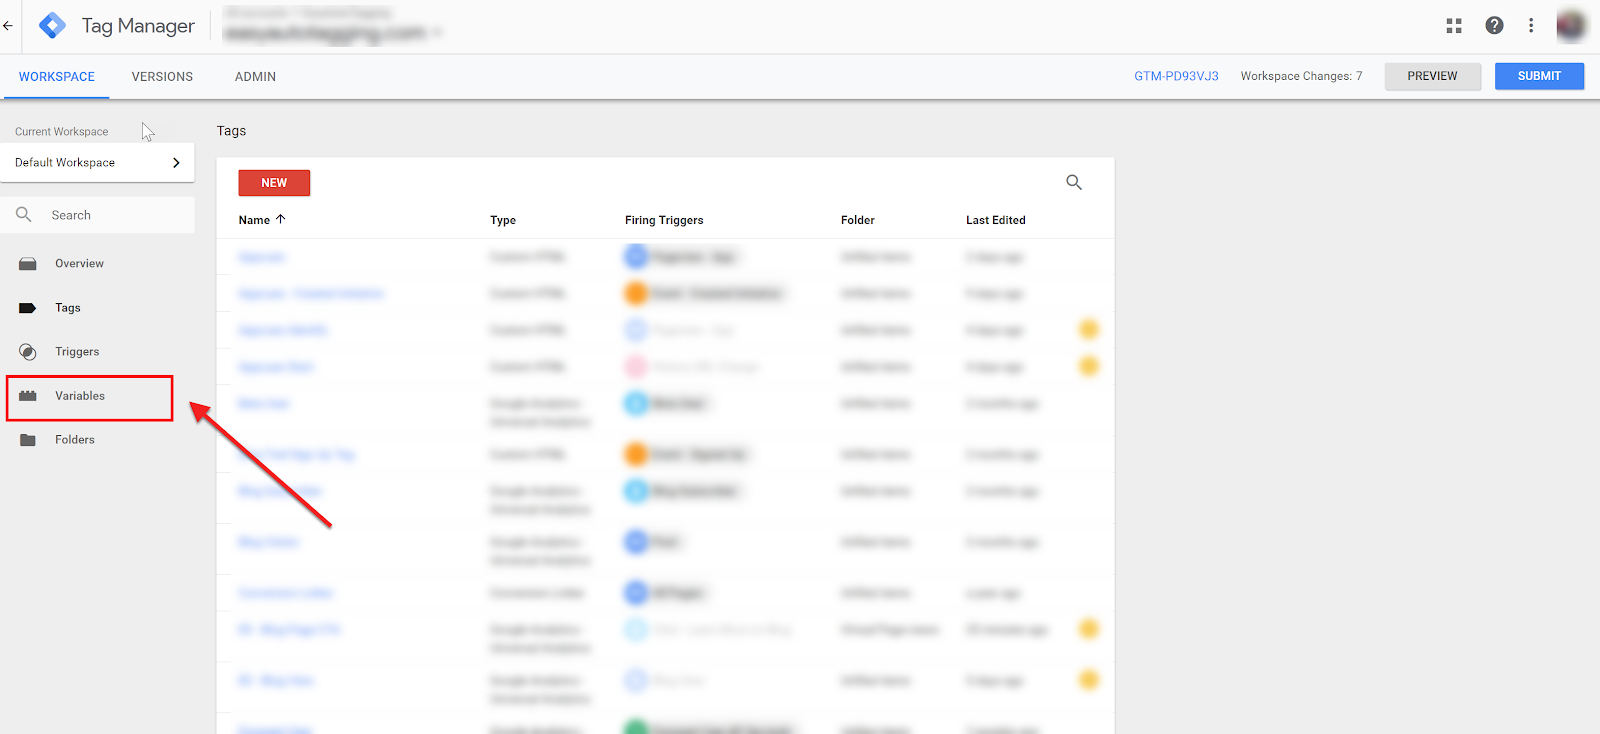
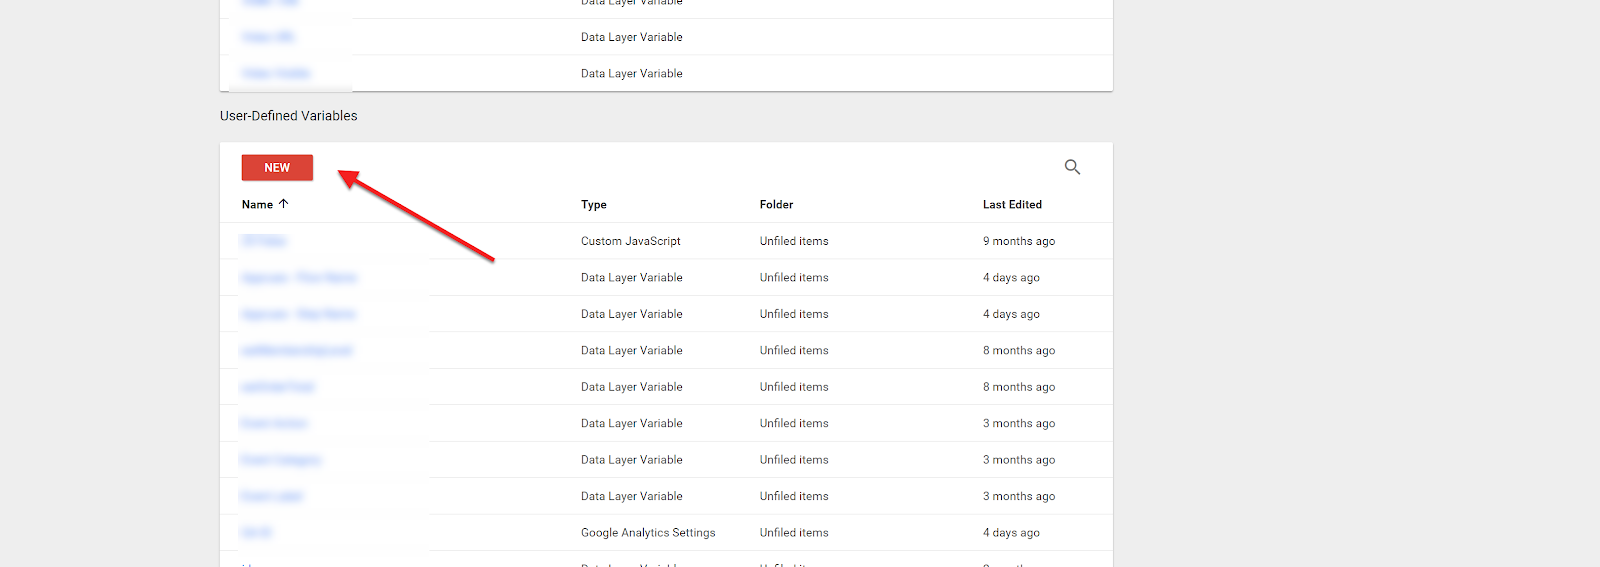
Then click on New to create a new User-Defined Variable.
Give the User-defined Variable a name, in this case, EEC Step 1 click on the icon to configure the variable and select Custom JavaScript as the variable type.
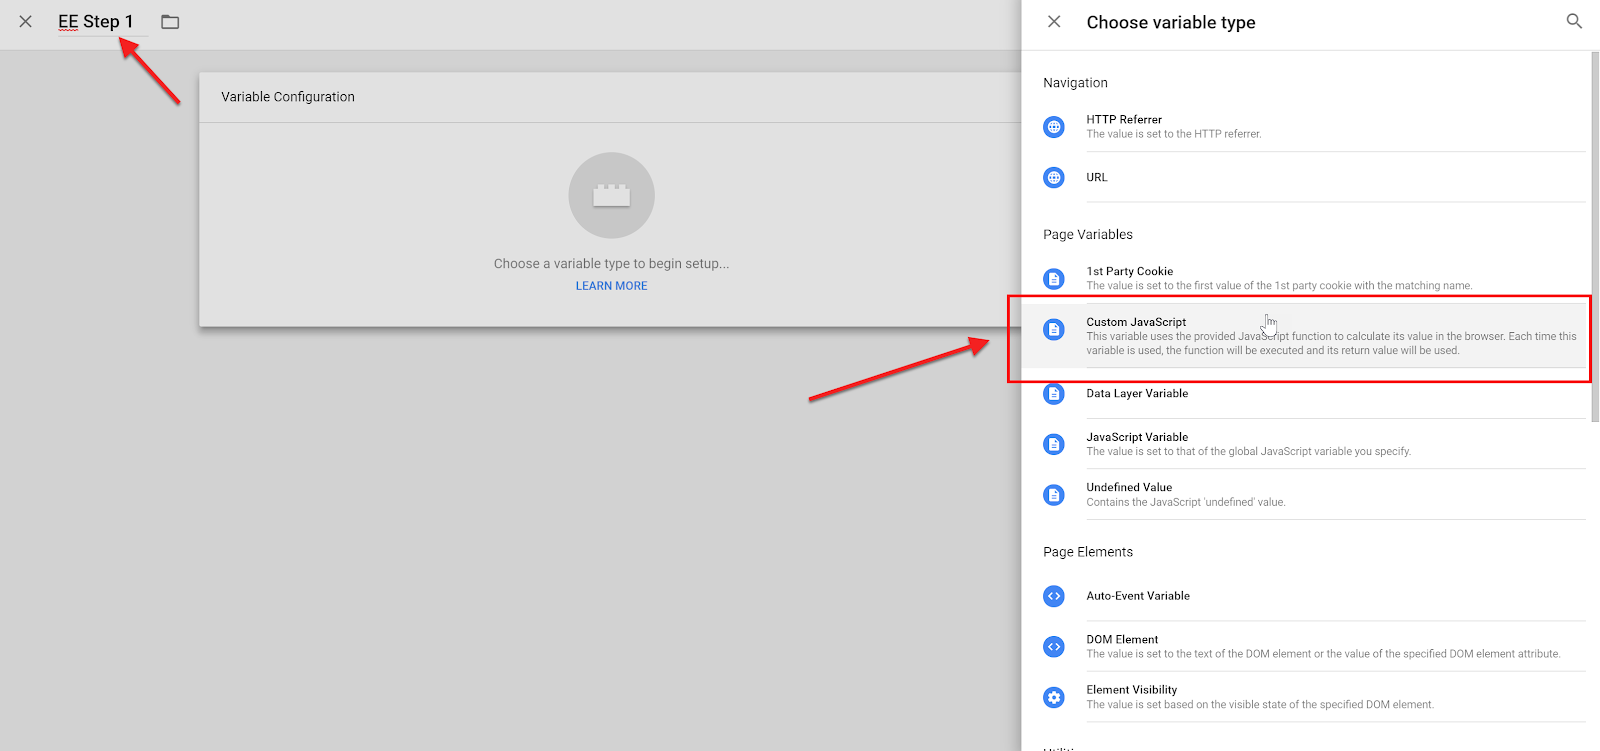
Enhanced Ecommerce – User Defined VariableScript – Step Event
Copy paste the following custom Javascript function which writes the Ecommerce object to the data layer so that it can be picked up by GTM and forwarded to Google Analytics.
function () {
return {‘ecommerce’:{
‘checkout’: {
‘actionField’: {‘step’: 1}
}}};
}
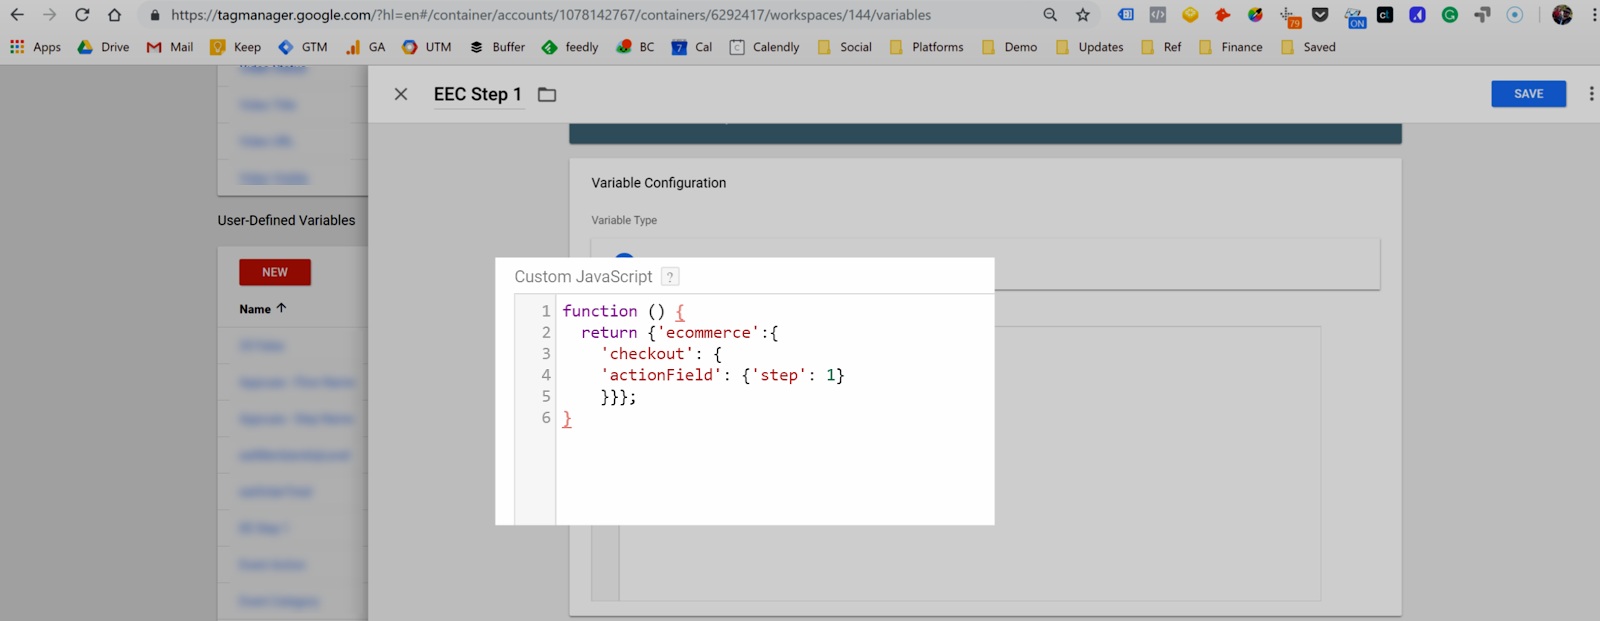
Next, create a variable in the same manner for the Signed Up (Step 2) and Action (Step 3) events. Just update the Step Number to reflect its respective step.
Once the variables have been created go back to Events in the Google Tag Manager.
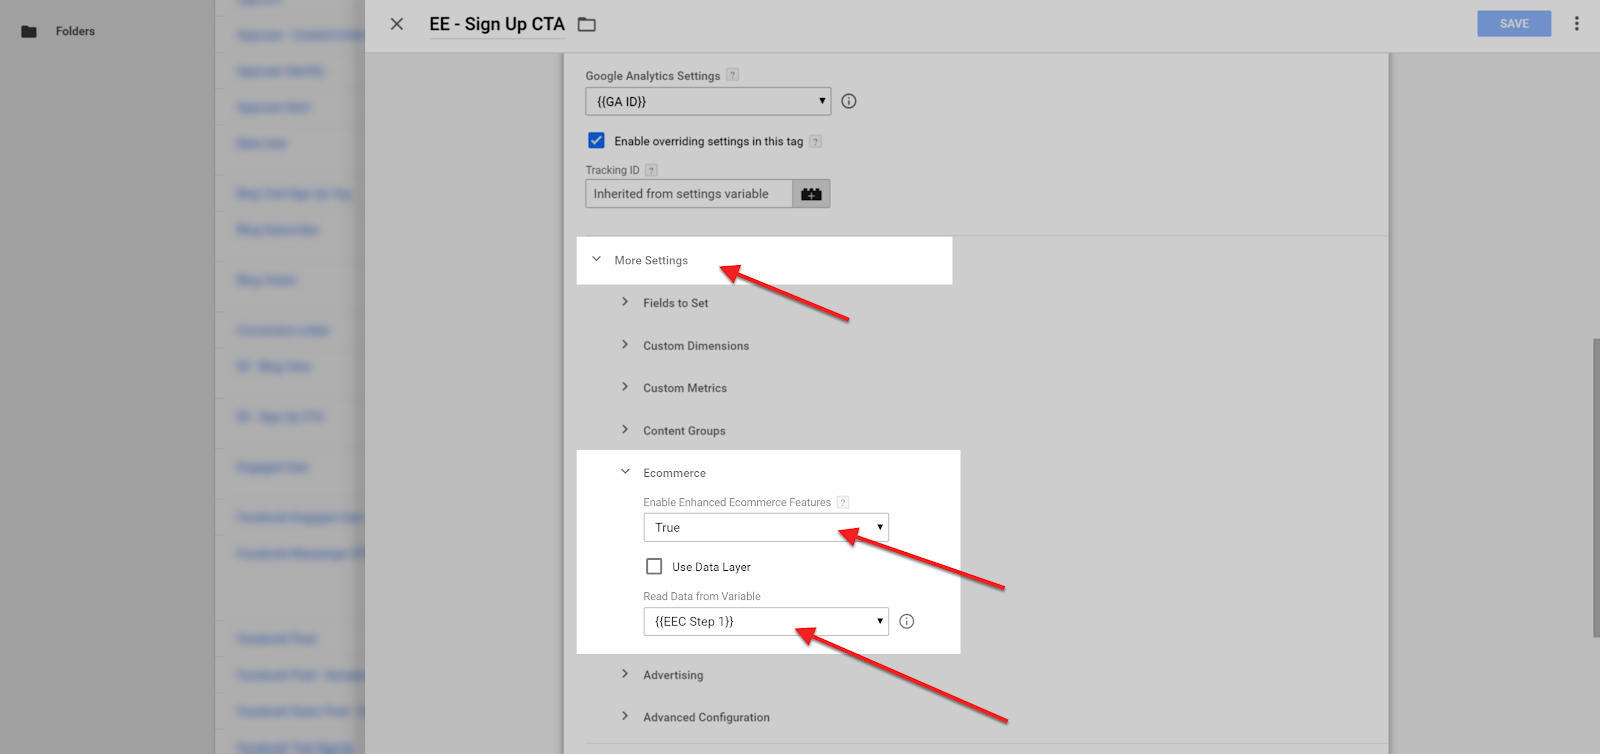
Let’s open up the Sign Up CTA event and under More Settings > Ecommerce set Enable Enhanced Ecommerce Features to True and under Read Data from Variable select the Variable specific to this step so in this case EEC Step 1.
Now do the same thing for the Signed Up and Action events.
Enhanced Ecommerce – Creating Variables to Write Objects to Data Layers – Signed Up (Conversion)
Ok, lastly we need to go through a similar set up for the final conversion. Here we want to track an actual purchase.
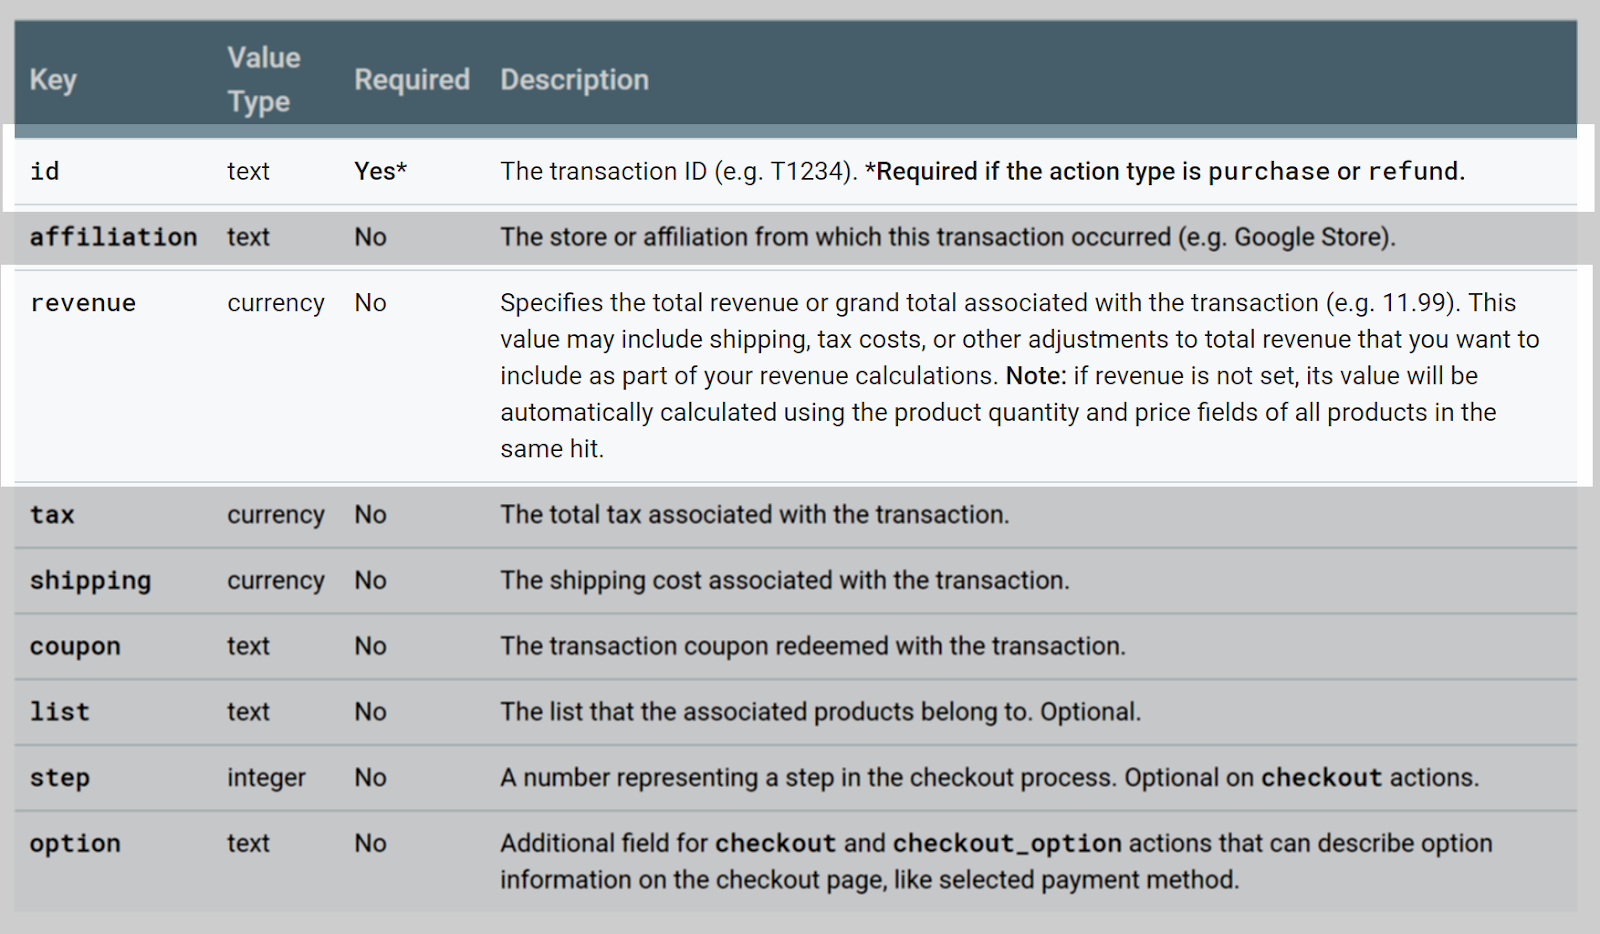
We will want to create a custom Variable using the checkout actionFieldObject ID and if applicable revenue. Since this action type is purchase an ID is required. You can input a random number if there is no revenue attached i.e. form submits/leads or a user ID for SaaS sign-ups and you can add revenue if applicable. (revenue is not a required field.)
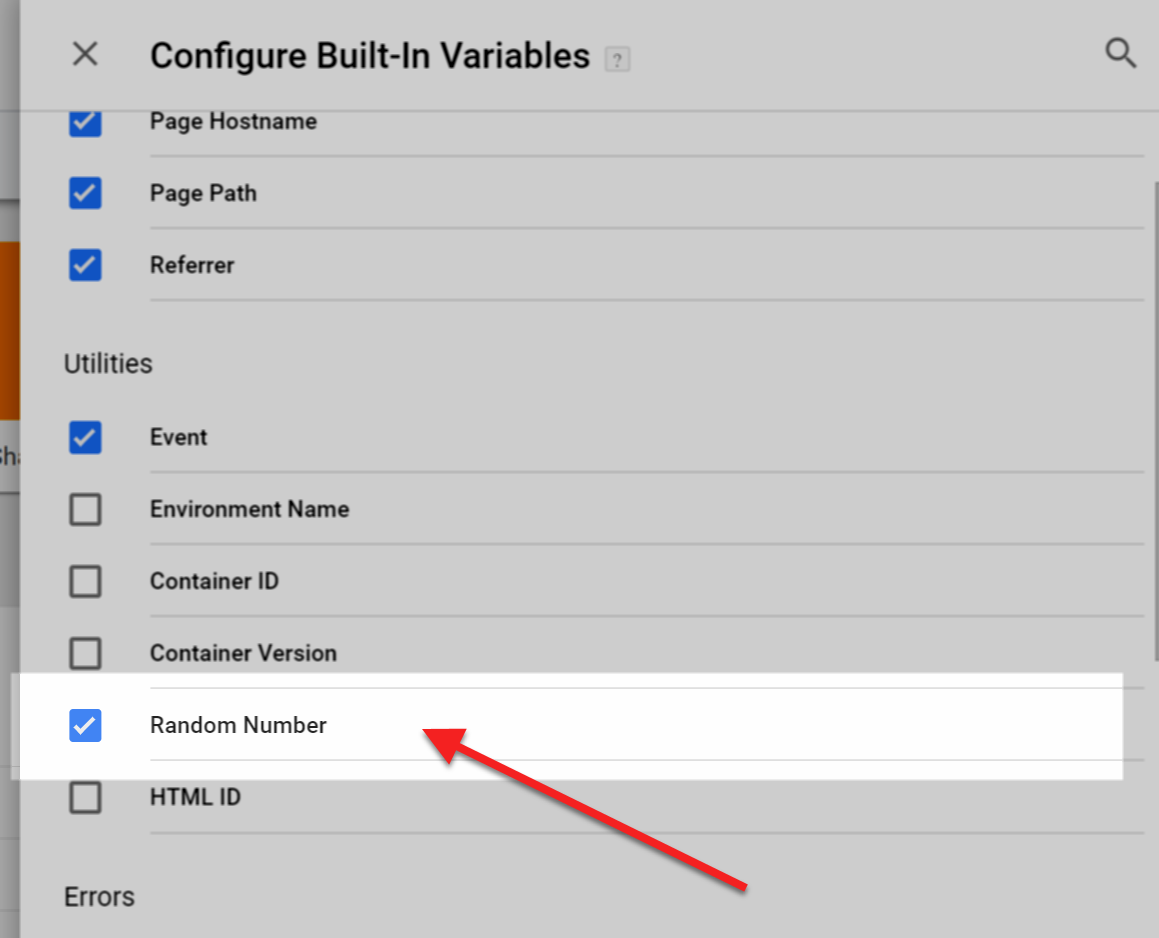
Note: If you are only using ID because it is required to track a purchase make sure you have the random number variable checked for your Built-In Variables.
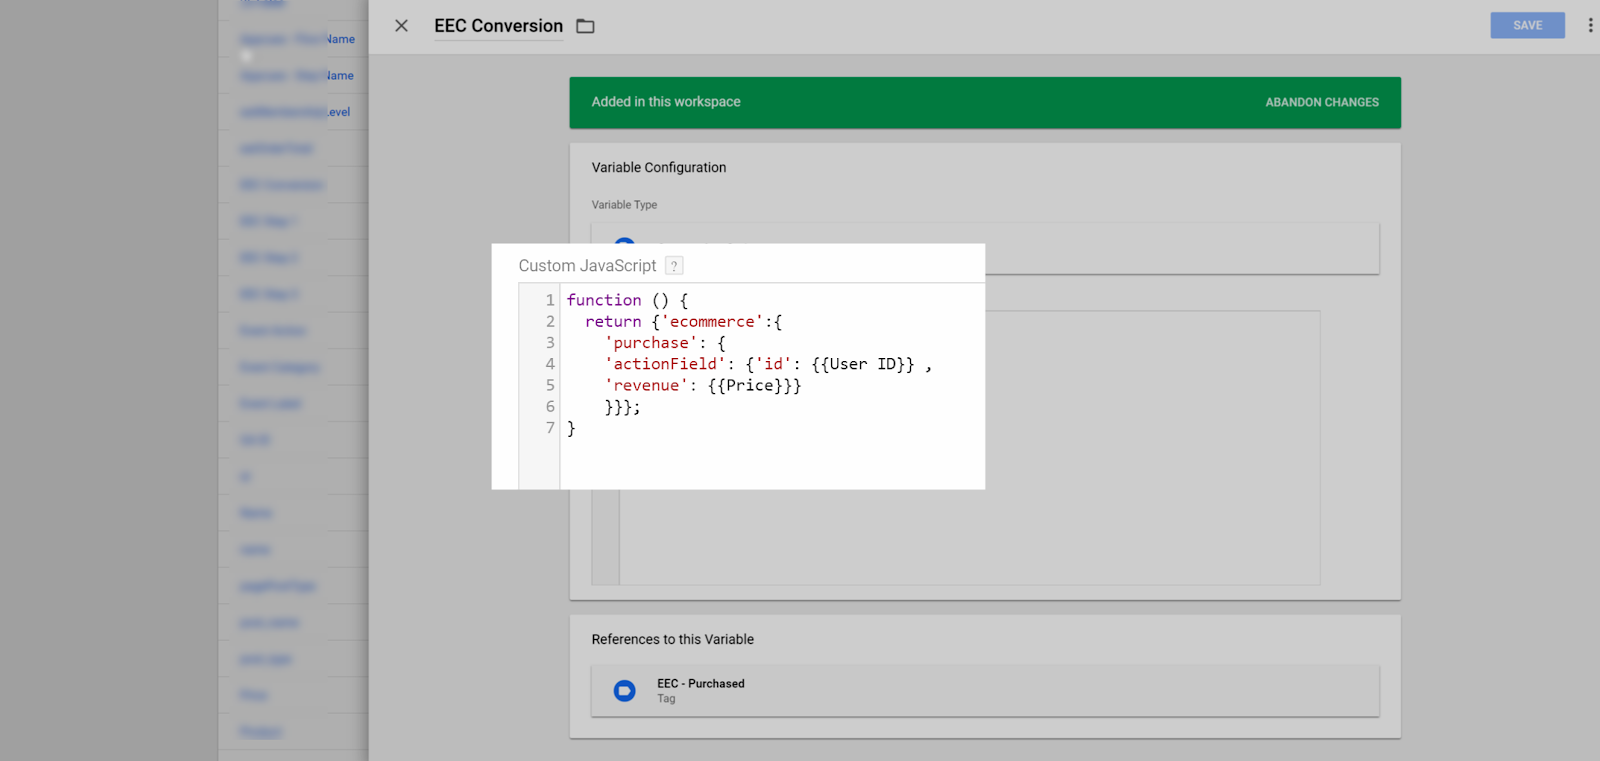
Enhanced Ecommerce – User Defined Variable Script – Conversion Event
Now create a new User-Defined Variable and add the following Javascript function. (This will write a data layer we can pass to GTM).
If you have a user ID and revenue use this:
function () {
return {‘ecommerce’:{
‘purchase’: {
‘actionField’: {‘id’: {{User ID}} ,
‘revenue’: {{Price}}}
}}};
}
Note: I already have user-defined variables built that grabs User ID and Revenue values. You can either create your own user-defined variable or write custom code to pull these values dynamically.
If you are tracking an event that does not have a User ID or Revenue attached use this:
function () {
return {‘ecommerce’:{
‘purchase’: {
‘actionField’: {‘id’: {{Random Number}}}
}}};
}
Once the conversion variables have been created go back to the conversion event EEC Purchased in the Google Tag Manager and open up the Sign Up CTA event.
Then under More Settings > Ecommerce set Enable Enhanced Ecommerce Features to True and under Read Data from Variable select the Variable specific to this step so in this case EEC Conversion.
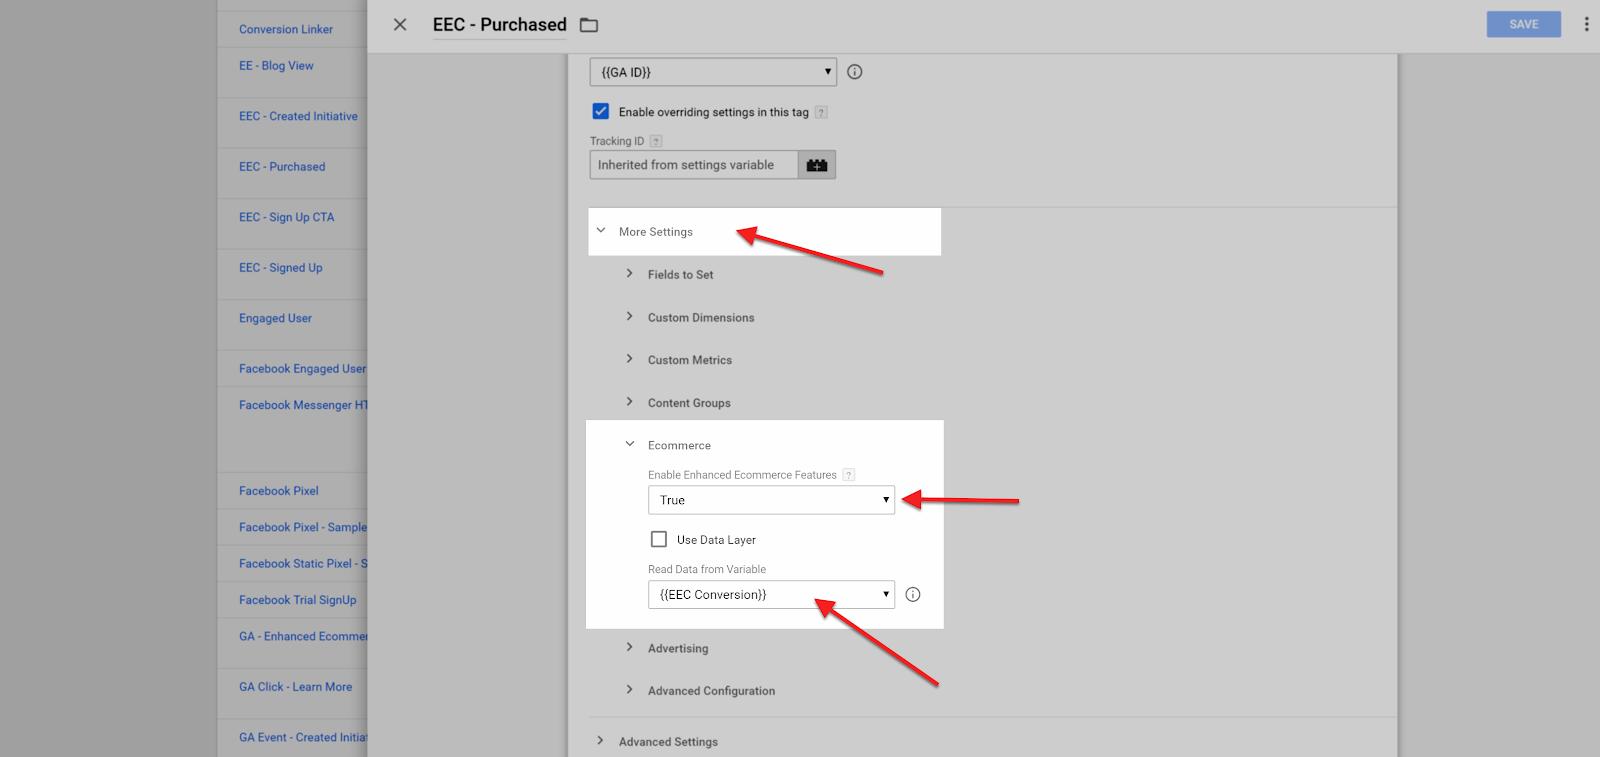
Once the data populates you can leverage Ecommerce Funnels Checkout Behavior reports under Conversions > Ecommerce > Shopping Behavior.
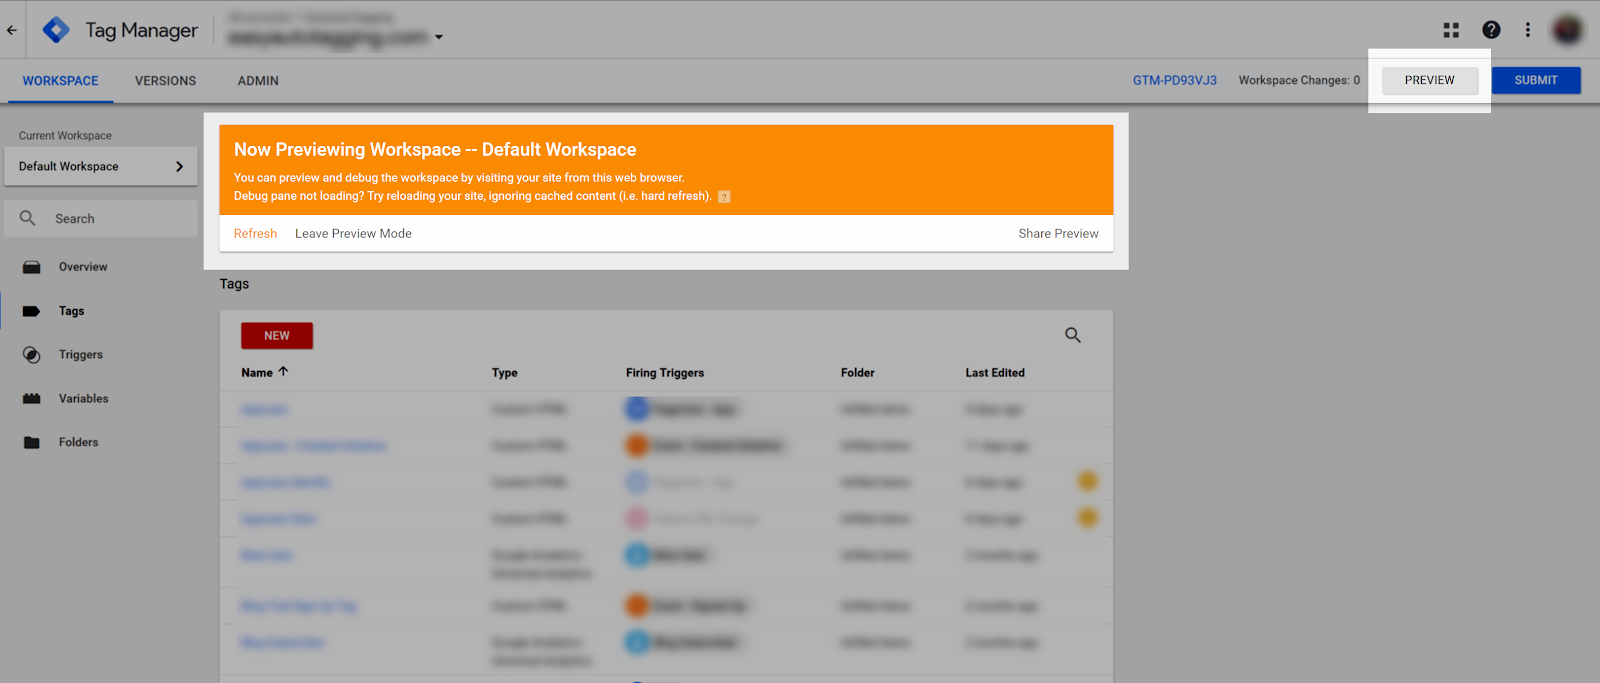
Preview, Debug, and Test
You should always test your tag implementation before submitting your changes. Let’s briefly go over previewing and debugging GTM tags and also verifying that ecommerce objects are properly pushing to GA.
To check that events are firing for the Sign Up CTA on the home page I would do the following:
Enable Preview Mode in the Google Tag Manager
Next, go to the page where you are tracking the Sign Up CTA events. In this case, I will go to the home page and ctrl + click Sign Up. (ctrl + click opens the link in a new tab so that you can see the event fire in the current GTM preview)
Google Analytics Debugger
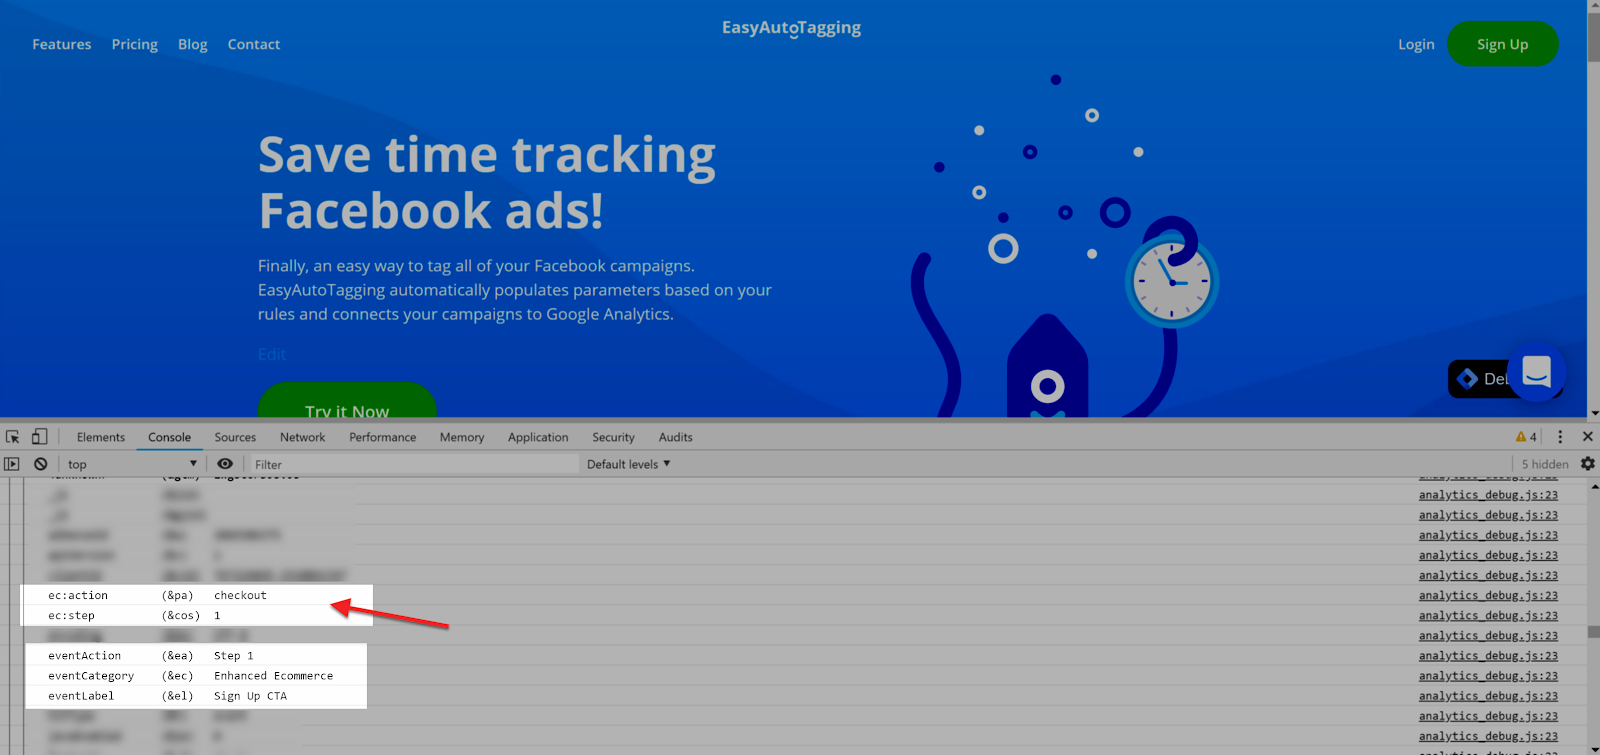
We will also want to make sure that we are properly writing Ecommerce Objects to each event to do this you do need to have the Google Analytics Debugger installed.
[Make sure GA Debugger is turned on] After clicking (ctrl + click) on the Sign Up CTA right click anywhere on the page and go to inspect element. ( alternatively, ctrl + click I)
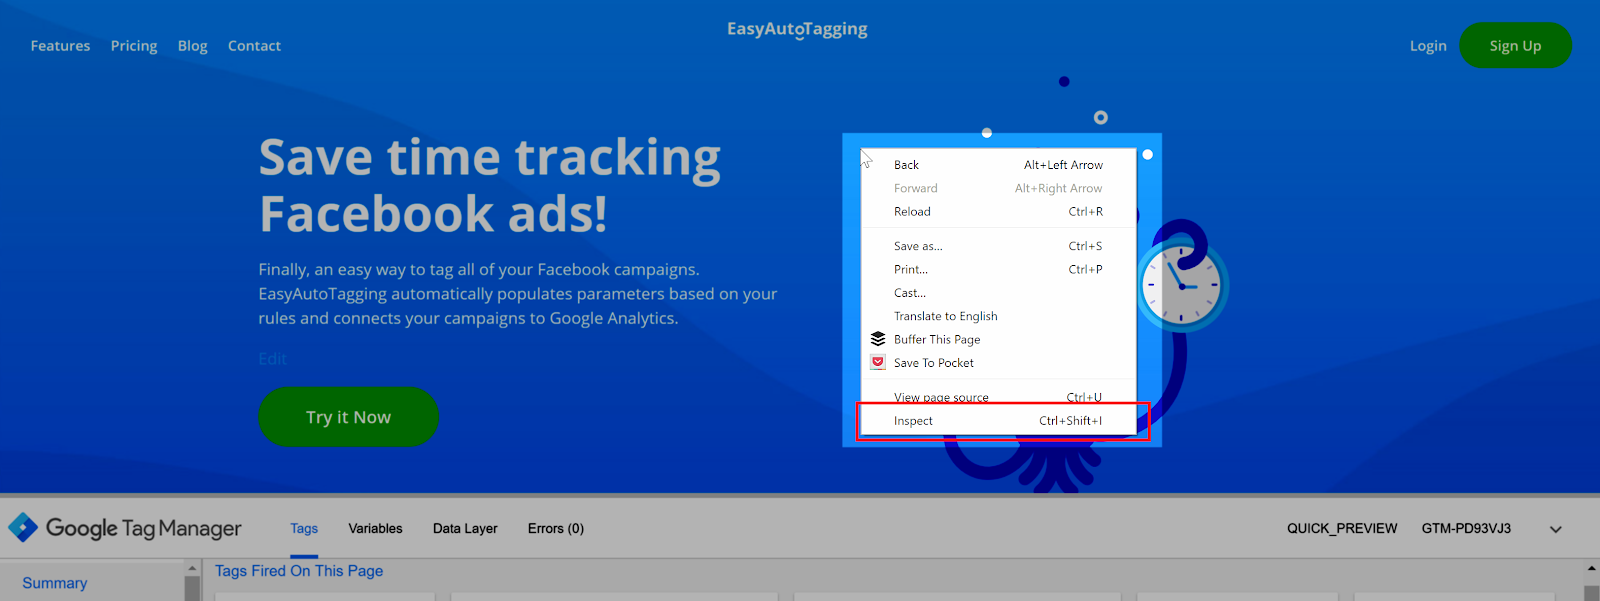
In the Javascript Console look for the Google Analytics event Action, Category, and Label. Right above it, you should see the Ecommerce Object fields for action and step.
Conclusion
Even though the setup is more involved tracking conversion funnels parallel to specific business goals is super valuable in identifying points of friction in the user journey.
Also, the ability to segment funnels steps (depending on your set up) gives you actionable data that can be used to close sales.
How do you track and analyze digital marketing funnels for conversion funnel optimization and how have you made this data actionable?
Let me know in the comments below.
[…] are a simple way to get a quick overview of key performance metrics,” says Gabe Solberg of EasyAutoTagging. “For this reason, I would keep the dashboard simple and focused on 1 – 2 key performance […]
[…] An example of a funnel. Source: EasyAutotagging […]