How To Import Facebook Cost Data Into Google Analytics 4
Written by: EasyAutoTagging Staff Read time 5 minutes
Importing Facebook cost data into Google Analytics 4 is an essential step to measure and analyze the performance of your Facebook campaigns accurately. By importing cost data from Facebook Ads into Google Analytics 4, you can get a comprehensive view of your advertising ROI, understand which campaigns and channels drive the most revenue, and make data-driven decisions to optimize advertising spend.
You have three options when it comes to importing cost data into Google Analytics 4:
- Import Facebook cost data via the .CSV method
- Import Facebook cost data via the SFTP method
- Automate the process with EasyAutoTagging
In this post, we will show you how you can automate uploading Facebook cost data into google analytics 4 with EasyAutoTagging.
Getting Started with EasyAutoTagging
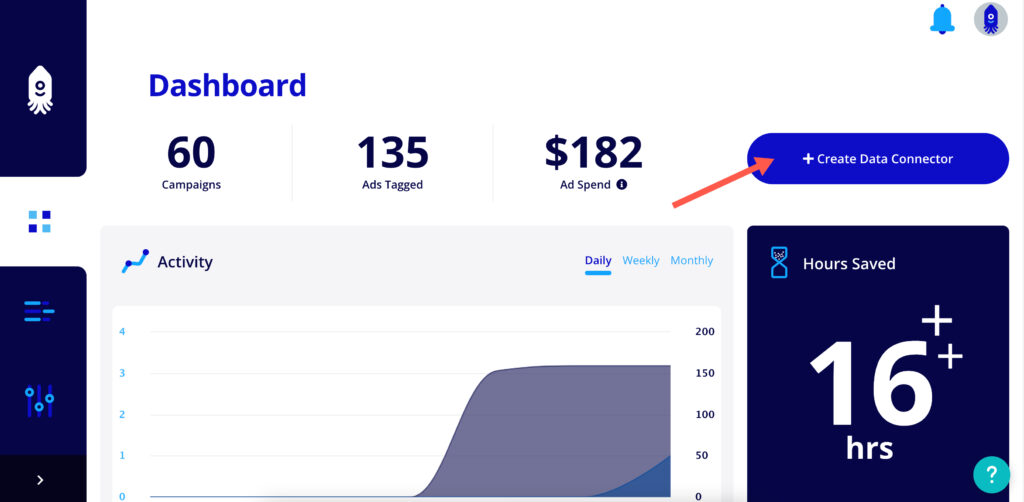
Head over to the sign-up page and create your account to get started. Once your account is created, click +Create Data Connector in the top right corner.
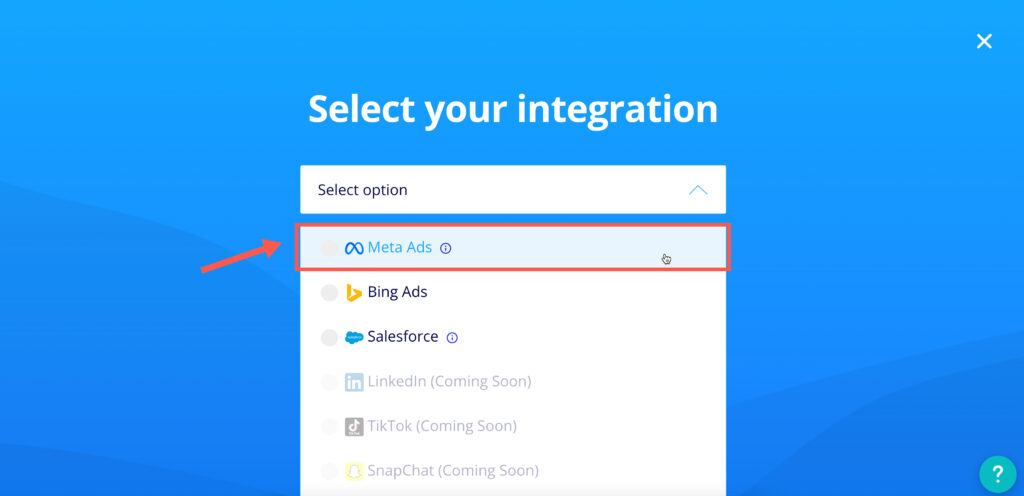
Next, select Facebook as your integration and click Continue.
Select Tag & Import and click Next.
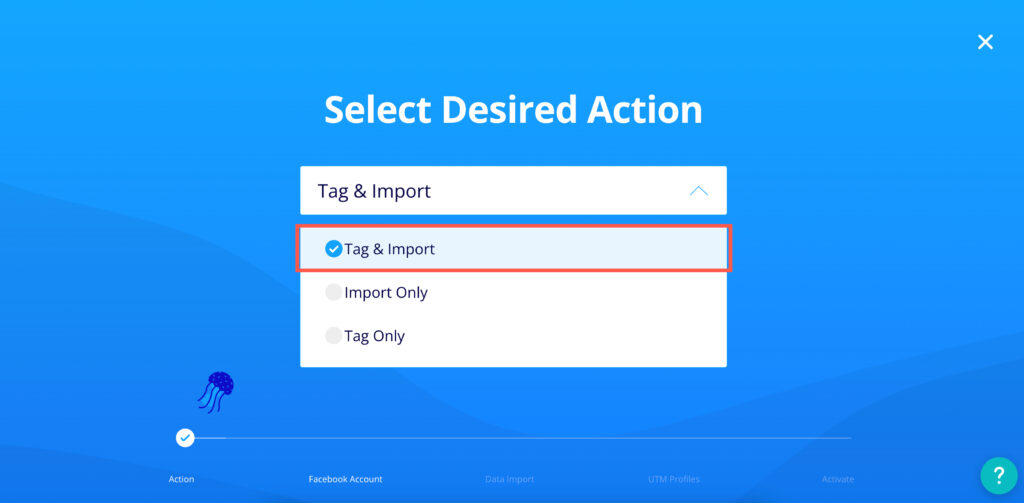
Note: Tag and Import will generate UTM Parameters for your Facebook Ads and pull Facebook cost data into Google Analytics 4. If you do not want to update UTMs for your Facebook Ads you can select import only.
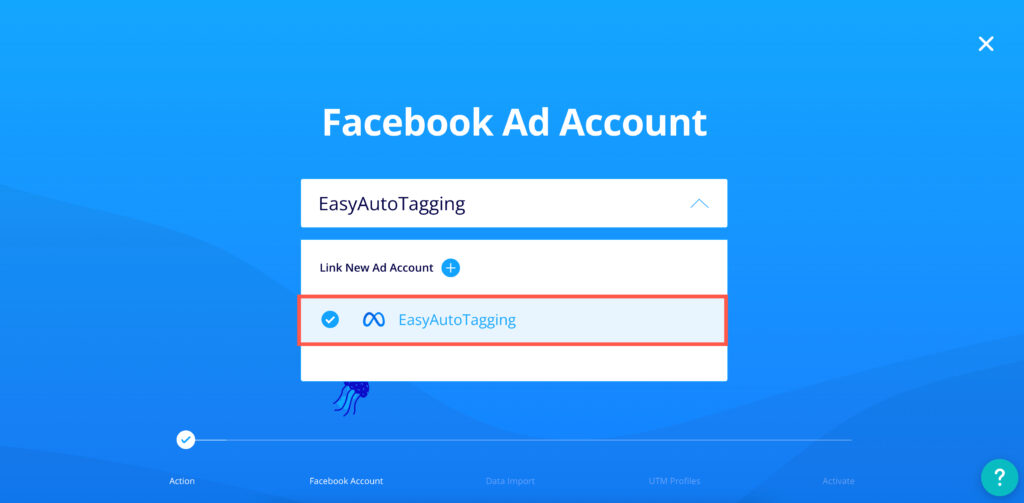
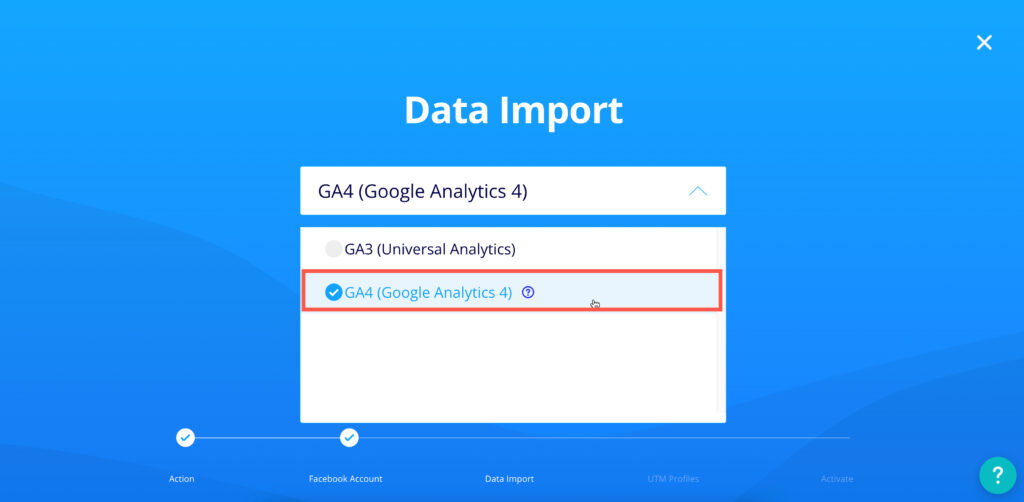
Select the Meta account you want to import Facebook cost data for.
Select Google Analytics 4 for your Google Analytics version.
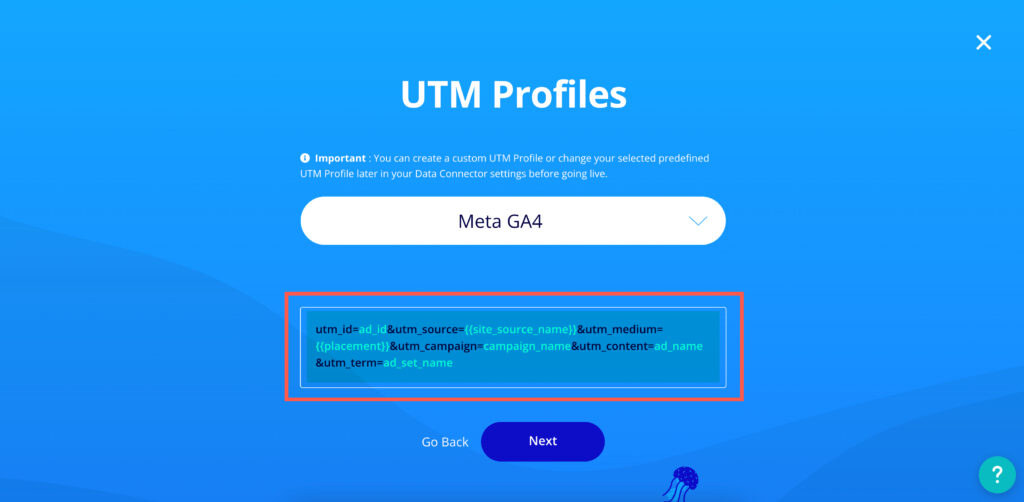
Assigning A UTM Profile to Your Facebook Cost Data Import Connector
Select the default Meta GA4 UTM Profile and assign it to your Data Connector. If the UTM Profiles do not match your UTM Parameters schema, you can create a custom UTM Profile before activating your Data Connector later. Learn more about UTM Profiles here.
To ensure that your Facebook cost data imports properly join with session data in Google Analytics 4, it is essential that your UTM Profile Schema matches the import schema. You can accomplish this by assigning a UTM Profile to a Tag & Import Data Connector, which will ensure that your Facebook Ads UTM Parameters and Import Schema are aligned.
However, it’s important to note that session data is not retroactive, so if you are importing Facebook cost data only it’s crucial to create a custom UTM Profile that matches your current Facebook Ad UTM Parameters and set up an Import-only Data Connector. By doing so, you can ensure that your Facebook cost data is accurately tracked and analyzed in Google Analytics 4, allowing you to make informed decisions about your advertising campaigns and optimize your ROI.
Configuring your Google Analytics Data Source
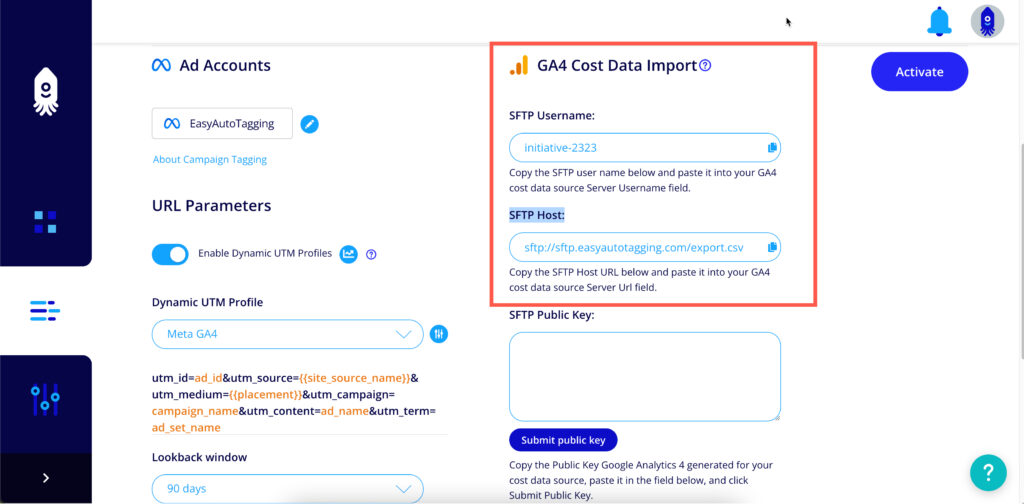
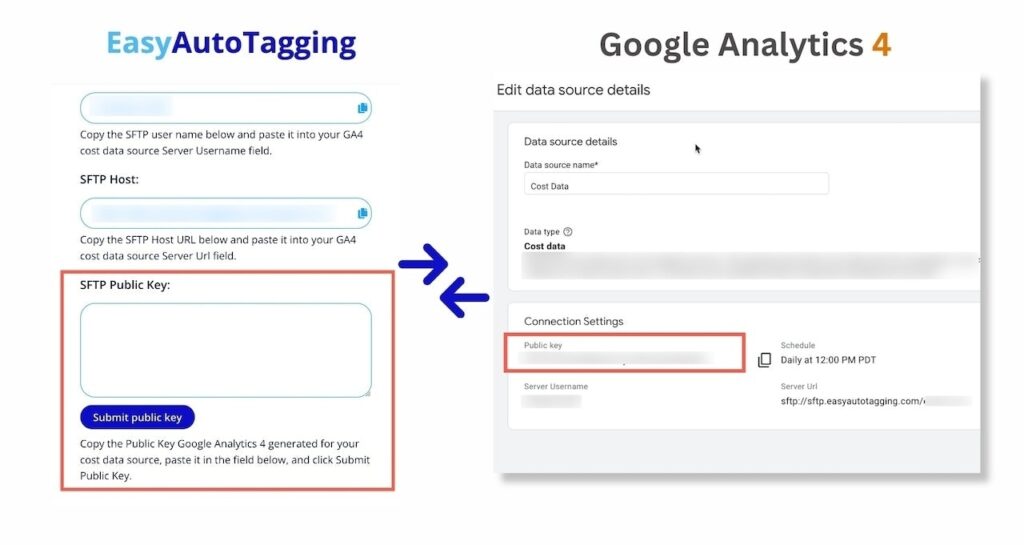
After assigning your UTM Profile and clicking “Next,” you will be directed to your Data Connector settings. In the right-hand column, you will find the SFTP Username and SFTP Host that EasyAutoTagging has generated for you. You can use these credentials when configuring your SFTP Cost Data Source in GA4.
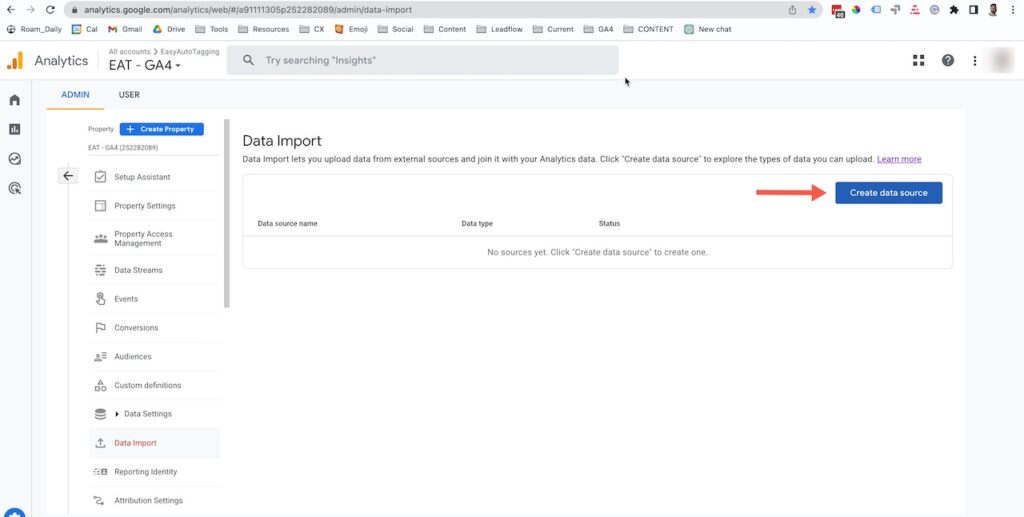
Google Analytics 4 Data Source
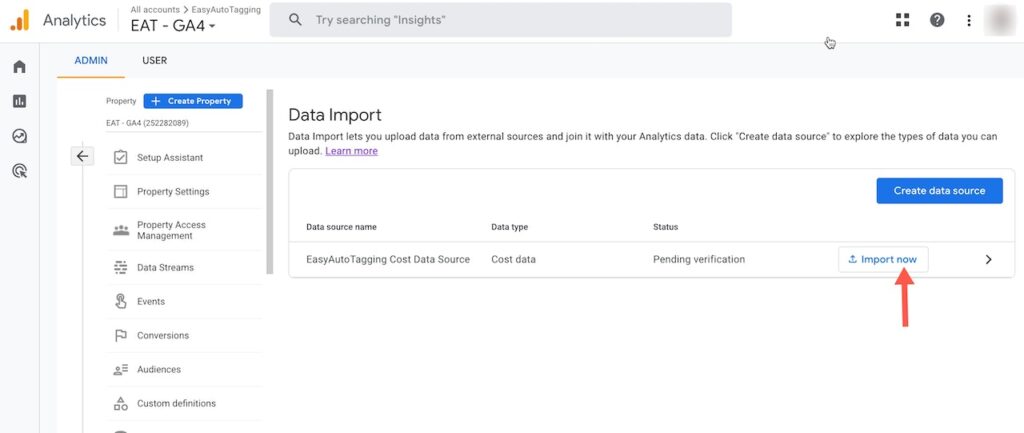
Head over to Data Import in the Admin section of your Google Analytics 4 property and click on Create data source.
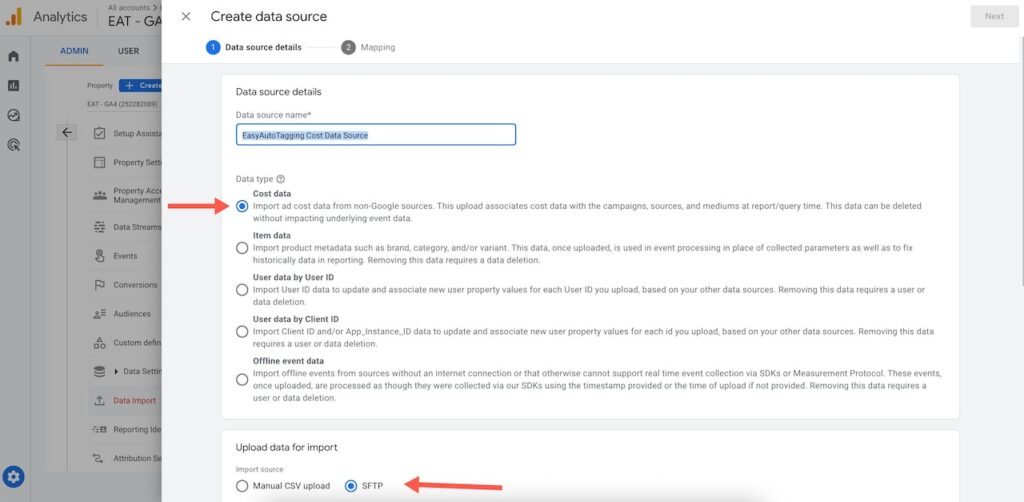
Define Your GA4 Data Type
For your Google Analytics 4 data source select Cost Data as your Data type and for the Import method select SFTP.
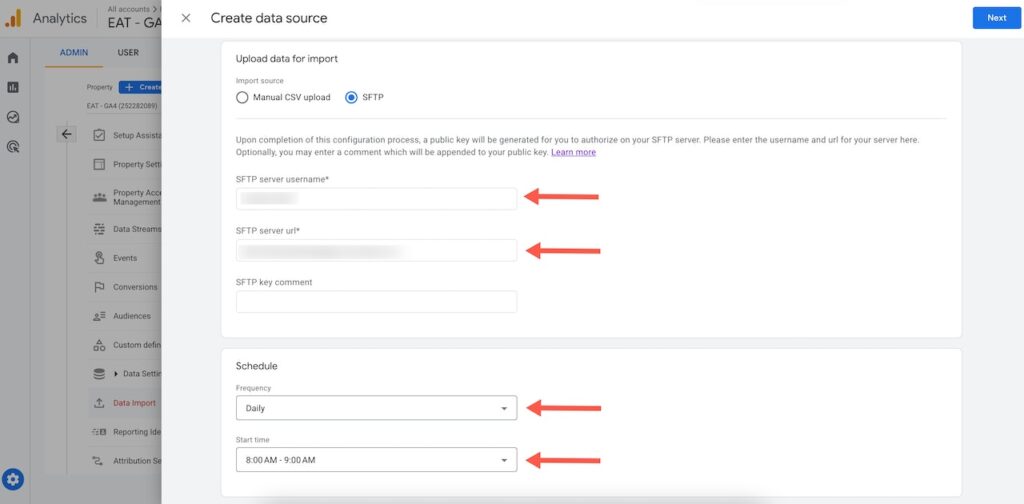
Configure Your SFTP and Set The Import Schedule
Now copy the SFTP user name and SFTP host located in your GA4 Data Connector and paste them into their respective Google Analytics 4 SFTP Server username and SFTP Server url fields then click Next.
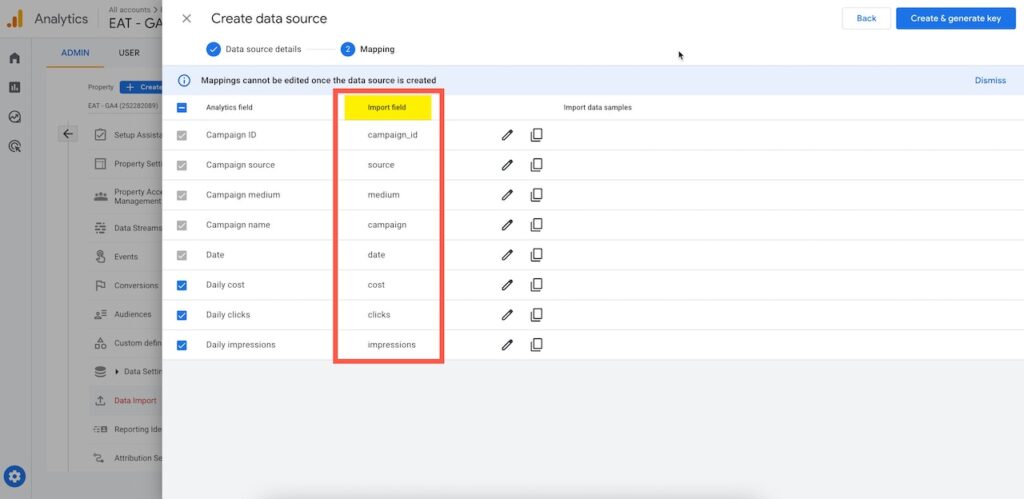
Define GA4’s Import Key Values
Important: Your key values are required to match the values shown here for data mapping to work correctly.
Now edit the key values so that Facebook cost data imports will map correctly in Google Analytics 4. For each analytics field change the respective Import field to match the import field column in this table:
| Analytics field | Import field |
| Campaign ID | campaign_id |
| Campaign source | source |
| Campaign medium | medium |
| Date | date |
| Campaign name | campaign_name |
| Daily cost | cost |
| Daily clicks | clicks |
| Daily impressions | impressions |
Once the key values are updated click on Create & generate key.
Create & Generate Your Public Data Source Key
Google Analytics 4 will automatically generate a public key that you can copy and paste into your GA4 Data Connector.
Activate Your Facebook Cost Data Connector
Activate your GA4 Data Connector. Once your Google Analytics 4 Data Connector has been processed, click on Import Now in GA4 to force a manual import rather than wait until the next scheduled import.
Finding your Facebook Cost Data in Google Analytics 4
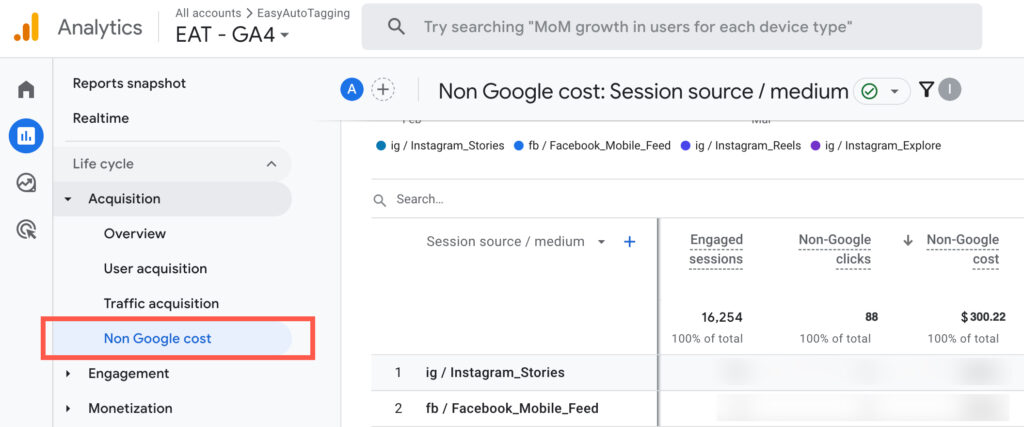
To find Facebook ads acquisition and cost in Google Analytics 4 head over to GA4 > Acquisition > Non-Google Cost
Facebook Cost Data Source UTM Limitations
At the moment, it’s only possible to import UTM Parameters for cost data, including:
- utm_id
- utm_campaign
- utm_source
- utm_medium.
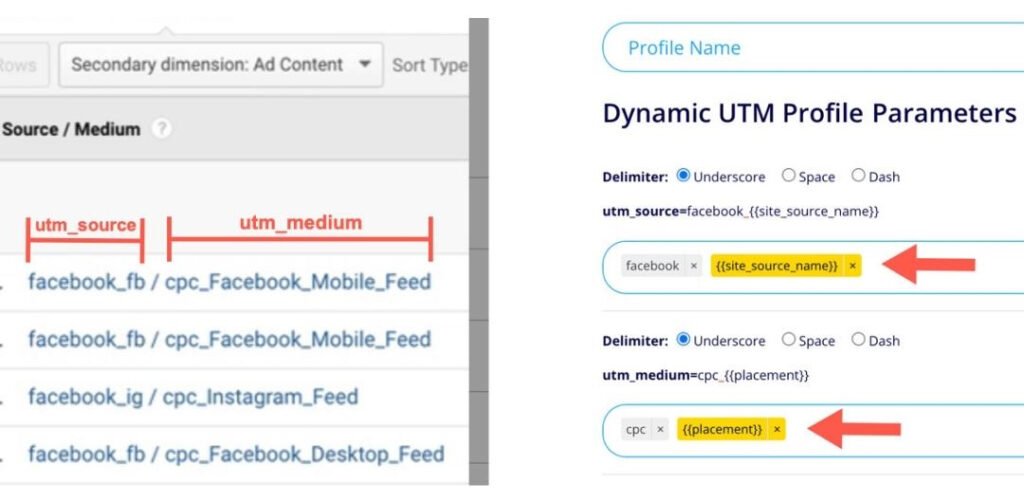
However, since Google Analytics 4 only joins Facebook cost data when the UTM Schema matches, it’s not possible to measure ROAS or CPL using the utm_content or utm_term dimensions. To address this, you can customize your UTM Parameters by concatenating multiple values. For example, you could set up your UTM Parameters as follows:
- utm_id=ad_id
- utm_source=facebook_{{site_source_name}}
- utm_medium=cpc_ad set name_{{placement}}
- utm_campaign=campaign name_ad name

By concatenating values in this way, you can gather more comprehensive data that will allow you to track and analyze the performance of your advertising campaigns more effectively. To learn more about how to build UTM Profiles and concatenate values, you can refer to our guide.
Conclusion
Importing Facebook cost data into Google Analytics 4 can help you accurately measure and analyze the performance of your Facebook campaigns. Here is a summary of the steps to automate the process with EasyAutoTagging:
- Sign up for EasyAutoTagging and create a data connector for Facebook Ads.
- Assign a UTM profile to your data connector to ensure proper import schema alignment.
- Configure your Google Analytics 4 data source by selecting Cost Data and SFTP as the data type and import method.
- Set up your SFTP credentials and define your key values to ensure correct data mapping.
- Paste GA4’s generated public data source key and activate your data connector.
- Find your Facebook cost data in Google Analytics 4 under Acquisition > Non-Google Cost.
By following these steps, you can ensure that your Facebook cost data is accurately tracked and analyzed in Google Analytics 4, allowing you to make informed decisions about your advertising campaigns and optimize your ROI.
AUTHOR BIO:
The EasyAutoTagging staff is made up of seasoned pros in digital marketing, marketing analytics, and ad tech. They’ve brought a wealth of experience and hands-on knowledge to our blog and help documentation over the years. From in-depth articles on the latest industry trends to easy-to-follow guides. You can explore more of their articles here.
Leave a comment