Use Cases
Note: This is an archived page. Please reference our Knowledge Base for current support documentation.
What are you trying to do?
Below are use cases Facebook Marketers have applied when integrating EasyAutoTagging into their workflow.
You can reference a basic overview and documentation of what EasyAutoTagging does in the index below or watch this video 👇
If you have any questions, don’t hesitate to get in touch via email [support@easyautotagging.com]
-
Index
-
USE CASE 1: Automatically apply URL Parameters to all campaigns in your Facebook Ad account
1. Click on Create Data Connector in your dashboard
2. Give the Data Connector a name
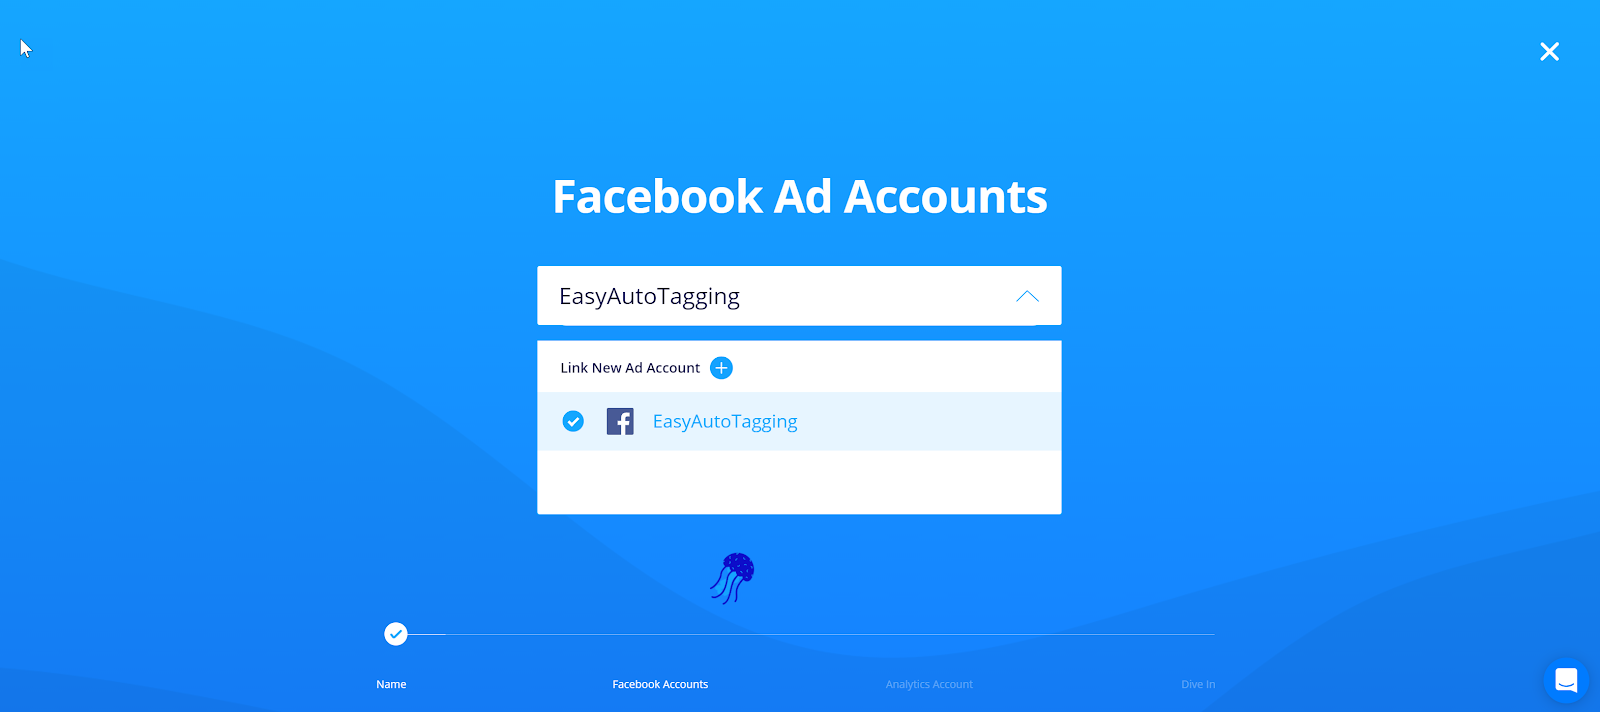
3. Connect your Facebook Account
Note: You can assign one or multiple Facebook Ad Accounts to each Data Connector. However, to keep your data organized we recommend you create one Data Connector for each Facebook Ad Account.
4. Turn off Import Data
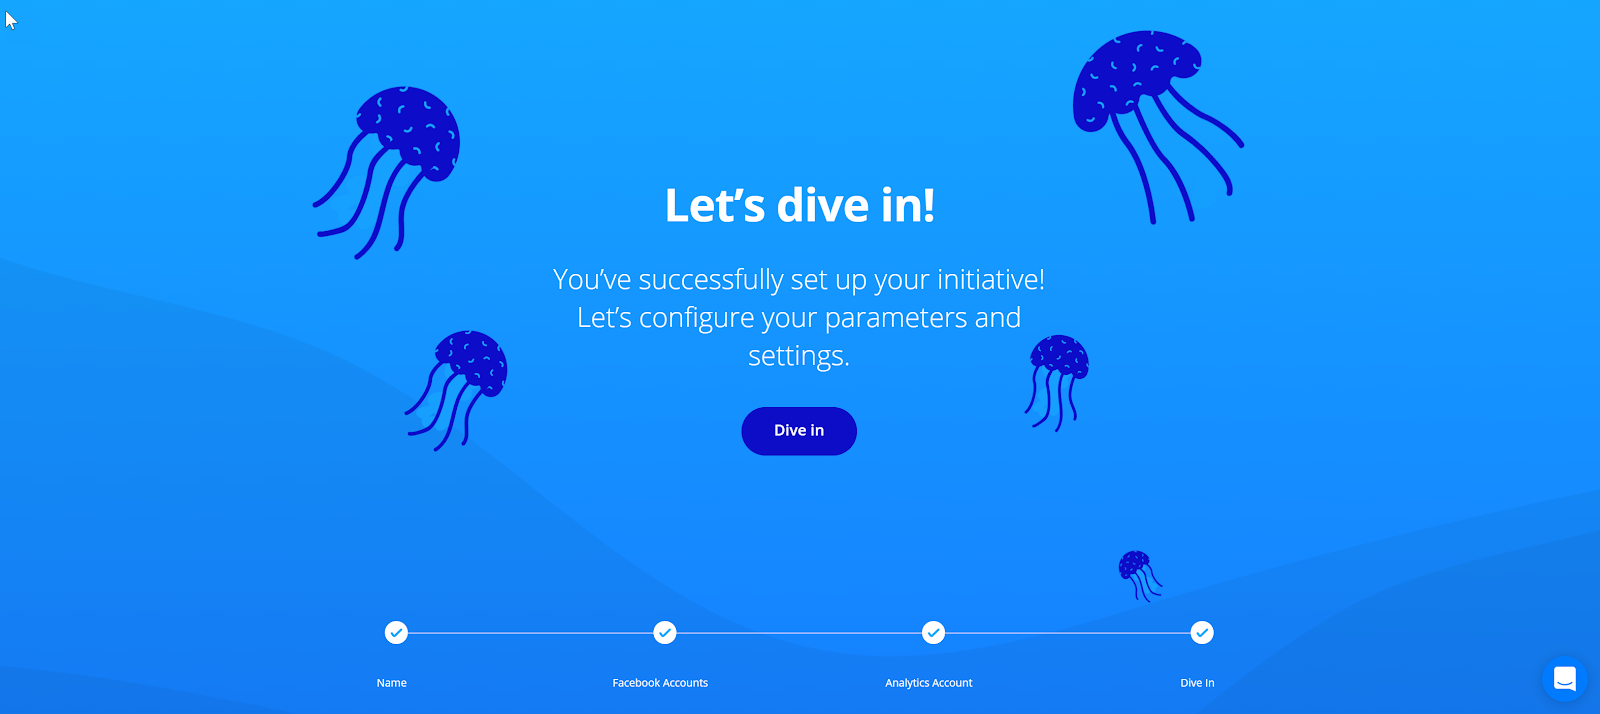
5. Click Dive in to configure your Data Connector settings
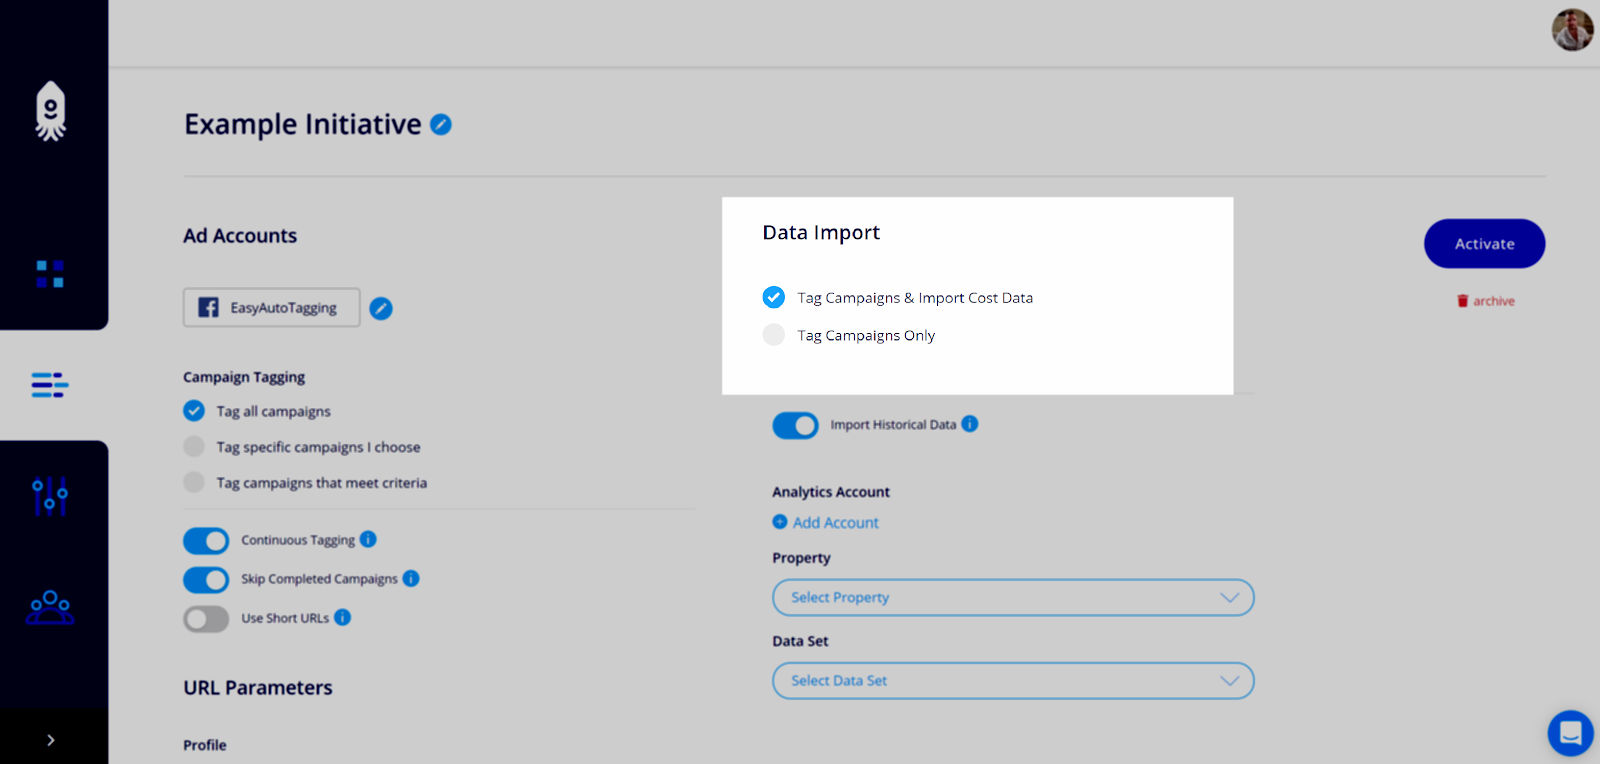
6. Select Tag all campaigns
Note: Warning ⚠️ this will tag every ad in your account. We don’t recommend using this option if working with accounts that have historical data. If you do have an account with historical data use campaign name or date range filters to control what campaigns to tag and import into Google Analytics.
7. Keep Continuous Tagging on if you want EAT to tag new ads on an ongoing basis and keep Skip Completed Campaigns active to skip any campaigns that have been labeled by Facebook as completed.
Note: Keep in mind campaigns that are manually turned off without an end data do not fall under the Skip Completed Campaign category because Facebook labels these as inactive not completed.
8. Select a predefined UTM Profile or create a new one [Learn how to create a UTM Profile here]
9. Click Activate, and you will receive an email once your ads are tagged.
-
USE CASE 2: Only apply URL Parameters ONE TIME to specific campaigns in your Facebook Ad account
1. Click on Create Data Connector in your dashboard
2. Give the Data Connector a name
3. Connect your Facebook Account
Note: You can assign one or multiple Facebook Ad Accounts to each Data Connector. However, to keep your data organized we recommend you create one Data Connector for each Facebook Ad Account.
4. Turn off Import Data
5. Click Dive in to configure your Data Connector settings
6. Select Tag Specific Campaign I Choose
7. Select the campaigns you would like to tag with UTM Parameters
8. Turn off Continuous Tagging
Note: This will only tag ads with UTM Parameters in selected campaigns once. If you create any new ads within the selected campaigns, EAT will ignore them.
9. Select a predefined UTM Profile or create a new one [Learn how to create a profile here]
10. Click Activate, and you will receive an email once your ads are tagged.
-
USE CASE 3: Automatically apply URL Parameters to Facebook Ads and import Cost Data into Google Analytics
1. Click on Create Data Connector in your dashboard
2. Give the Data Connector a name
3. Connect your Facebook Account
Note: You can assign one or multiple Facebook Ad Accounts to each Data Connector. Keep in mind that you can only select one Google Analytics cost data set to import Facebook performance for each initiative.
Here is how it affects your Data Connector set up:
If you are only tagging campaigns with URL Parameters then you can connect multiple Facebook Ad Accounts across numerous clients. Although we do not recommend this.
If you are tagging campaigns with URL Parameters and importing cost data, you will only want to connect a single Facebook Ad accounts associated with one client. This ensures that Facebook data is imported to the correct Google Analytics account.
4. Connect your Google Analytics Account
Note: At this step, no data will get imported. You will have the option to select your Google Analytics property, view and cost data set when configuring your initiative settings.
5. Click Dive in to configure your Data Connector settings
6. Select Tag all campaigns
Note: Warning ⚠️ this will tag every ad in your account. We don’t recommend using this option if working with accounts that have historical data. If you do have an account with historical data use campaign name or date range filters to control what campaigns to tag and import into Google Analytics.
7. Keep Continuous Tagging on if you want to EAT to tag new ads with UTM Parameters on an ongoing basis and keep Skip Completed Campaigns to skip any campaigns that are completed.
Note: Keep in mind campaigns that are turned off without an end data do not fall under the Skip Completed Campaign category because Facebook labels these as inactive not completed.
8. Select a predefined UTM Profile or create a new one [Learn how to create a UTM Profile here]
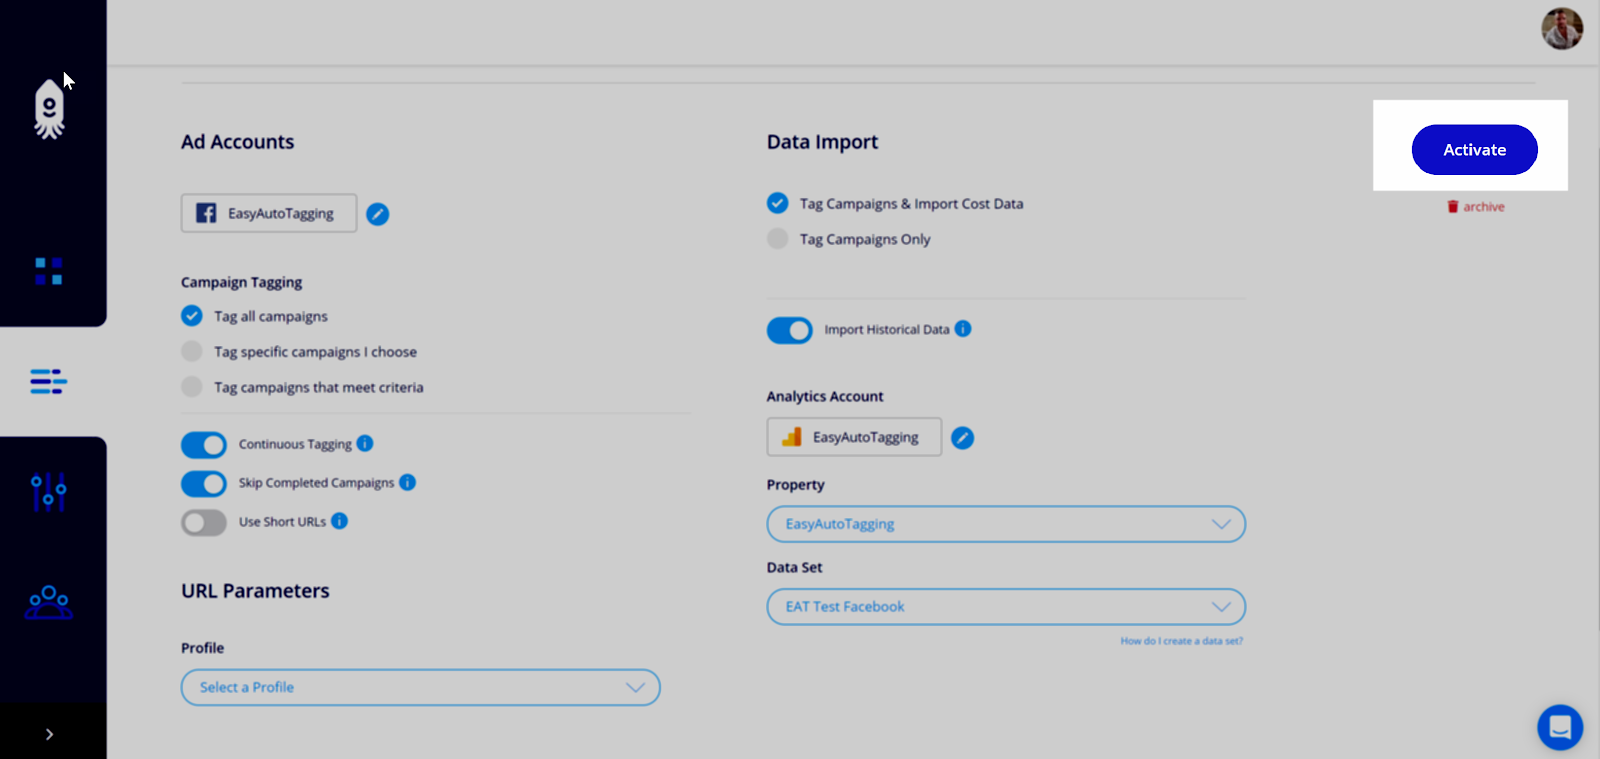
9. Make sure that Tag Campaigns & Import Cost Data is Selected
10. Keep Import Historical Data on if you want to import data older than seven days.
Note: EasyAutoTagging continuously imports the previous seven days of cost data activity to ensure that Google Analytic metrics are updated to reflect any cost, impression and click adjustments Facebook has made.
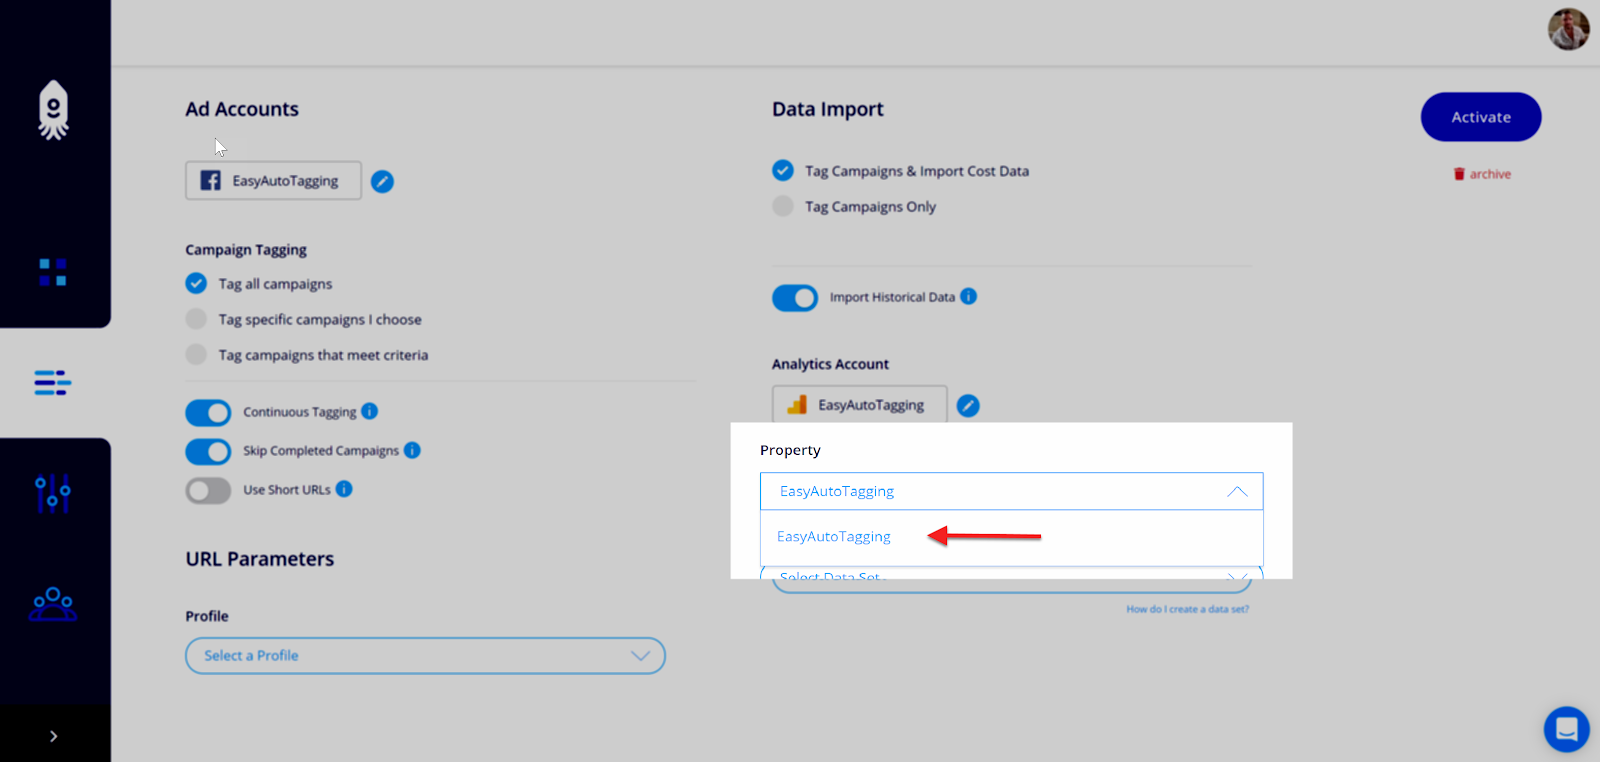
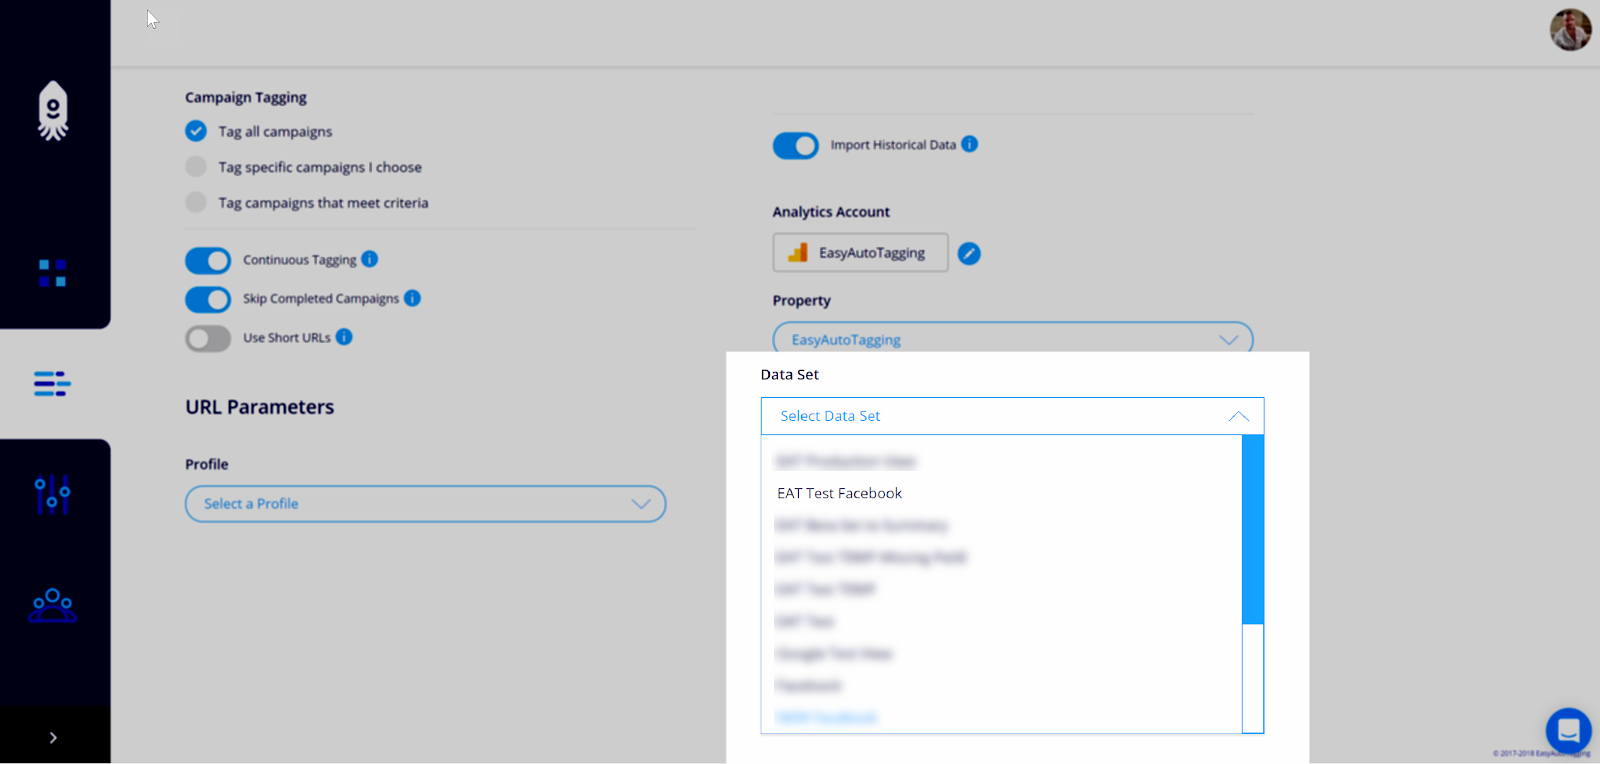
11. Select your Google Analytics Property
12. Select your Cost Data Set. If you do not have a Cost Data Set created, you can learn how to build one here.
13. Click Activate, and you will receive an email once your ads are tagged with URL Parameters. A daily import of your cost data will happen once every 24 hours importing the past seven days of data.
-
Use Case 4: Automatically apply URL Parameters to multiple Facebook Ad Accounts + Cost data import (optional)
1. Click on Create Data Connector in your dashboard
2. Give the Data Connector a name
3. Connect your Facebook Account and assign multiple Facebook Ad Accounts.
Note: You can assign one or multiple Facebook Ad Accounts to each Data Connector. Keep in mind that you can only select one Google Analytics cost data set to import Facebook performance for each initiative.
Here is how it affects your initiative set up:
If you are only tagging campaigns with URL Parameters then you can connect multiple Facebook Ad Accounts across numerous clients. Although we do not recommend this.
If you are tagging campaigns with URL Parameters and importing cost data, you will only want to connect a single Facebook Ad accounts associated with one client. This ensures that Facebook data is imported to the correct Google Analytics account.
4. Connect your Google Analytics Account
Note: At this step, no data will get imported. You will have the option to select your Google Analytics property, view and cost data set when configuring your initiative settings.
5. Click Dive in to configure your Data Connector settings
6. Select Tag all campaigns
Note: Warning ⚠️ this will tag every ad in your account. We don’t recommend using this option if working with accounts that have historical data. If you do have an account with historical data use campaign name or date range filters to control what campaigns to tag and import into Google Analytics.
7. Keep Continuous Tagging on if you want to EAT to tag new ads with UTM Parameters on an ongoing basis and keep Skip Completed Campaigns to skip any campaigns that are completed.
Note: Keep in mind that campaigns that are turned off without an end data do not fall under the Skip Completed Campaign category because Facebook labels these as inactive not completed.
8. Select a predefined UTM Profile or create a new one [Learn how to create a UTM Profile here]
9. Make sure that Tag Campaigns & Import Cost Data is Selected
10. Keep Import Historical Data on if you want to import data older than seven days.
Note: EasyAutoTagging continuously imports the previous seven days of cost data activity to ensure that Google Analytic metrics are updated to reflect any cost, impression and click adjustments Facebook has made.
11. Select your Google Analytics Property
12. Select your Cost Data Set. If you do not have a Cost Data Set created, you can learn how to build one here.
13. Click Activate, and you will receive an email once your ads are tagged with URL Parameters. A daily import of your cost data will happen once every 24 hours importing the past seven days of data
-
USE CASE 5: Apply the same URL Parameter definitions to All Facebook Ads in a single Facebook Ad account except historical campaigns + Cost data import (optional)
1. Click on Create Data Connector in your dashboard
2. Give the Data Connector a name
3. Connect your Facebook Account
Note: You can assign one or multiple Facebook Ad Accounts to each Data Connector. Keep in mind that you can only select one Google Analytics cost data set to import Facebook performance for each initiative.
Here is how it affects your initiative set up:
If you are only tagging campaigns with URL Parameters then you can connect multiple Facebook Ad Accounts across numerous clients. Although we do not recommend this.
If you are tagging campaigns with URL Parameters and importing cost data, you will only want to connect a single Facebook Ad accounts associated with one client. This ensures that Facebook data is imported to the correct Google Analytics account.
4. Connect your Google Analytics Account
Note: At this step, no data will get imported. You will have the option to select your Google Analytics property, view and cost data set when configuring your initiative settings.
5. Click Dive in to configure your Data Connector settings
6. Select Tag campaigns that meet criteria
7. Select Campaign Created After to tag all campaigns created after the specified dates with UTM Parameters.
Note: Campaigns that were modified not created after the specified date do not fall under this filter. This filter also applies to campaigns only so EAT will just look at the campaign, not Ad Sets and Ad creation date as a rule to tag ads.
8. Keep Continuous Tagging on if you want to EAT to tag new ads with UTM Parameters on an ongoing basis and keep Skip Completed Campaigns to skip any campaigns that are completed.
Note: Keep in mind that campaigns that are turned off without an end data do not fall under the Skip Completed Campaign category because Facebook labels these as inactive not completed.
9. Select a predefined UTM Profile or create a new one [Learn how to create a UTM Profile here]
10. Make sure that Tag Campaigns & Import Cost Data is Selected
11. Keep Import Historical Data on if you want to import data older than seven days.
Note: EasyAutoTagging continuously imports the previous seven days of cost data activity to ensure that Google Analytic metrics are updated to reflect any cost, impression and click adjustments Facebook has made.
12. Select your Google Analytics Property
13. Select your Cost Data Set. If you do not have a Cost Data Set created, you can learn how to build one here.
14. Click Activate, and you will receive an email once your ads are tagged. A daily import of your cost data will happen once every 24 hours importing the past seven days of data
-
USE CASE 6: Apply URL Parameter definitions to active Facebook campaigns in a single Facebook Ad account + Cost data import (optional)
1. Click on Create Data Connector in your dashboard
2. Give the Data Connector a name
3. Connect your Facebook Account
Note: You can assign one or multiple Facebook Ad Accounts to each Data Connector. Keep in mind that you can only select one Google Analytics cost data set to import Facebook performance for each initiative.
Here is how it affects your initiative set up:
If you are only tagging campaigns with URL Parameters then you can connect multiple Facebook Ad Accounts across numerous clients. Although we do not recommend this.
If you are tagging campaigns with URL Parameters and importing cost data, you will only want to connect a single Facebook Ad accounts associated with one client. This ensures that Facebook data is imported to the correct Google Analytics account.
4. Connect your Google Analytics Account
Note: At this step, no data will get imported. You will have the option to select your Google Analytics property, view and cost data set when configuring your initiative settings.
5. Click Dive in to configure your Data Connector settings
6. Select Tag campaigns that meet criteria
7. Select Campaign Status Is > Active
Note: This will tag all campaigns with UTM Parameters that are currently active, and it will detect any campaigns that will become active in the future.
8. Keep Continuous Tagging on if you want to EAT to tag new ads with UTM Parameters on an ongoing basis and keep Skip Completed Campaigns to skip any completed campaigns.
Note: Keep in mind that campaigns that are turned off without an end data do not fall under the Skip Completed Campaign category because Facebook labels these as inactive not completed.
9. Select a predefined UTM Profile or create a new one [Learn how to create a UTM Profile here]
10. Make sure that Tag Campaigns & Import Cost Data is Selected
11. Keep Import Historical Data on if you want to import data older than seven days.
Note: EasyAutoTagging continuously imports the previous seven days of cost data activity to ensure that Google Analytic metrics are updated to reflect any cost, impression and click adjustments Facebook has made.
12. Select your Google Analytics Property
13. Select your Cost Data Set. If you do not have a Cost Data Set created, you can learn how to build one here.
14. Click Activate, and you will receive an email once your ads are tagged. A daily import of your cost data will happen once every 24 hours importing the past seven days of data.
-
Use Case 7: Apply URL Parameter definitions to specific Facebook campaigns a single Facebook Ad Account + Cost data import (optional)
1. Click on Create Data Connector in your dashboard
2. Give the Data Connector a name
3. Connect your Facebook Account
Note: You can assign one or multiple Facebook Ad Accounts to each Data Connector. Keep in mind that you can only select one Google Analytics cost data set to import Facebook performance for each initiative.
Here is how it affects your initiative set up:
If you are only tagging campaigns with URL Parameters then you can connect multiple Facebook Ad Accounts across numerous clients. Although we do not recommend this.
If you are tagging campaigns with URL Parameters and importing cost data, you will only want to connect a single Facebook Ad accounts associated with one client. This ensures that Facebook data is imported to the correct Google Analytics account.
4. Connect your Google Analytics Account
Note: At this step, no data will get imported. You will have the option to select your Google Analytics property, view and cost data set when configuring your initiative settings.
5. Click Dive in to configure your Data Connector settings
6. Select Tag Specific Campaign I Choose
7. Select the campaigns you would like to tag with UTM Parameters
7. Keep Continuous Tagging on if you want to EAT to tag new ads with UTM Parameters on an ongoing basis and keep Skip Completed Campaigns to skip any completed campaigns.
Note: Keep in mind that campaigns that are turned off without an end data do not fall under the Skip Completed Campaign category because Facebook labels these as inactive not completed.
8. Select a predefined UTM Profile or create a new one [Learn how to create a UTM Profile here]
9. Make sure that Tag Campaigns & Import Cost Data is Selected
10. Keep Import Historical Data on if you want to import data older than seven days.
Note: EasyAutoTagging continuously imports the previous seven days of cost data activity to ensure that Google Analytic metrics are updated to reflect any cost, impression and click adjustments Facebook has made.
11. Select your Google Analytics Property
12. Select your Cost Data Set. If you do not have a Cost Data Set created, you can learn how to build one here.
13. Click Activate, and you will receive an email once your ads are tagged. A daily import of your cost data will happen once every 24 hours importing the past seven days of data
-
Use Case 8: Apply multiple Parameter definitions to different Facebook campaigns a single Facebook Ad Account + Cost data import (optional)
If you have multiple campaign types or clients within a single ad account and you would like to apply different UTM Parameter definitions we need to create one initiative for each campaign grouping.
Let’s take the instance of different campaign types in a single ad account. For the sake of this tutorial, I will call them Campaign Type A and Campaign Type B.
The naming convention is not essential as long as you can group campaigns by an identifier within the campaign name be that a client name, ID or placement.
1. Click on Create Data Connector in your dashboard
2. Give the Data Connector a name
3. Connect your Facebook Account
Note: You can assign one or multiple Facebook Ad Accounts to each Data Connector. Keep in mind that you can only select one Google Analytics cost data set to import Facebook performance for each initiative.
Here is how it affects your initiative set up:
If you are only tagging campaigns with URL Parameters then you can connect multiple Facebook Ad Accounts across numerous clients. Although we do not recommend this.
If you are tagging campaigns with URL Parameters and importing cost data, you will only want to connect a single Facebook Ad accounts associated with one client. This ensures that Facebook data is imported to the correct Google Analytics account.
4. Connect your Google Analytics Account
Note: At this step, no data will get imported. You will have the option to select your Google Analytics property, view and cost data set when configuring your initiative settings.
5. Click Dive in to configure your Data Connector settings
6. Select Tag campaigns that meet criteria > Campaign Name Contains then enter Campaign Type A
Note: These values are not case sensitive.
7. Keep Continuous Tagging on if you want to EAT to tag new ads with UTM Parameters on an ongoing basis and keep Skip Completed Campaigns to skip any completed campaigns.
Note: Keep in mind that campaigns that are turned off without an end data do not fall under the Skip Completed Campaign category because Facebook labels these as inactive not completed.
8. In URL Parameters section click on the Select a UTM Profile drop-down then select Create a New UTM Profile
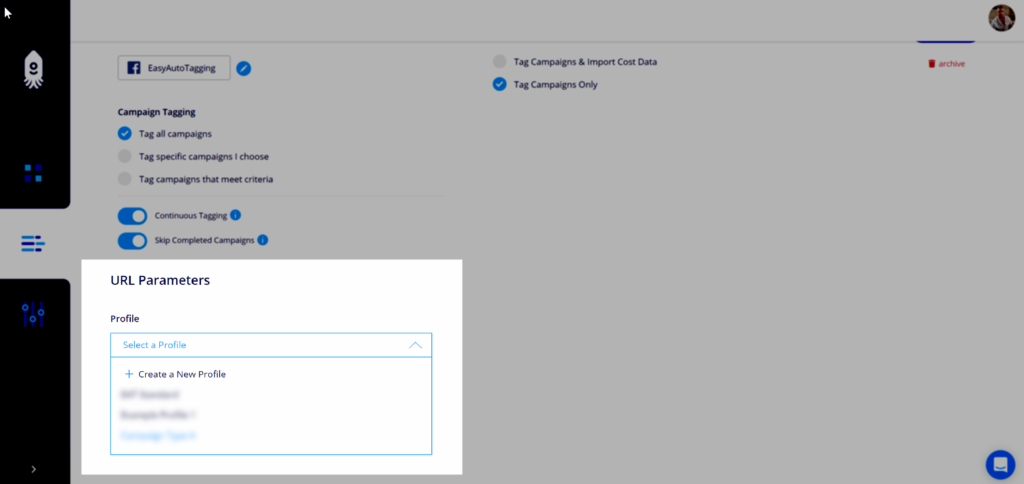
9. Create a new UTM Profile defining your URL Parameters specific to Campaign A [Learn how to create a UTM Profile here]
9. Make sure that Tag Campaigns & Import Cost Data is Selected
10. Keep Import Historical Data on if you want to import data older than seven days.
Note: EasyAutoTagging continuously imports the previous seven days of cost data activity to ensure that Google Analytic metrics are updated to reflect any cost, impression and click adjustments Facebook has made.
11. Select your Google Analytics Property
12. Select your Cost Data Set. If you do not have a Cost Data Set created, you can learn how to build one here.
13. Click Activate, and you will receive an email once your ads are tagged. A daily import of your cost data will happen once every 24 hours importing the past seven days of data
Repeat the same steps 1 – 13 for ‘Campaign Type B.’
You can create an unlimited number of initiatives for all EAT accounts, so you are not limited in flexibility and customization across one or multiple Facebook Ad accounts.
-
Use Case 9: Apply URL Parameter definitions for All paused historical campaigns in a single Facebook Ad Account + Cost data import (optional)
If you are working with a third party reporting platform that maps performance data by referencing live URL Parameter tags within Facebook Ads, you might want to tag all historical data for accurate and consistent data mapping.
To do this, we will create an Data Connector that tags all past campaigns.
1. Click on Create Data Connector in your dashboard
2. Give the Data Connector a name
3. Connect your Facebook Account
Note: You can assign one or multiple Facebook Ad Accounts to each Data Connector. Keep in mind that you can only select one Google Analytics cost data set to import Facebook performance for each initiative.
Here is how it affects your initiative set up:
If you are only tagging campaigns with URL Parameters then you can connect multiple Facebook Ad Accounts across numerous clients. Although we do not recommend this.
If you are tagging campaigns with URL Parameters and importing cost data, you will only want to connect a single Facebook Ad accounts associated with one client. This ensures that Facebook data is imported to the correct Google Analytics account.
4. Turn off Import Data
5. Click Dive in to configure your Data Connector settings
6. Select Tag campaigns that meet criteria
7. In the drop-down select Campaigns created before and choose a date that includes all campaigns created up to the desired date
8. Turn off Continuous Tagging
Note: This will only tag ads with UTM Parameters in selected campaigns once. If you create any new ads within the campaigns chosen, EAT will ignore them.
9. Turn off Skip Completed Campaigns since we are tagging historical campaigns
10. Select a predefined UTM Profile or create a new one [Learn how to create a UTM Profile here]
11. Click Activate, and you will receive an email once your ads are tagged.