How to Use Facebook Ads Manager: Beginners Guide
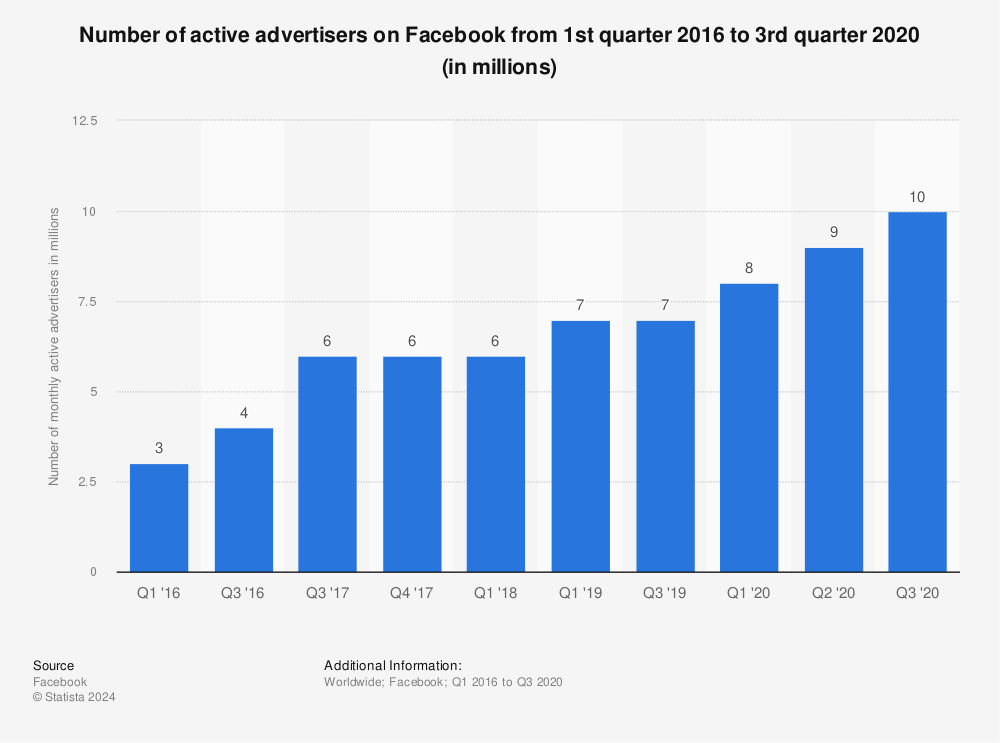
The number of active advertisers using the Facebook Ads Manager more than doubled from 3 Million in 2016 to 9 Million in 2020.
Certainly, there is a good reason for this.
Considering that 71% of American adults (and 74% of high income earners $75K+) spend an average of 38 minutes on Facebook each day.
Simply put, Facebook Ads can be highly effective in reaching prospective leads or customers.
However, getting started with Facebook Ads can be overwhelming.
So, we put together a comprehensive Facebook Ads Manager guide to review key 🔑 sections of the ads manager.
If you see anything we missed, please let us know in the comments below.
Facebook Ads Manager Guide – Table Of Contents
Where can I find the Ads Manager in Facebook?
Getting familiar with using the Facebook Ads Manager
Accessing your Facebook Ads Manager columns
Customizing your Facebook Ads Manager columns
The power of Audience Insights
Building & Managing Facebook Audiences
Better media planning with the Campaign Planner
Retaining social proof via Page Posts in the Ads Manager
Introduction to Automated Rules
Where can I find the Ads Manager in Facebook?
Let’s get started with the basics.
You can access or set up your Facebook Ad Account in two ways.
Either way, we will show you how to access the Facebook Ads Manager from your personal account and from the Business Manager.
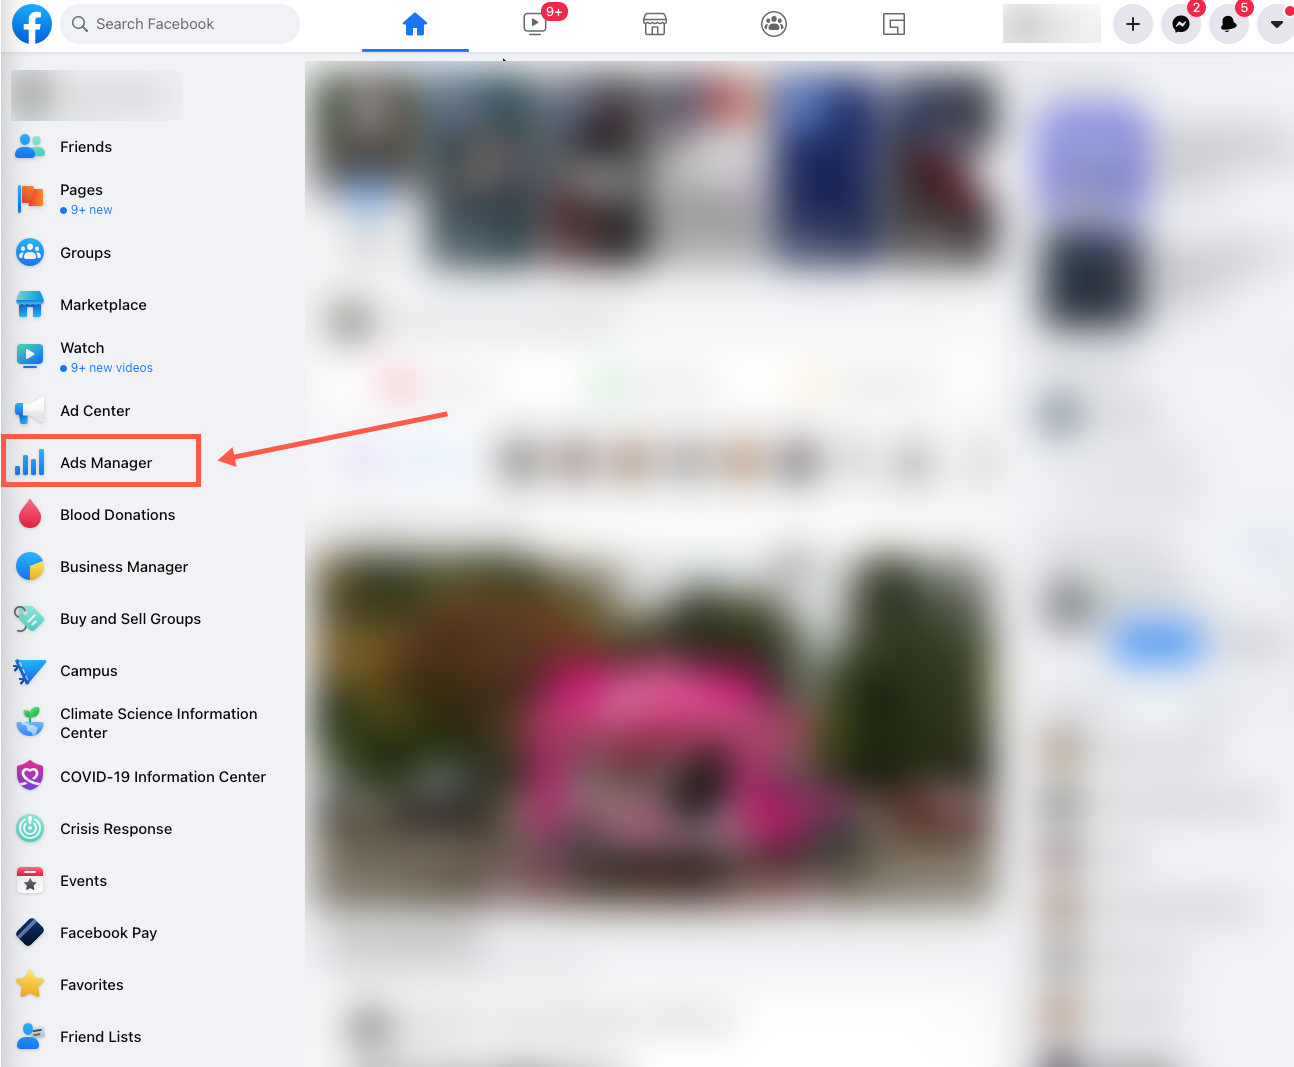
How to access the Facebook Ads Manager from your personal account?
1. Go to your Facebook Home Page
2. Find a link to the Ads Manager in the left side navigation
How to access the Facebook Ads Manager from your business account?
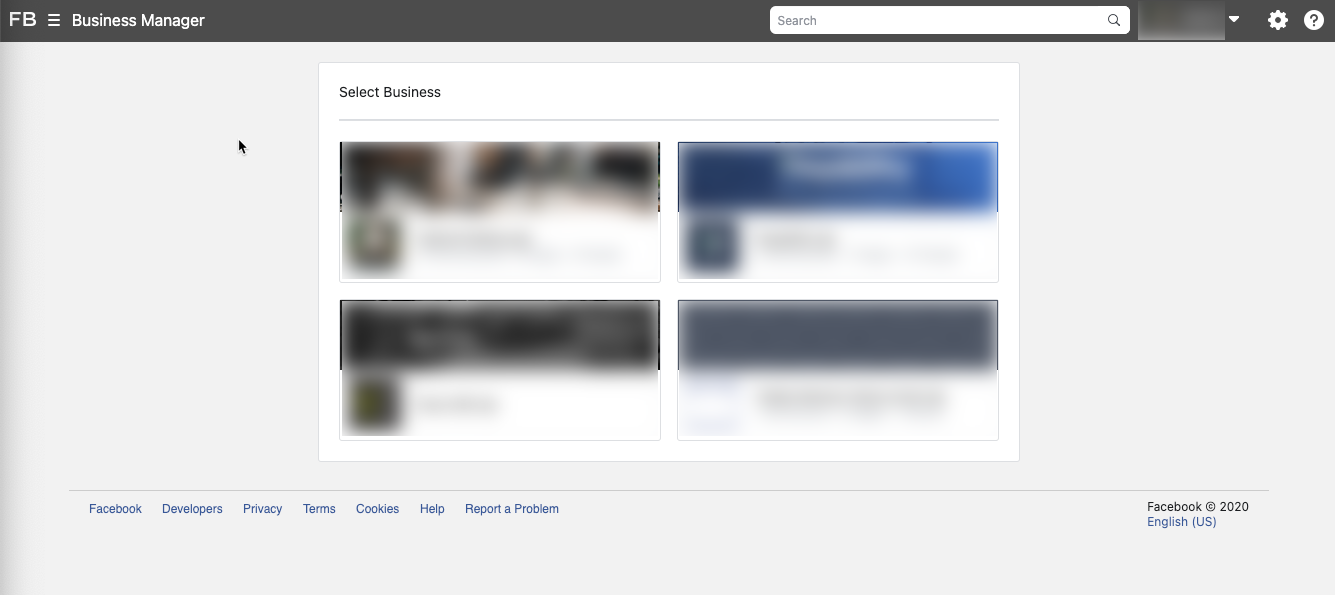
1. Make sure you are logged into your Facebook Ads account
2. Go to https://business.facebook.com/
3. Select the Business you are working with
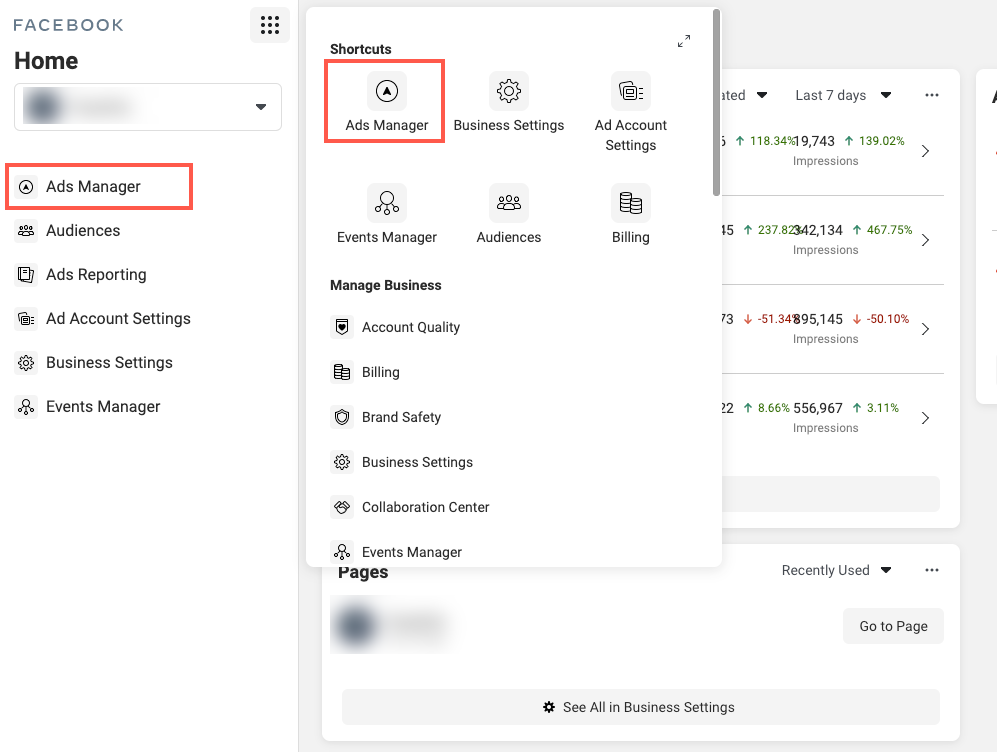
4. Once in the Facebook Business Manager you can select Ads Manager from the left side nav or the fly out menu
Next, let’s take a look at navigating the Facebook Ads Manager.
Getting familiar with using the Facebook Ads Manager
The Facebook Ads Manager can be intimidating at first.
To keep it simple let us break the ads manager down into nine primary sections.
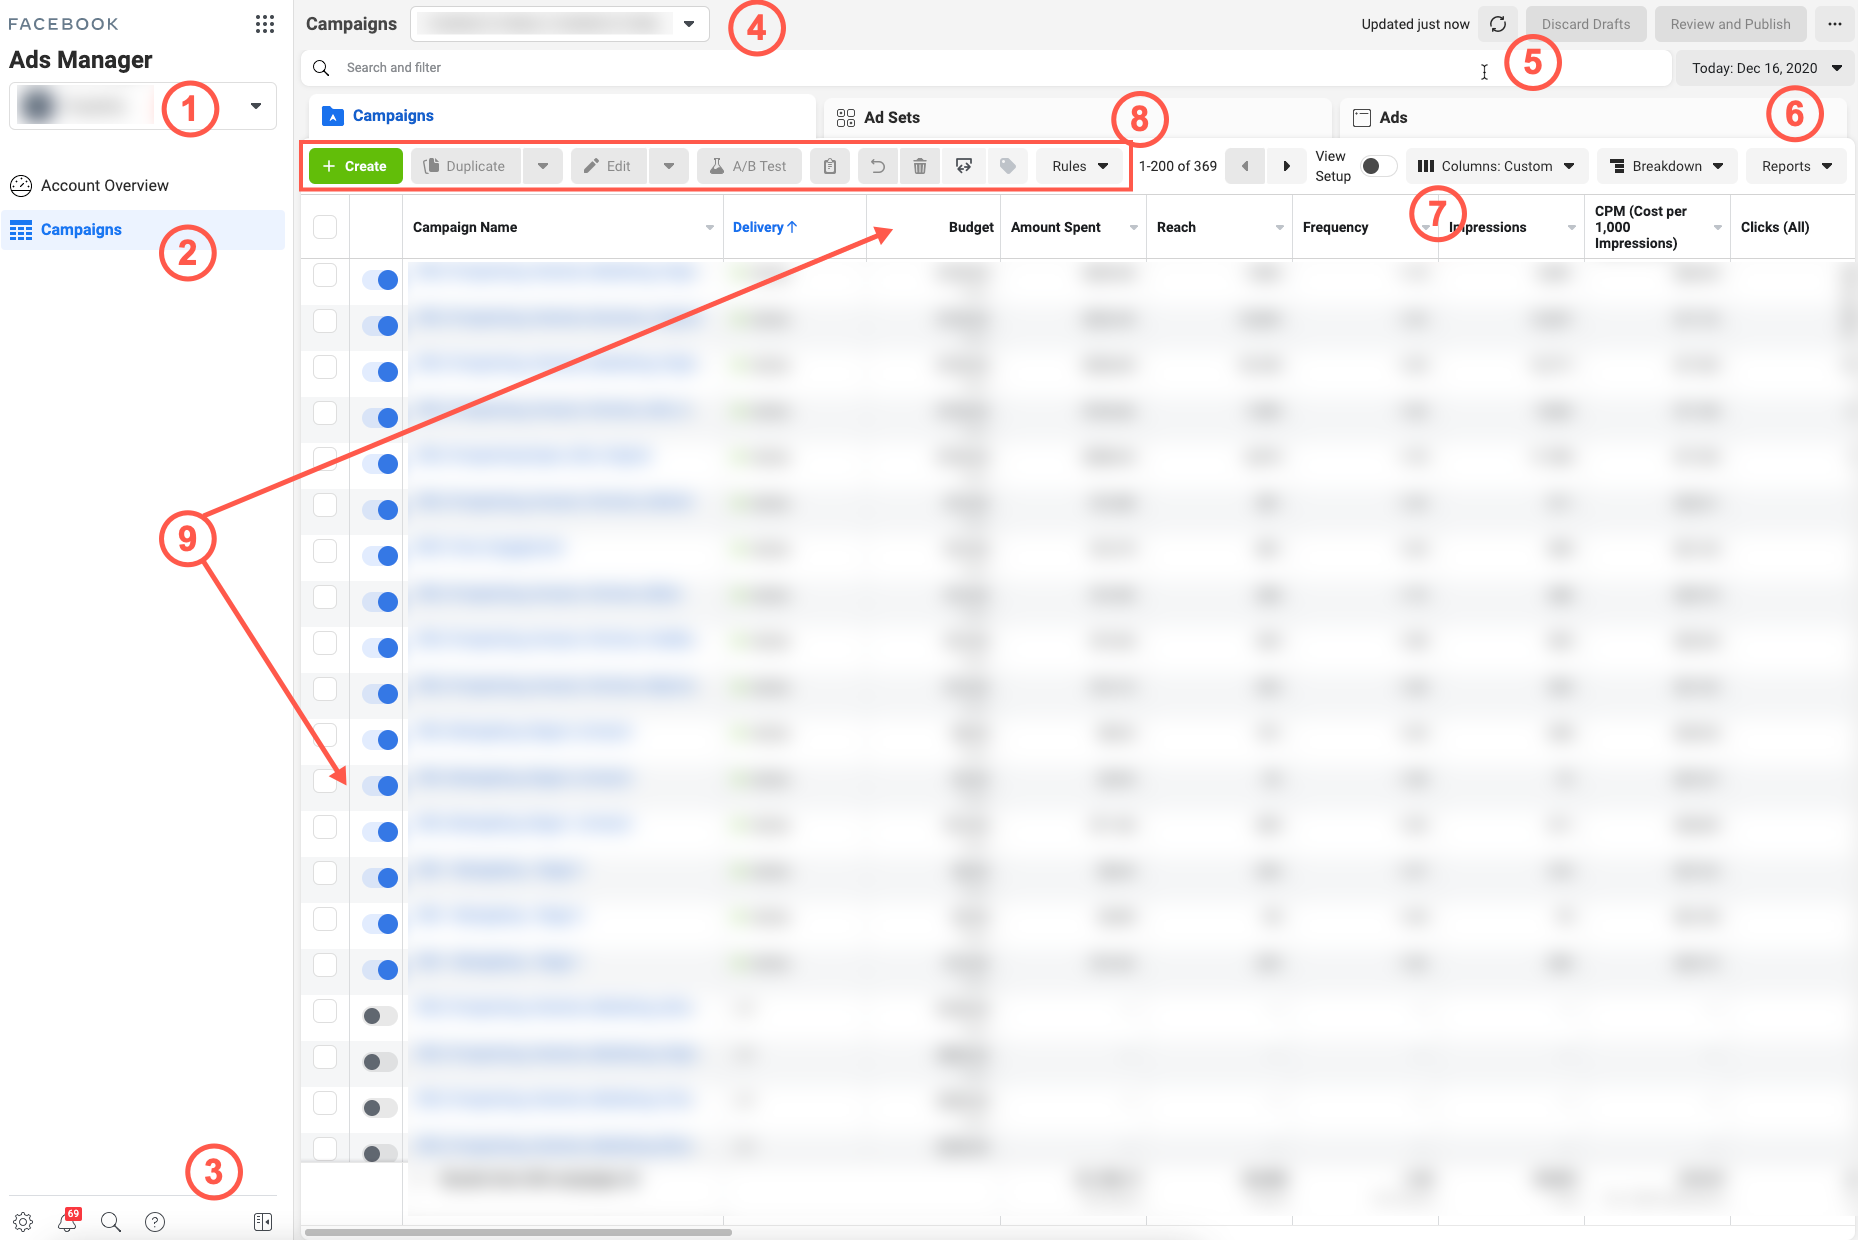
The 9 sections of the Facebook Ads Manager
1. The drop down at the top of the left nav under Ads Manager can be used to switch between different Business Manager Accounts
2. Just below the dropdown section you can access Account Overview. The account overview provides high level account insights and recommendations.
The Campaigns tab provides a list of all campaigns in your ad account. This is where you will be spending most of your time.
3. The footer menu at the bottom of the left side nav includes access the Facebook Business Manager, account notifications, search, help and the option to collapse the left side nav.
4. This drop down enables you to toggle between Facebook Ads Manager accounts that you own or have access to.
5. When you make changes or create new assets the Discard Drafts and Review and Publish buttons will activate.
The refresh icon to the left of these buttons refreshes your ads manager view to include the most recent data.
Tip:
If you are seeing weirdness in the ads manager you might want to reset the Facebook Ads Manager. Keep in mind that doing this will remove any customized settings such as custom columns (we will get to these later).

6. This is your date picker where you can also select comparison timeframes
7. The columns drop down allows you to access preset columns or create you custom column view. We will go over custom columns in detail below.
8. The toolbar gives you access to tools such as creating/deleting campaigns, assigning tags or assigning rules.
9. These are you primary ads manager columns and rows. These change depending on if you have the Campaign, Ad Set or Ad tabs active.
Accessing your Facebook Ads Manager columns
To access your columns go to Columns in the Facebook Ads Manager
Towards the bottom of the drop down select Customize Columns
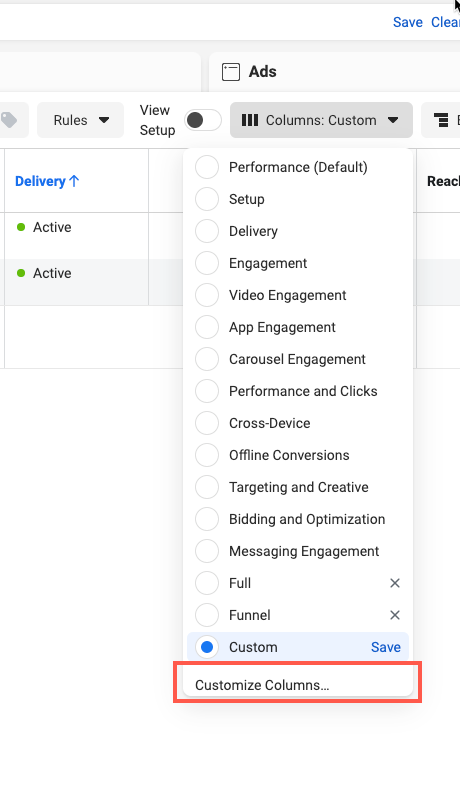
Once selected the Customize Columns window will display.
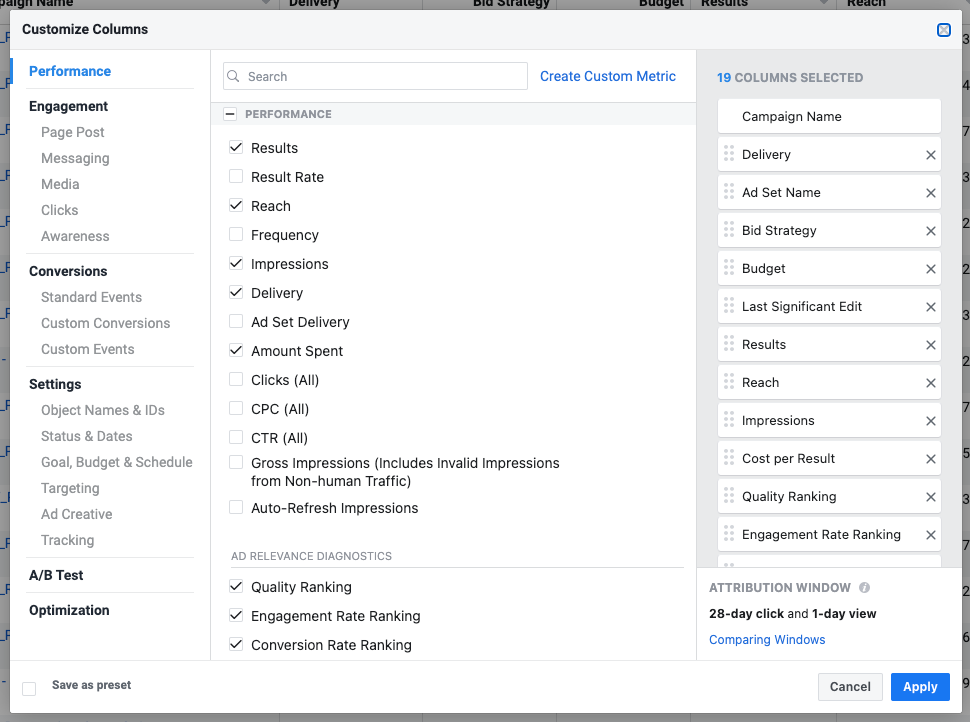
Here you can select and de-select what columns to display in your ads manager dashboard.
Customizing your Facebook Ads Manager columns
The preset columns that Facebook provides are somewhat limited and do not account for your specific business needs.
Organizing columns to reflect your Facebook sales or lead funnel is the best way to efficiently analyze performance in the ads manager.
Ecommerce Custom Column Set
For example, a custom column set for a typical Ecommerce funnel would include the following:
- Campaign Name – Only Displayed in the Ad Set and Ads tab
- Ad Set Name – Only Displayed in the Ads tab
- Budget
- Delivery
- Amount Spent
- Reach
- Frequency
- Impressions
- CPM
- Clicks (All)
- CTR (All)
- CPC (All)
- Link Clicks
- CTR (Link Click-Through Rate)
- CPC (Cost per Link Click)
- Unique Link Clicks
- Unique CTR ()Link Click-Through Rate)
- Cost Per Unique Link Click
- Landing Page View
- Cost Per Landing Page View
- Adds to Cart
- Cost per Adds to Cart
- Adds to Cart Conversion Value
- Purchases
- Cost per Purchases
- Purchase Conversion Value
- Purchase ROAS (Return on Ad Spend)
In addition, the following columns (which are only visible on the ad level) provide insights into how Facebook recognizes the quality of your ads.
Higher quality ads = lower advertisement costs.
- Conversion Rate Ranking
- Engagement Rate Ranking
- Quality Ranking
Now that we have a default custom column set for the Facebook Ads Manager let’s take a look at creating custom metrics.
Creating custom metrics
Facebook also has the option to create custom metrics.
Notice that by default Facebook does not provide conversion rate metrics as a column option.
So, to add these let’s go ahead and create custom conversion rate metrics.
To get started with custom metrics click on Create Custom Metric
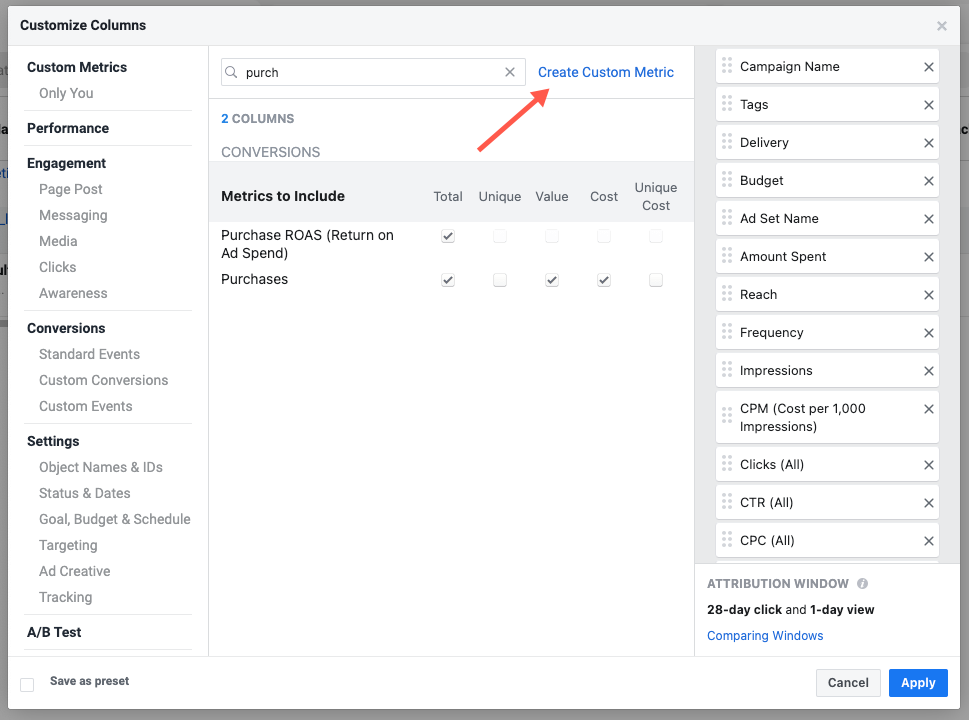
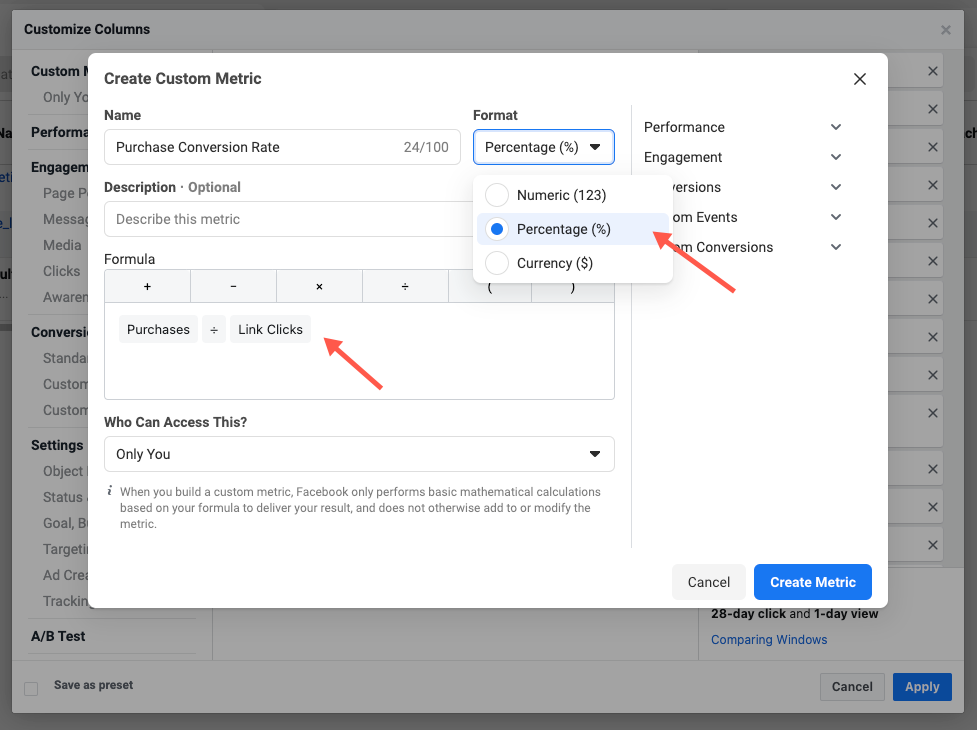
Enter the name of your metric.
In this case we are creating a Purchase Conversion Rate Metric.
Next, enter the formula and define the Format. For conversion rate we will want to use Percentage.
In addition, you can set access to the custom metric under Who Can Access This? You can either make the metric available to yourself or allow access to anyone in this business.
Then click Create Metric.
Customizing your Facebook Ads Manager comparison windows
On the bottom right if the Customize Column pop up you have a section called Comparison Windows.
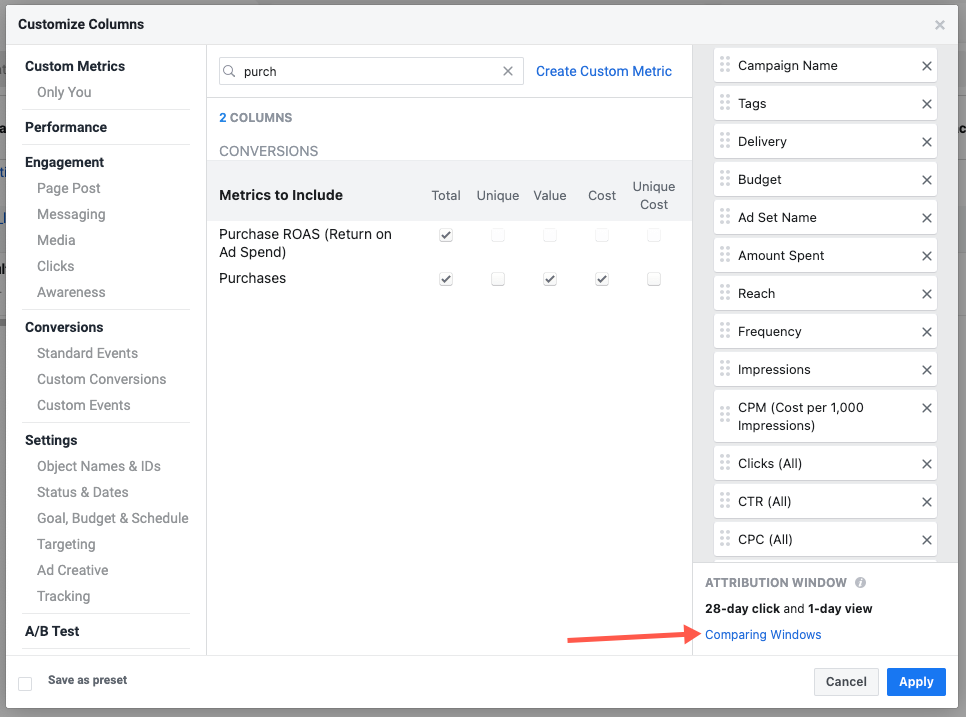
When selected you can define if you want to view performance in the default attribution window or use you own custom one. For example, you could select multiple attribution windows to compare performance.
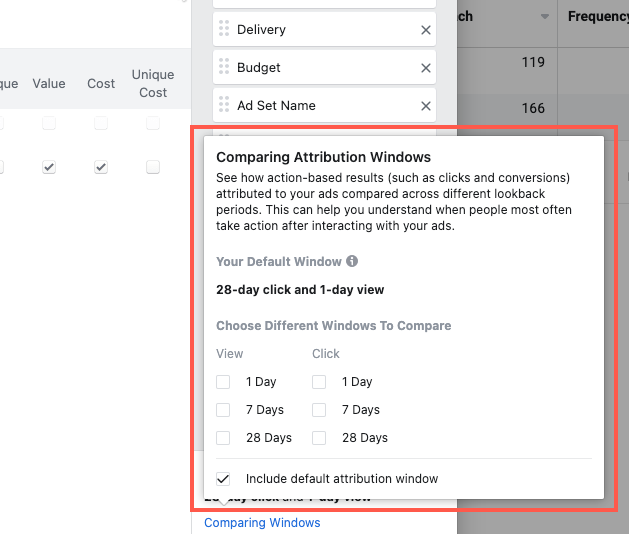
Once you adjusted the settings and selected the columns to display click Apply.
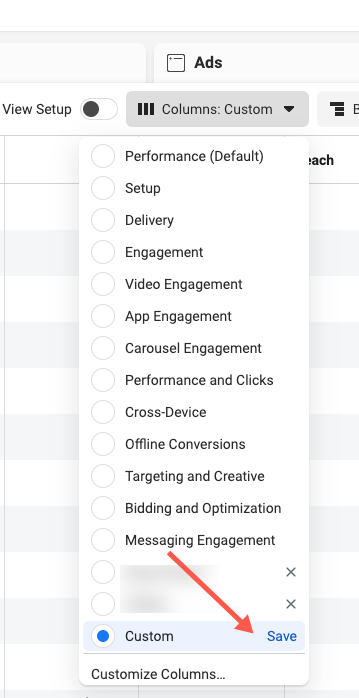
As soon as you are back in the Facebook Ads Manager make sure to click Save next to Custom so that you can access this column set in the future.
Note: Since the iOS 14 Privacy update Facebook transitioned to an aggregated event measurement model and removed conversion reporting for breakdowns. Learn how you can build a Facebook Ads Dashboard for E-commerce in Google Analytics where you can measure CPA and ROAS on the breakdown level.
The power of Audience Insights
Facebook’s granular audience building capability is a powerful feature that enables you to deliver ad personalization at scale.
To get started click on the Business Tool icon in the Facebook Ads Manager and scroll down Analyze and Report > Audience Insights
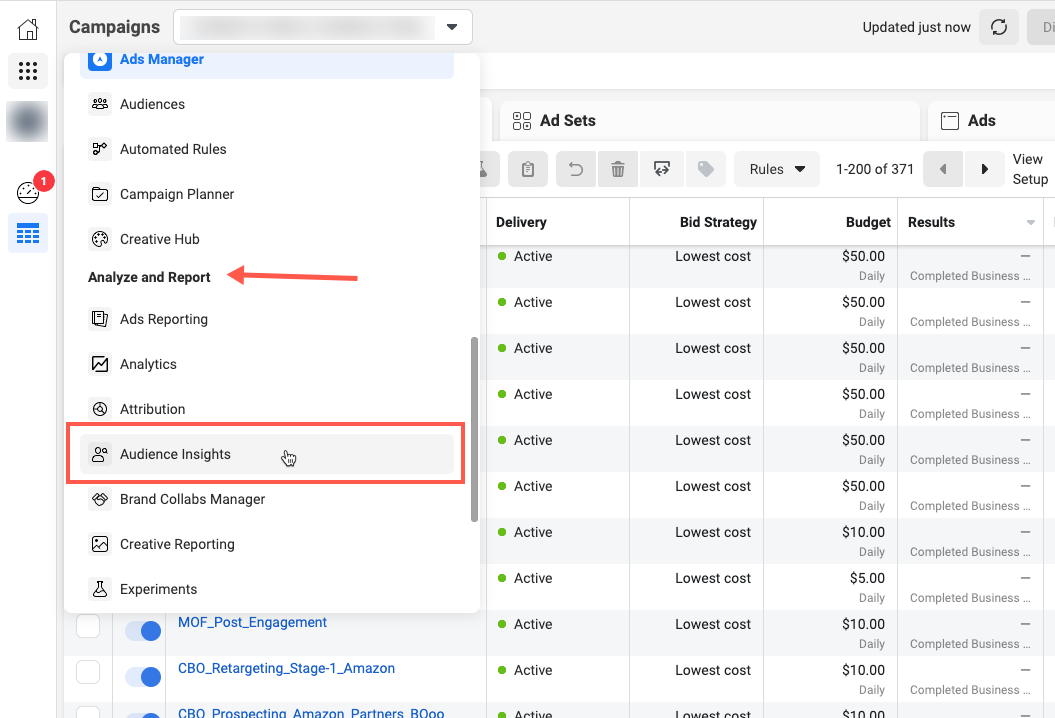
Next choose an audience you want to start with. You have two choices; Everyone on Facebook or specific People connected to your Page.
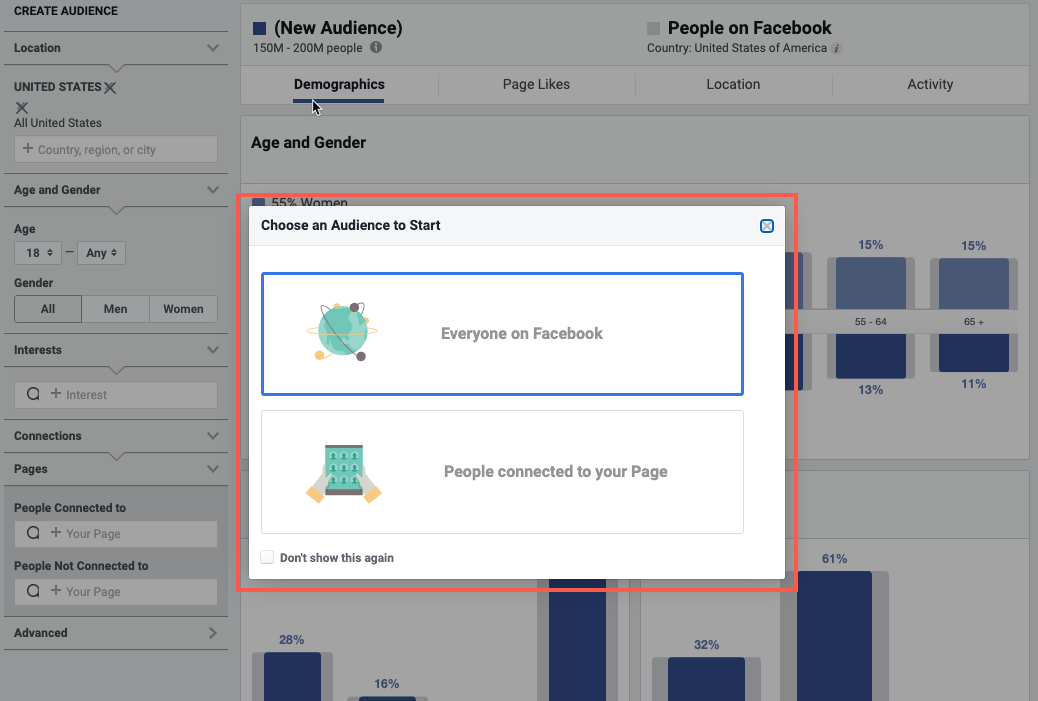
Once you choose an audience to start you will be taken to the audience insights dashboard.
In the left sidebar you can define broader audience parameters such as country, connections, and interest for your audience.
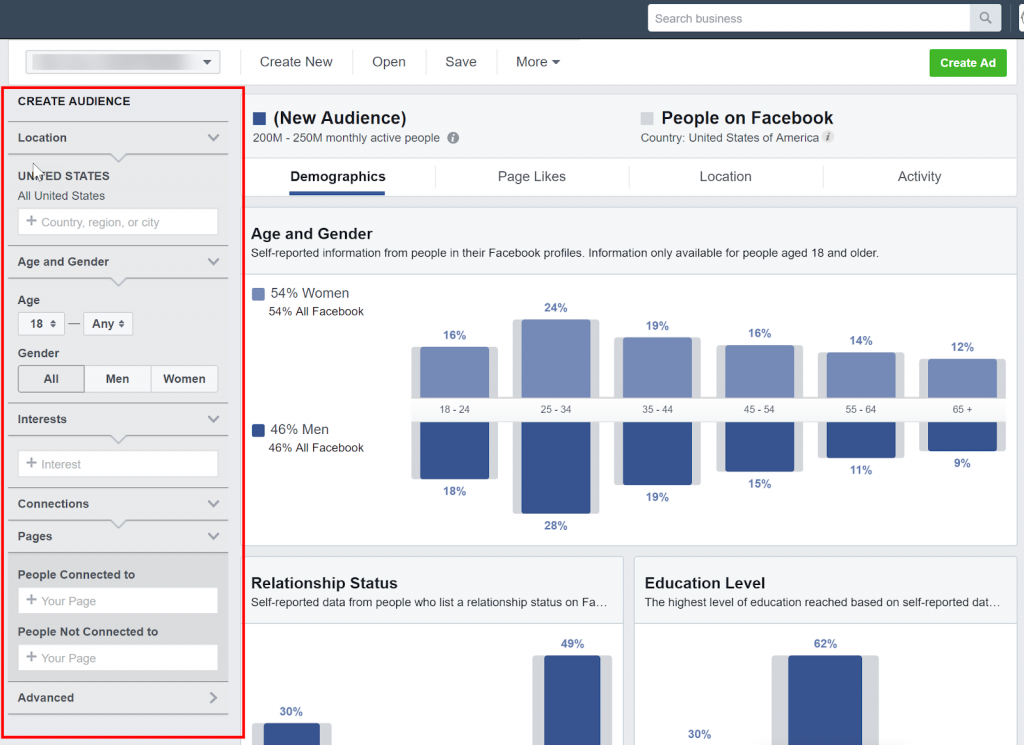
After theses parameter have been set, you can learn more about your target audience.
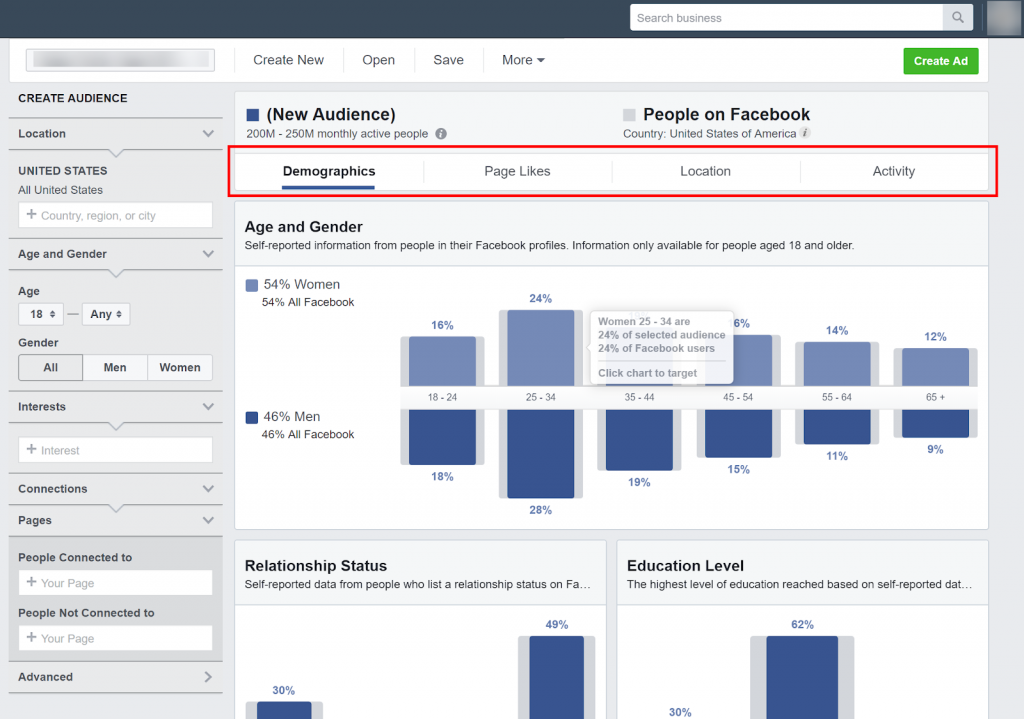
To learn more simply navigate the Demographics, Page Likes, Location or Activity tabs.
Using this information you can create sub-segments and fine tune your target audiences.
Pro Tip:
Leverage Facebook’s Audience insights to find interests and categories closely linked to your core target audience. Doing this enables you to expand past potentially narrow interest targets into other, seemingly not related, interconnected affinity interests.
Let’s use an example and say you want to target people that shop at Foot Locker.
1. In the left side bar search for Foot Locker and add it to Interests
2. Next, go to the Page Likes tab
3. The Top Categories table will show you a list of categories. For example, people that like Foot Locker are also interested in the Radio Station Breakfast Club.
4. The Page Likes table will list other pages this audience has an affinity to interact with
For example, people that like Foot Locker also have an affinity to like East Bay, kind of obvious.
However have you considered targeting people that like the sports show host Stephen A. Smith.
Take this a step further and create personalized ads that make a reference (direct or indirect) to Stephen A. Smith.
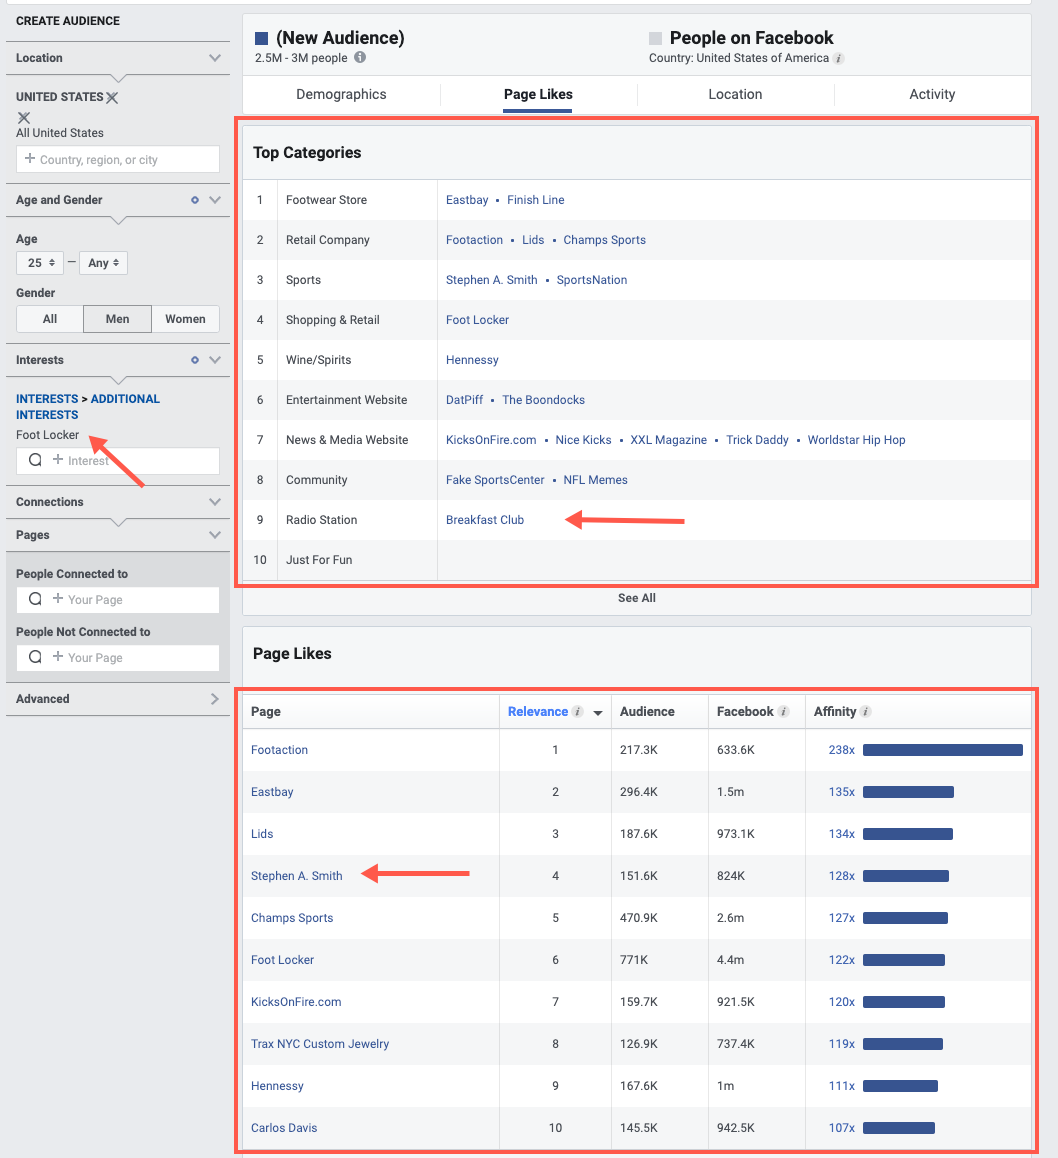
Note: Facebook defines relevance as: “The Pages that are most likely to be relevant to your audience based on affinity, Page size and the number of people in your audience who already like that Page.”
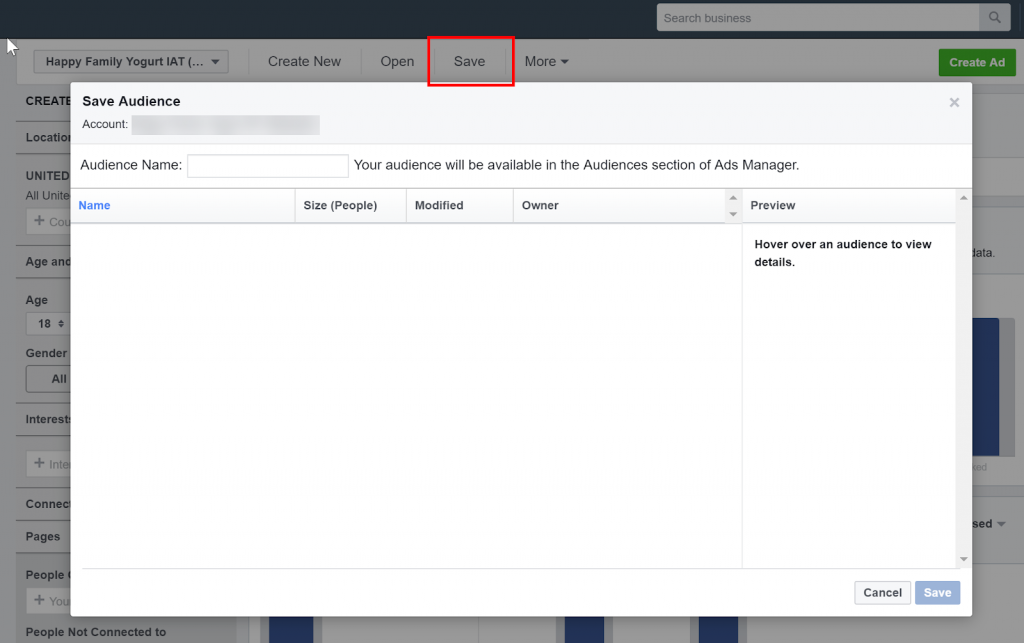
Once you are done building your audience save it directly into the Audience Section of the Facebook Ads Manager.
Building & Managing Facebook Audiences
The Facebook Audience Section is where you can build, manage, edit and access all of your saved audiences.
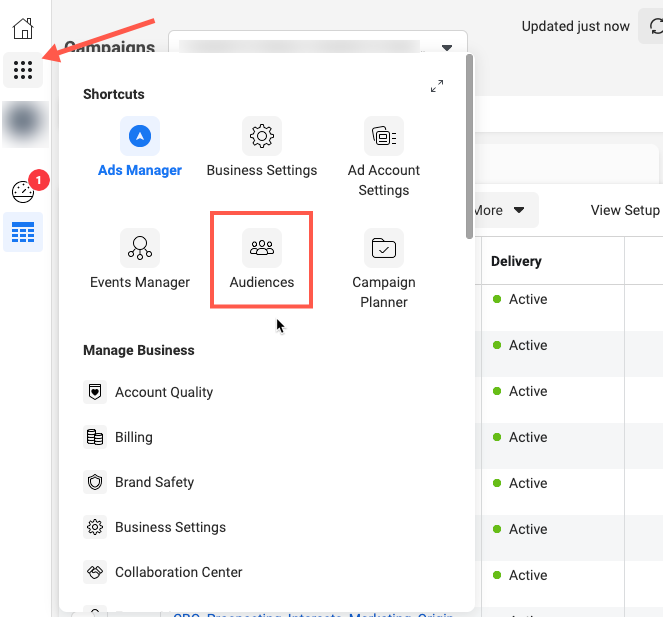
First, to access audiences click on the fly out menu in the left nav and select Audiences
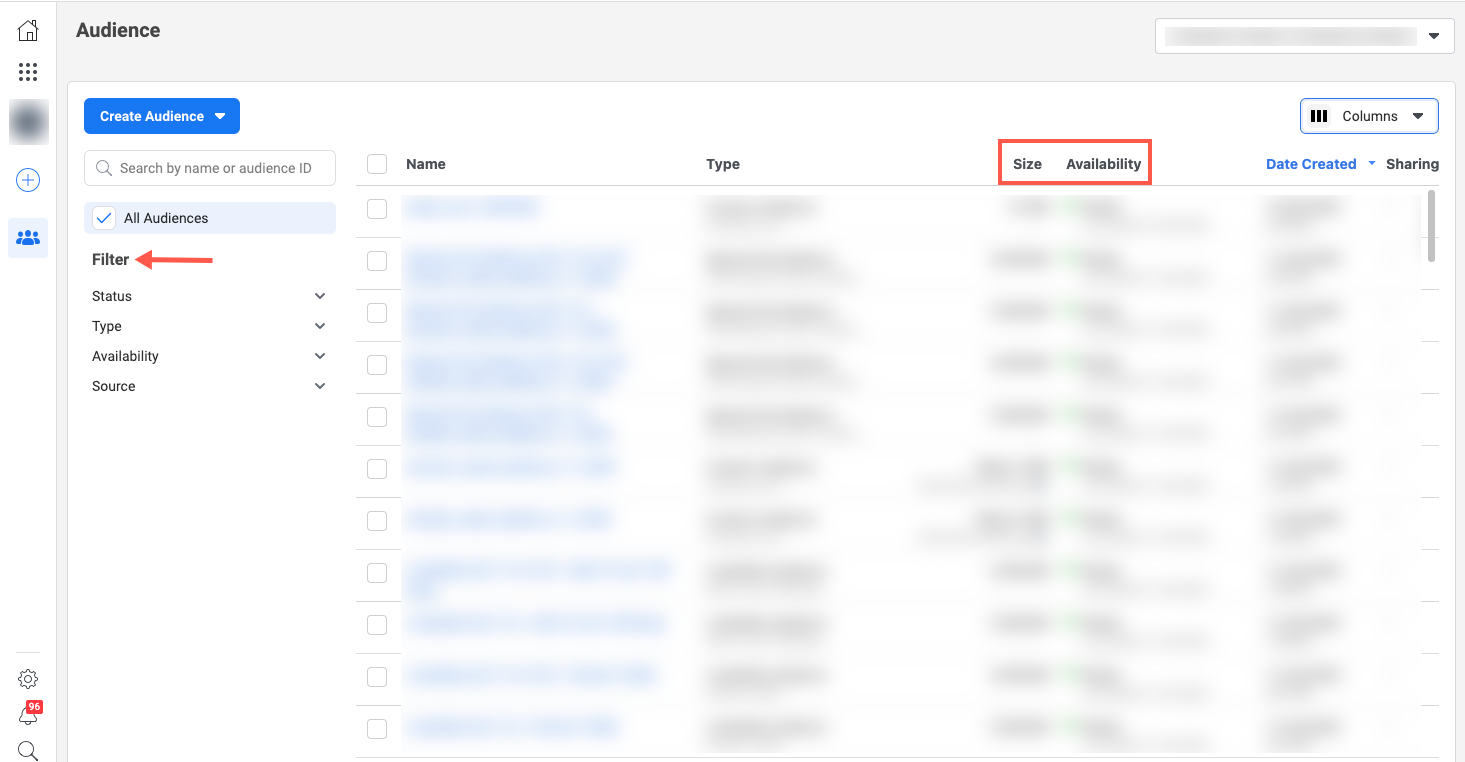
Now, you will see a list of all your audiences in a table, view including their their size and availably.
If you have a large number of audiences the filter on the left enables you to drill down by Status, Type, Availability and Source.
Next, click on Create Audience. The dropdown will give you the option to create four audience types.
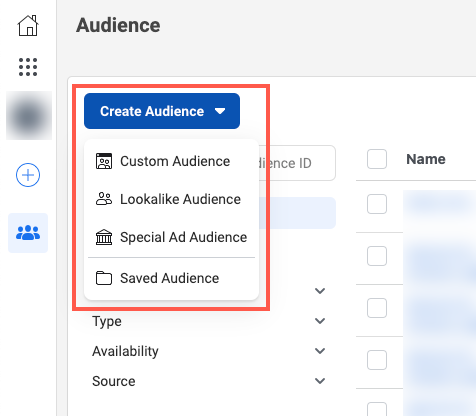
The four primary audience types are:
Custom Audience
Looaklike Audience
Saved Audience
Special Ad Audience
Let’s take a closer look at each one of these.
Custom Audiences
With custom audiences you can define an audiences based on interactions people have taken with your business in different ways.
You can upload owned customer data, for example customer emails (sensitive data is hashed on upload), build an audience segmenting website/app traffic, or target people that have interacted with your business through an offline activity.
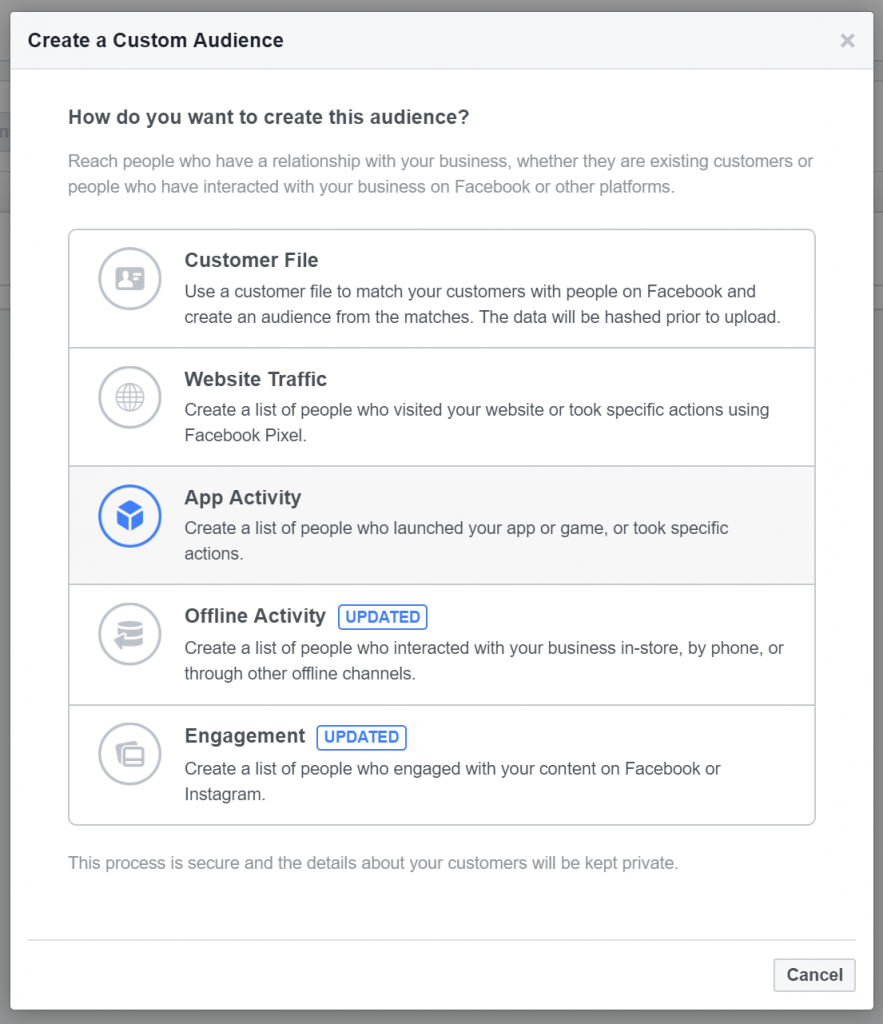
In addition, under Engagements, there are a plethora of options to build audiences.
Here you can define people that have interacted with your Facebook or Instagram page, spent time watching your video(s), or interacted with your ads.
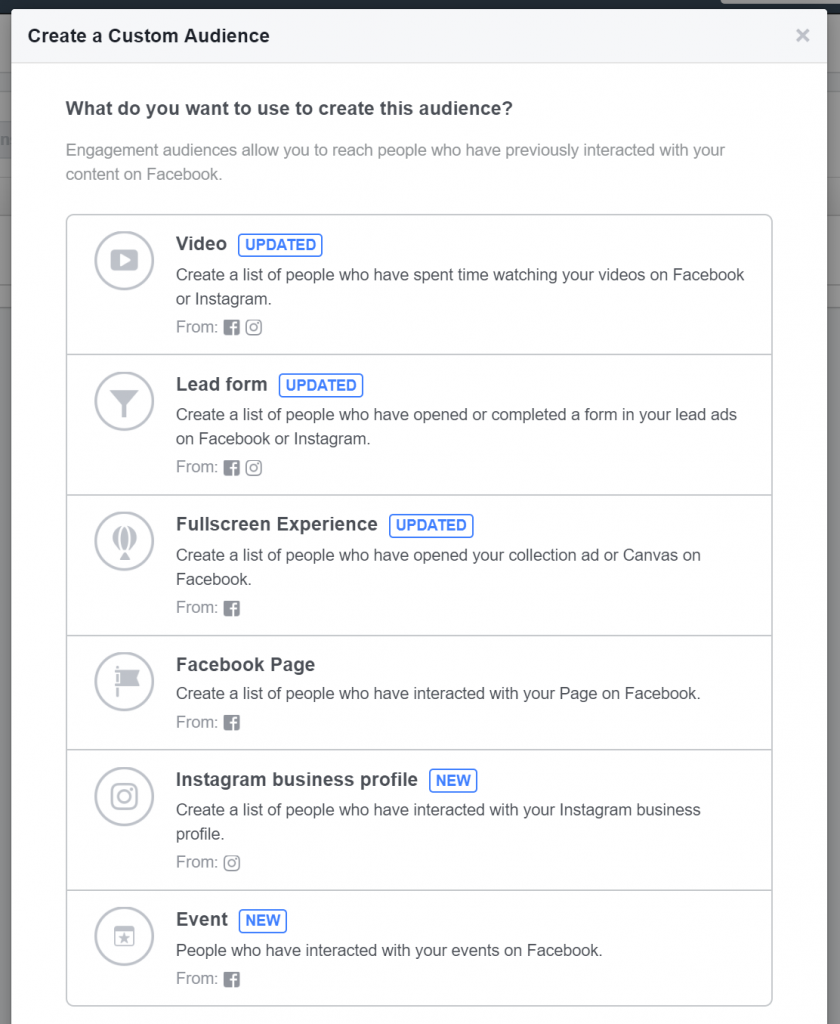
These are powerful ways to not only re-engage users but also to build seed audiences for lookalike targets.
Lookalikes
As the name implies you can build lookalike audiences off of your source data. Your source data consists of custom conversions or page data.
When you build a Lookalike Audience you first define the country then the audience size.
Available sizes range from 1% – 10% with 1% being the closest match to your source data.
Obviously the closer the match range the higher the quality of your Lookalike. Which is why a LAL of 1% – 2% is often used.
However, Lookalikes can work well for audience expansion. Building out and testing LAL audiences ranging from 1% – 10% is a great way to figure out how much you can maximize your qualified reach before you see a reduction in performance.

Saved Audiences
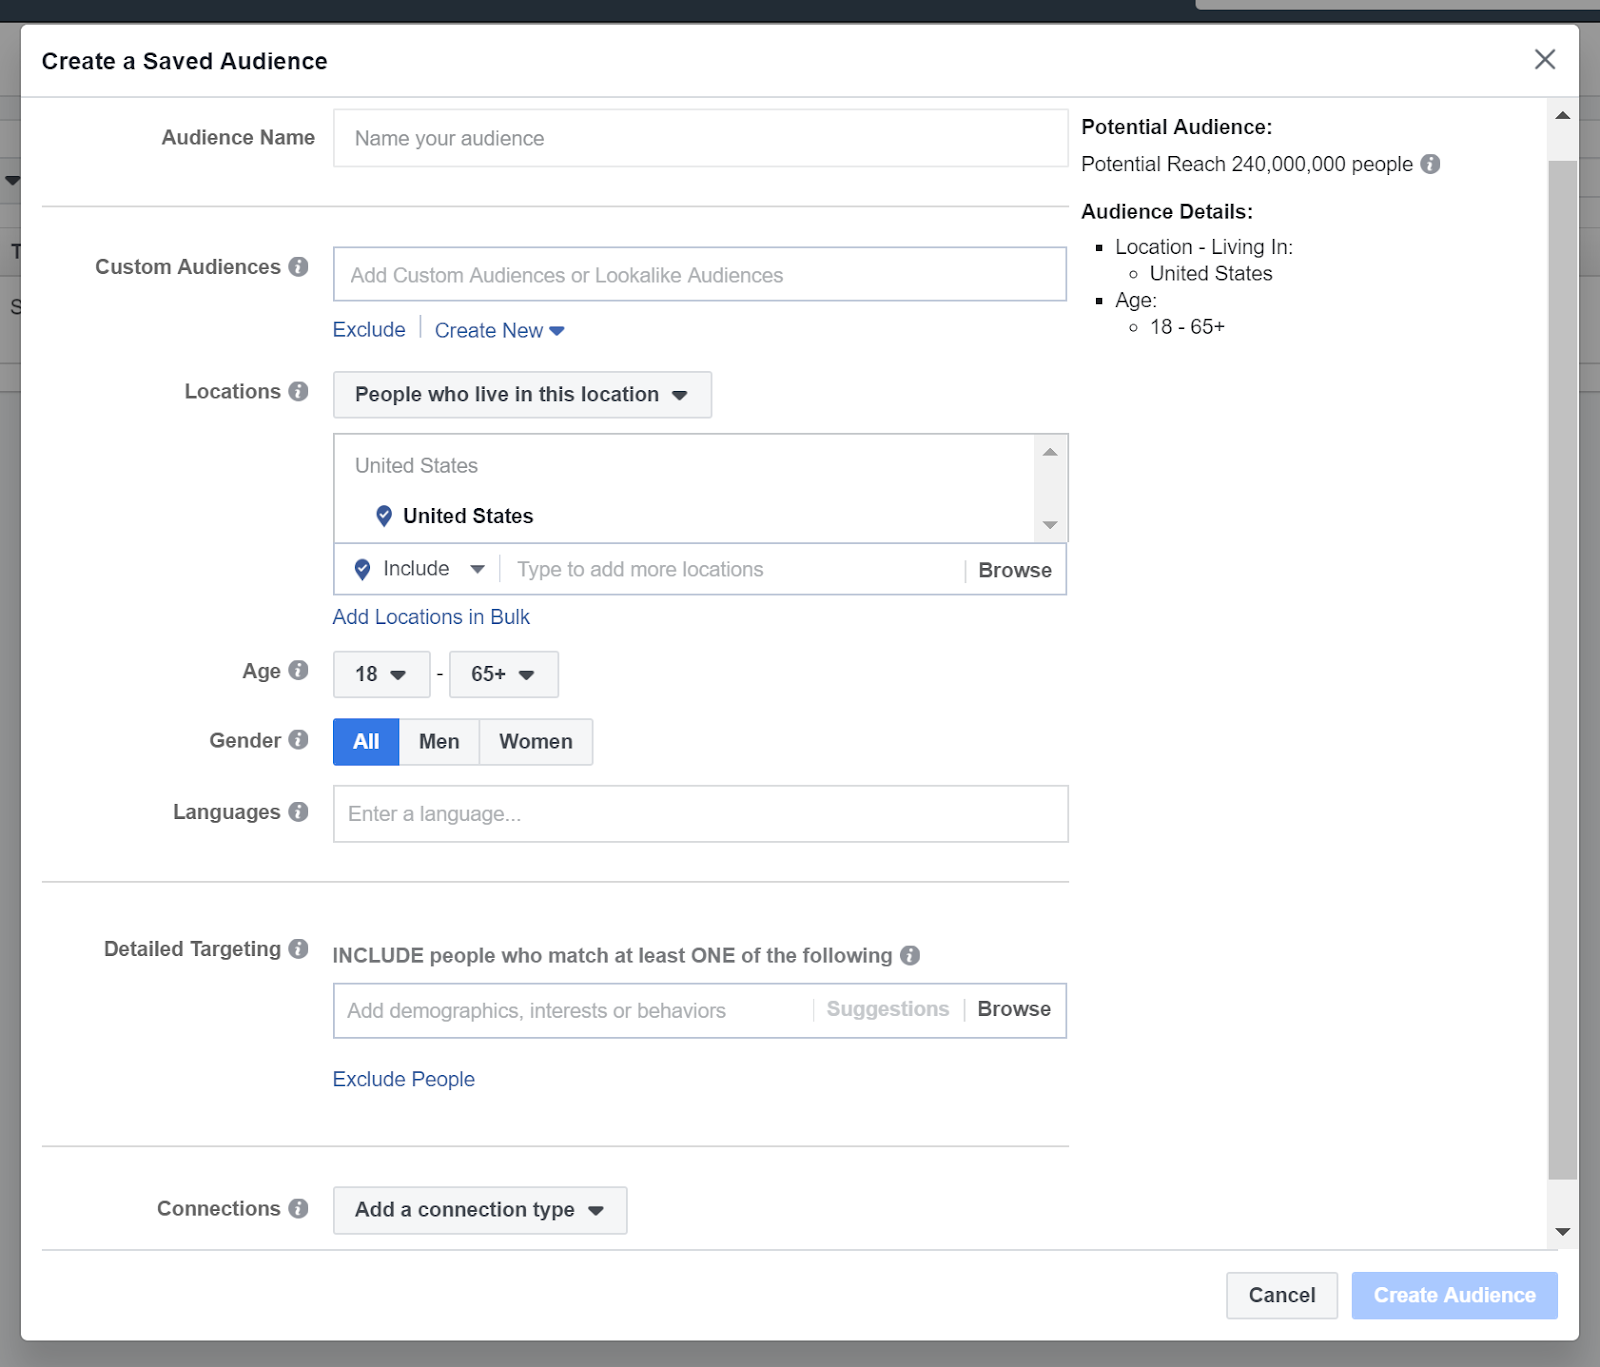
Saved audiences are built in a similar way to how we created an audience using Audience Insights above.
You can assign multiple audience criteria including custom conversions, page connections, locations, gender, age, language, and interests.
By layering your audience and defining exclusions/inclusions you can build refined audiences to target and personalize ads.
Special Ad Audiences
Special Ad Audiences work the same way as Lookalike audiences above.
The only difference is that these audiences will only available for ads in a Special Ad Category and any audience information that doesn’t comply with the special categories of credit, employment, or housing will not be used.
Better media planning with the Campaign Planner
The campaign planner is a great tool for media buyers. Especially when working with bigger brands/budgets or awareness campaigns.
With the campaign planner you can estimate and compare the impact of your media budget against targeted audience segments.
The results are not deterministic since, as you well know media buying is never that straightforward. However the results do provide directional insights that can help frame a narrative for your media plan.
Creating your first campaign plan in the Facebook Ads Manager
To get started click on the fly out menu in the left nav bar and scroll down to Advertise > Campaign Planner
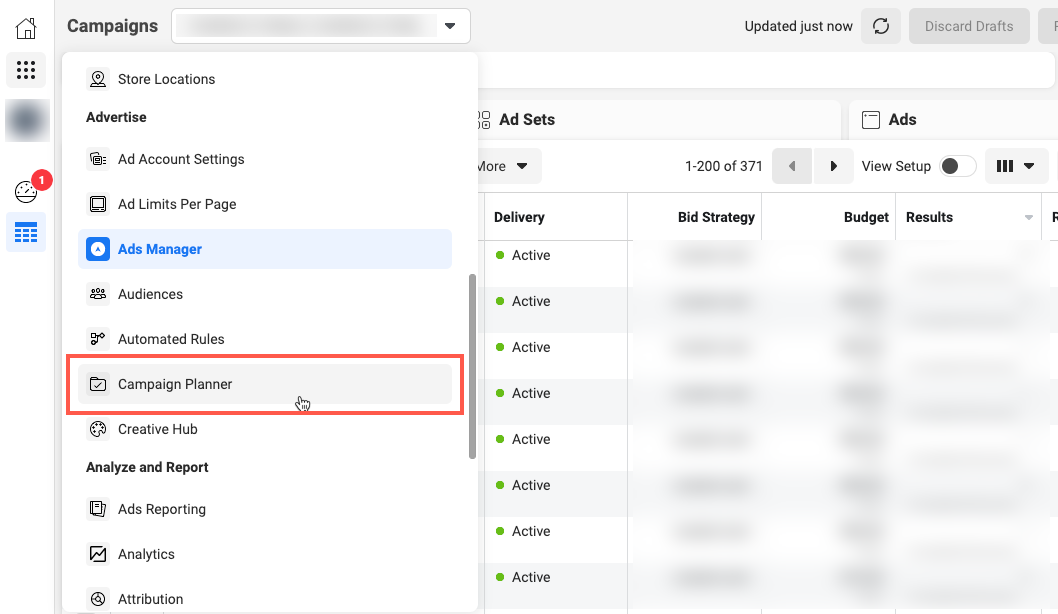
Next click on Create Plan
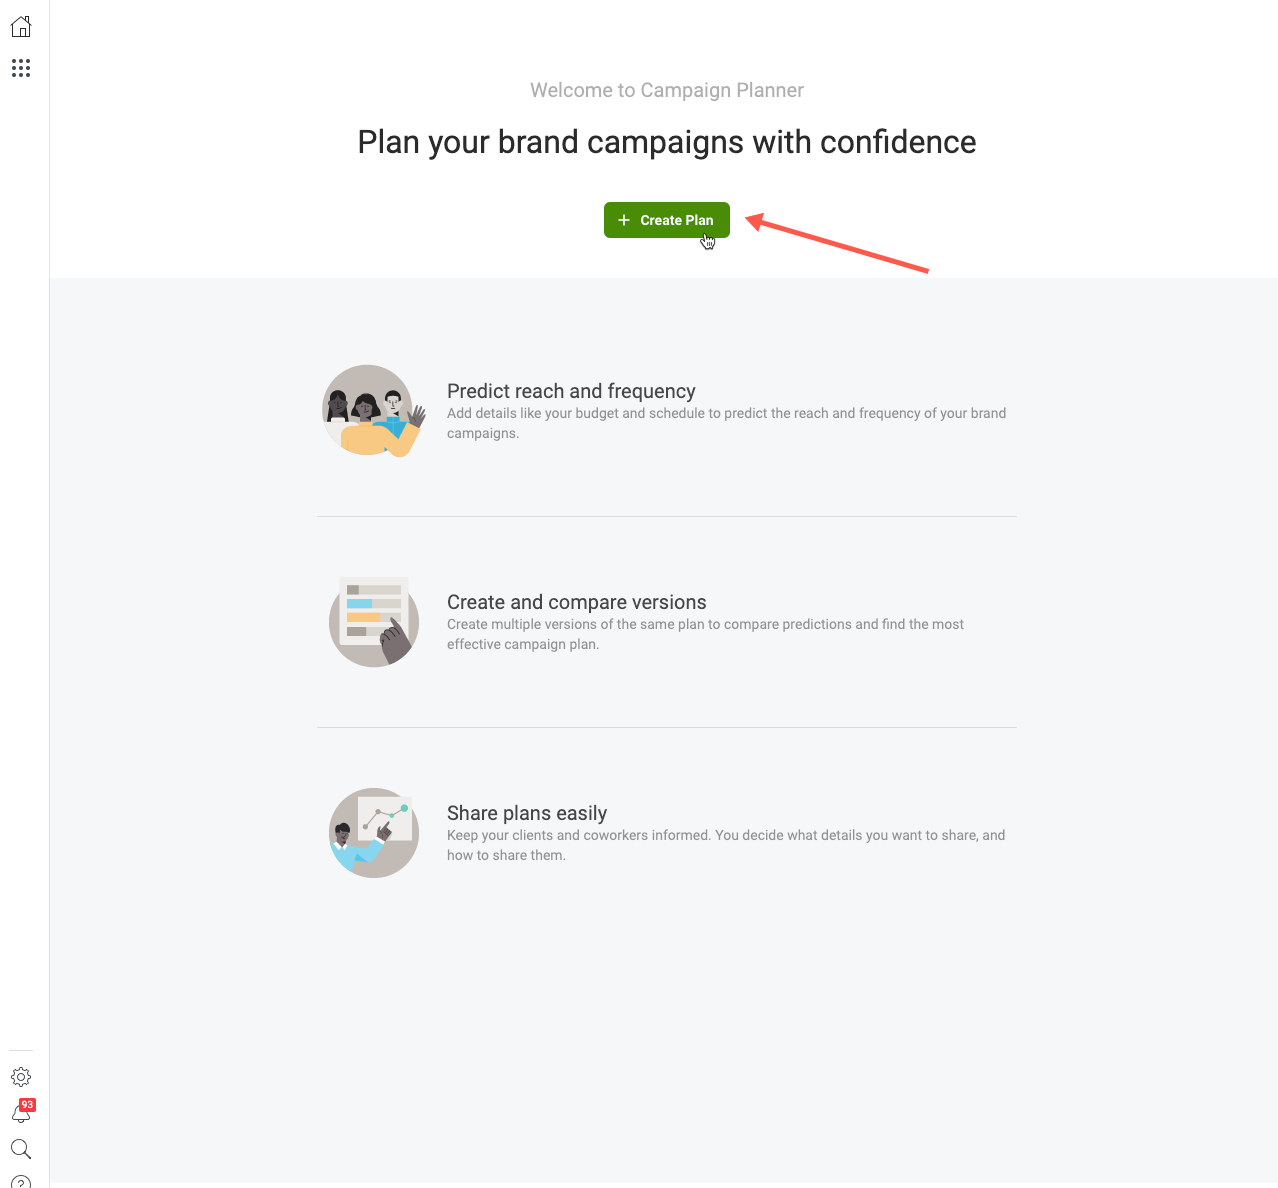
You will now be taken through the steps of creating a plan.
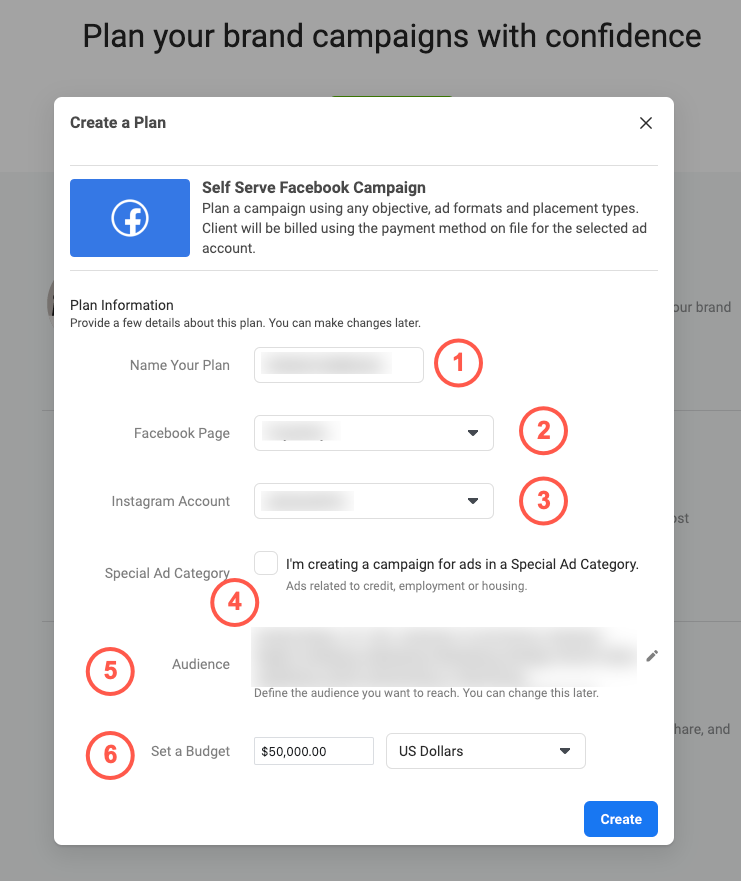
1. Give your plan a name
2. Assign your Facebook Page for this plan
3. Assign your Instagram Account for this plan
4. Check the box if you are running ads that fall under employment, credit or housing.
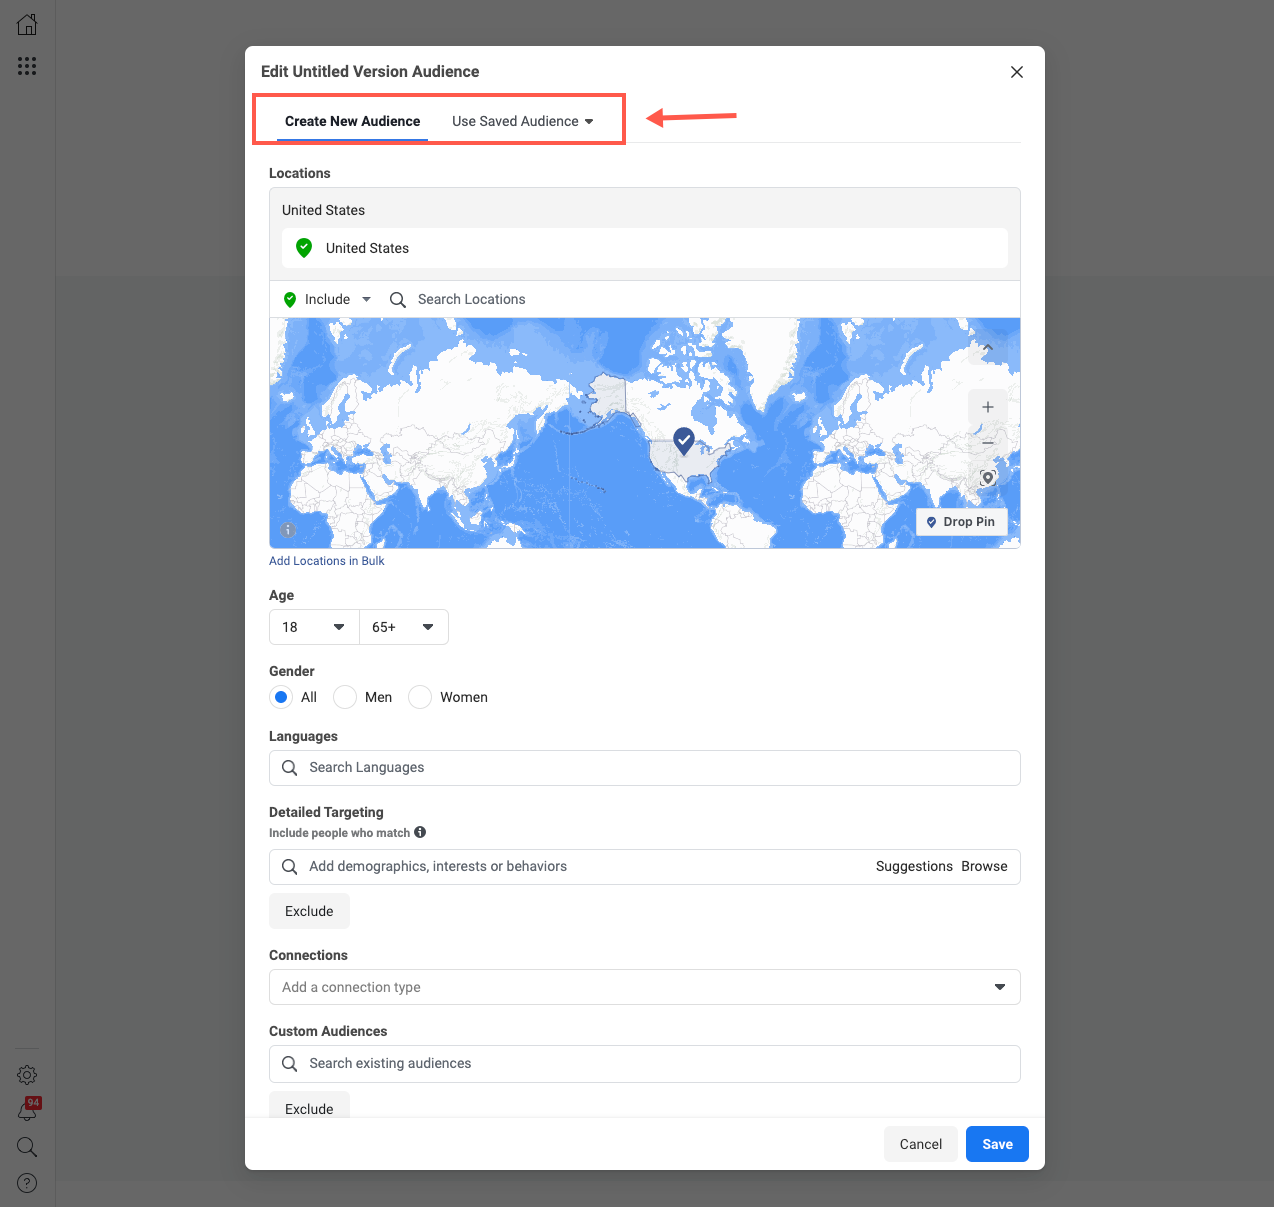
5. Select you audience. You can click on the pencil to either create an audience or select a saved audience.
6. Set a budget and click Create
With the plan created let’s refine our first version.
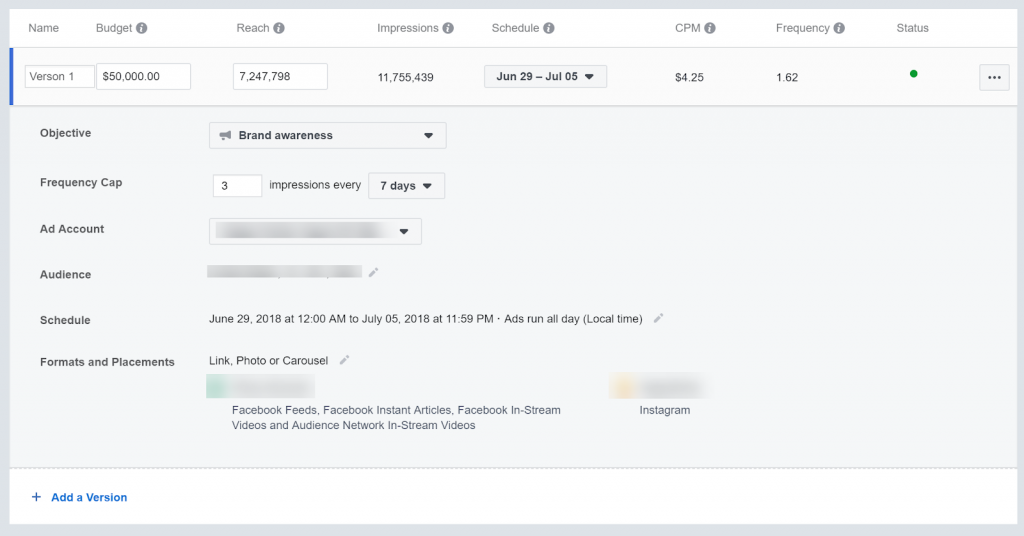
For now we can call this Version 1 and leave our budget as is.
For this example, the budget will be our fixed variable.
Next, you will want to set your flight Schedule in the top bar. These dates define our campaign flight dates.
Now let’s go over the specific settings for this version:
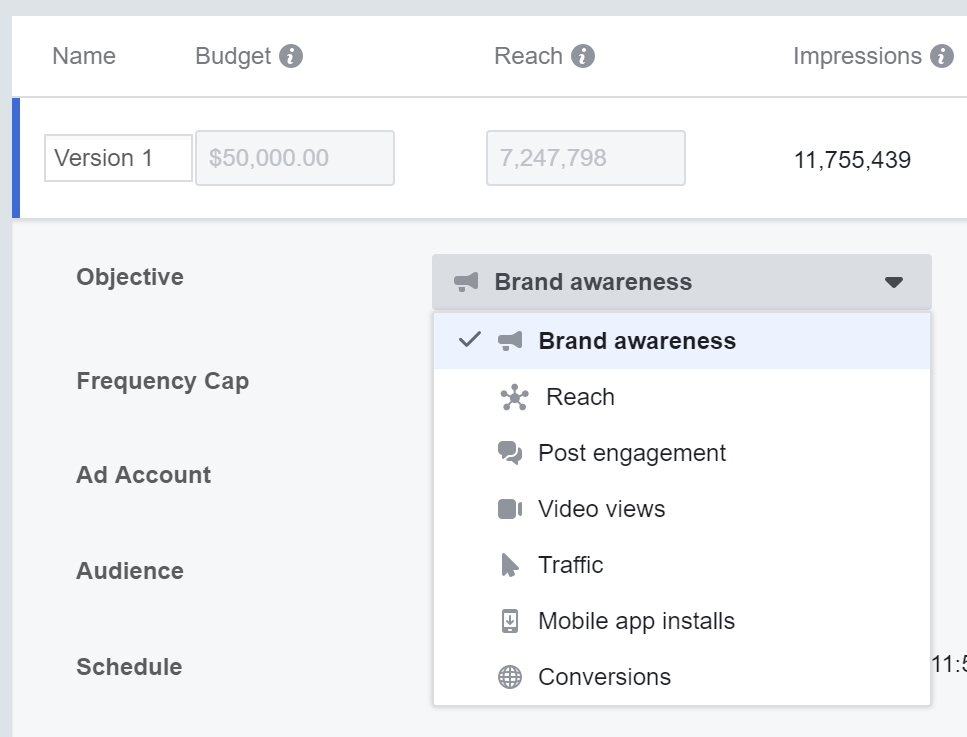
Objective
Under objective, define what campaign objective to focus on .
In this case we are going to select Brand Awareness which focuses on reaching as much of our target audience given our fixed variable. In this case our fixed variable is the budget.
However, you can also make projections for other campaign objectives to fit your media planning needs.
Frequency Cap
For this awareness campaigns, the target is to reach users a minimum of 3 times in a 7-day window. You can adjust this as needed.
Ad Account
Select your Ad Account
Audience
Select an existing or build a new audience.
Schedule
Define your ad schedule (read; day-parting). For example, if you are marketing in the B2B space, you can decide to only run this campaign Monday through Friday.
Format and Placements
If you don’t run campaigns on automatic placements select your ad and ad set placement setting to match your campaign ad and ad set settings.
Comparing budgets using the Campaign Planner
Once you are satisfied with all of your settings duplicate the version created. Then you can use it as a base to work off for version 2.
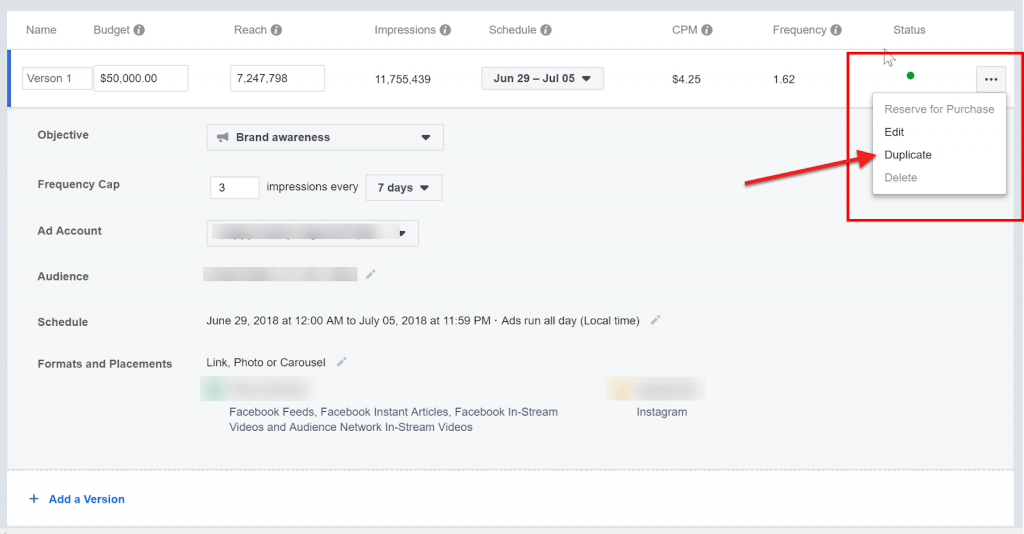
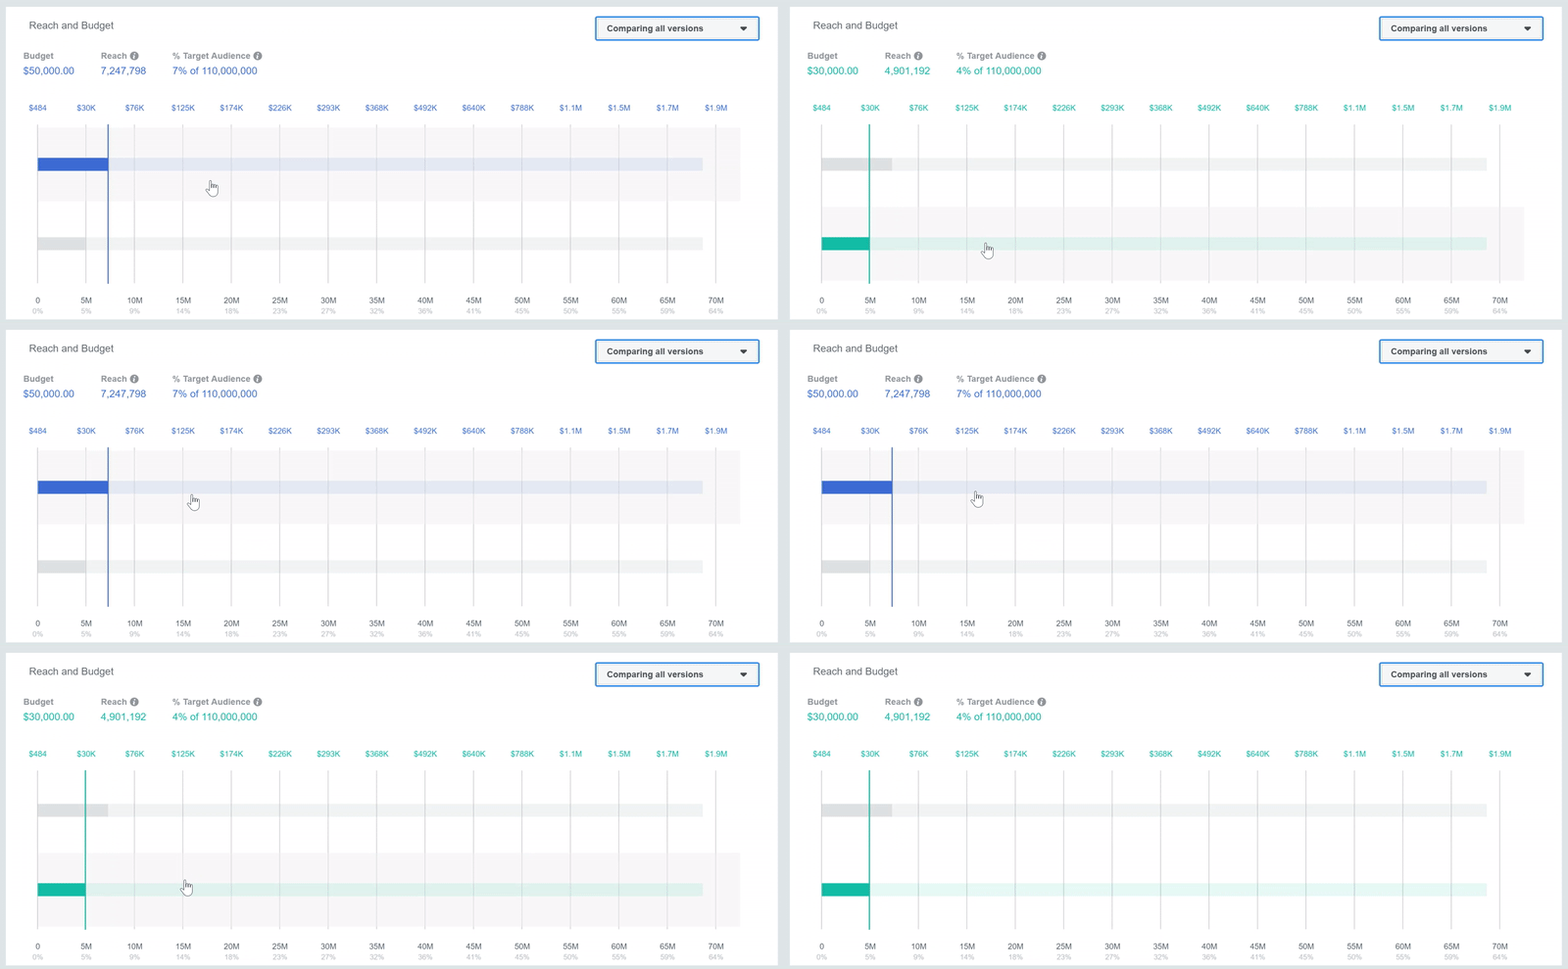
Let’s change the budget in version 2 to $30,000 so that we can compare reach against the $50,000 budget.
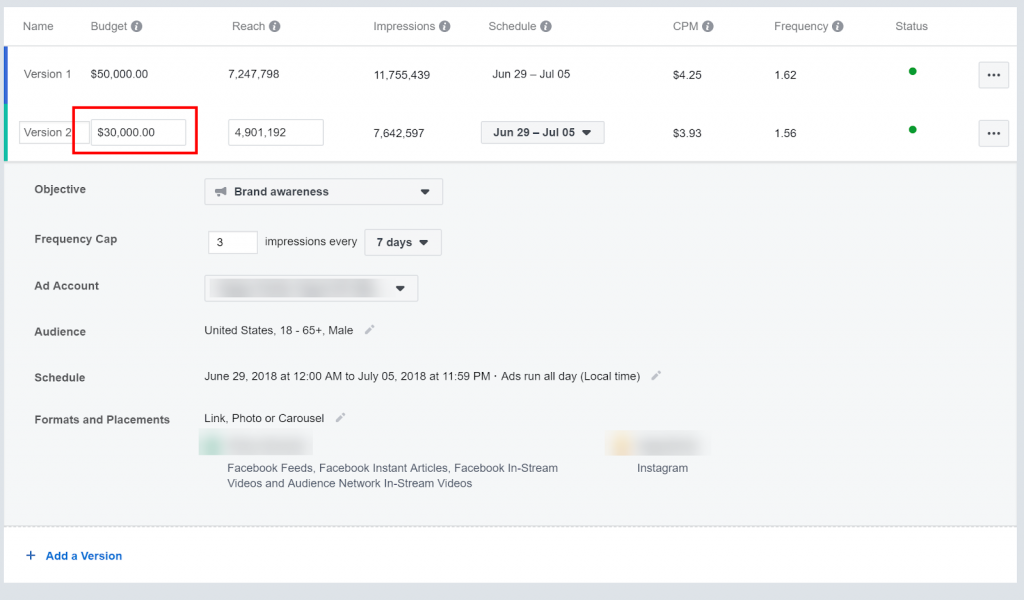
Now that we have two versions defined (Facebook let’s you create up to 10 different versions) we can reference the Reach & Budget graph and set it to compare Version 1 to Version 2.
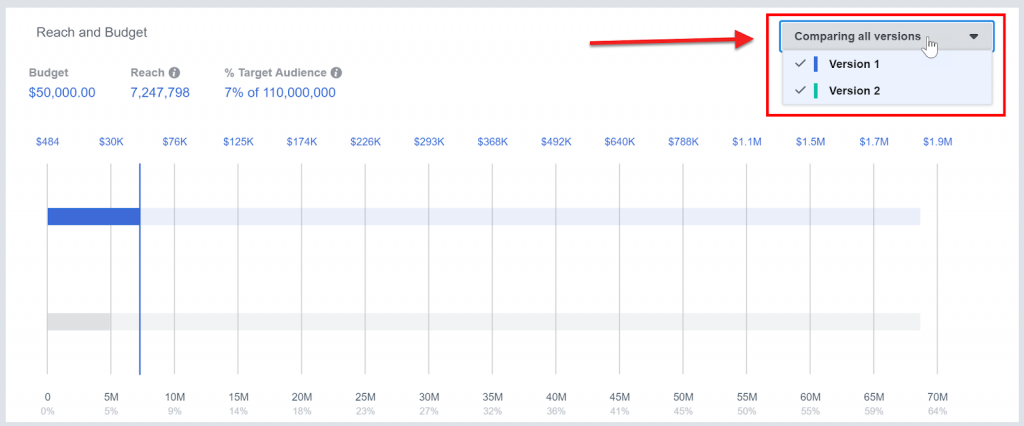
The results will look something like this:
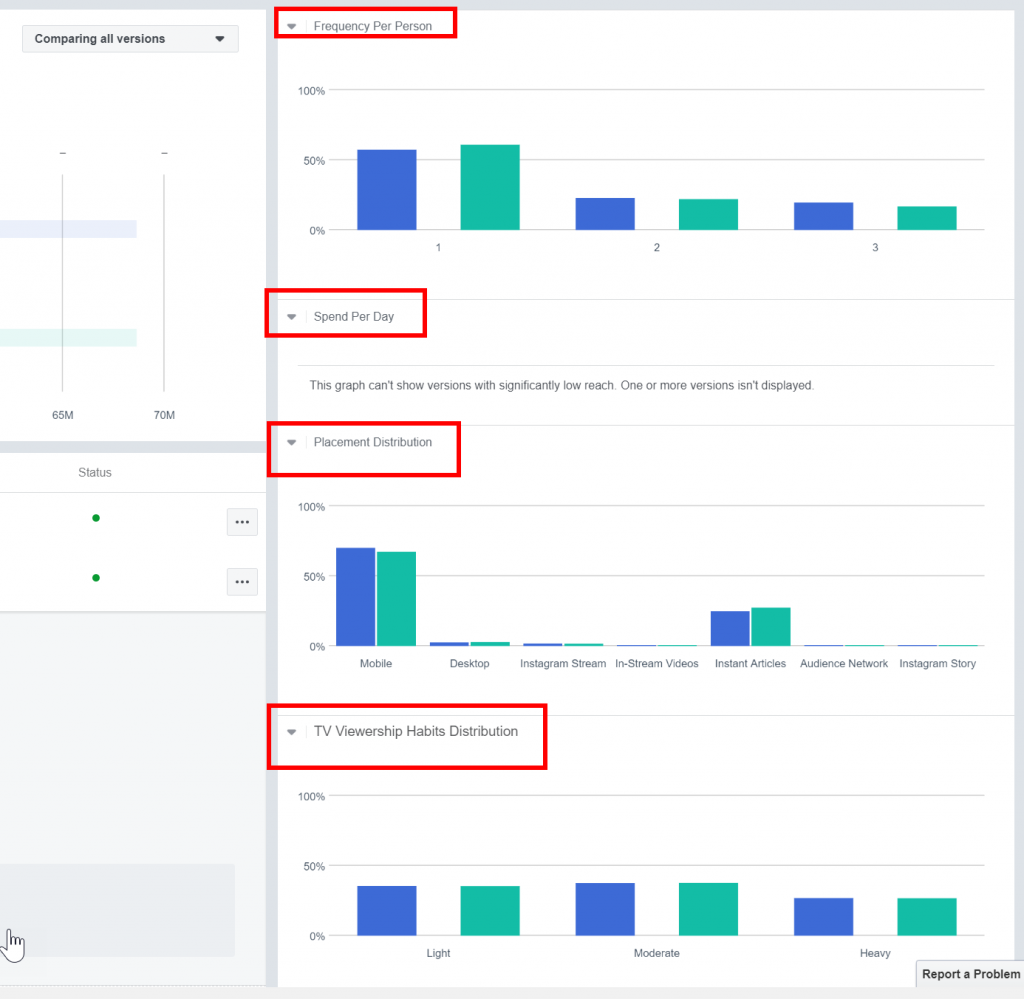
In addition, you can get insights into Frequency Per Person, Spend Per Day, Placement Distribution and TV Viewership Habits in the charts on the right.
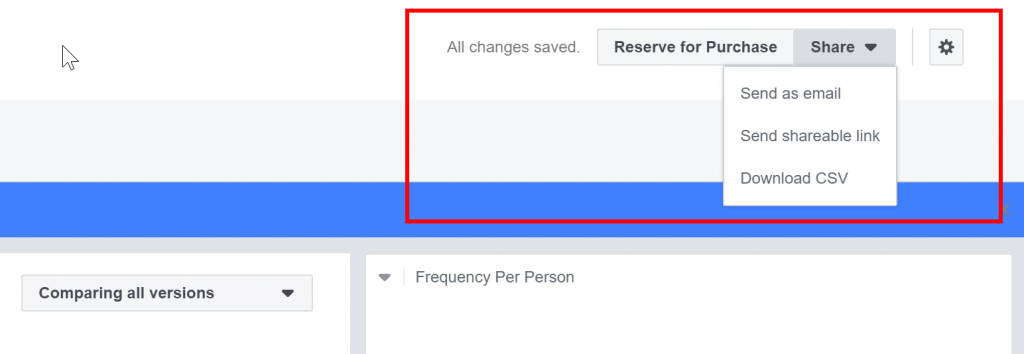
Once satisfied, you can Reserve for Purchase or share the plan via email, link or download a CSV.
In conclusion, even if you do not reserve and buy using the Facebook Ads Manager campaign planner it is still a great tool for planning media buys.
Retaining social proof via Page Posts in the Ads Manager
To locate the Page Posts section:
Go to the fly out menu on the left side nav of the Ads Manager and scroll down to Engaged Customers > Page Posts
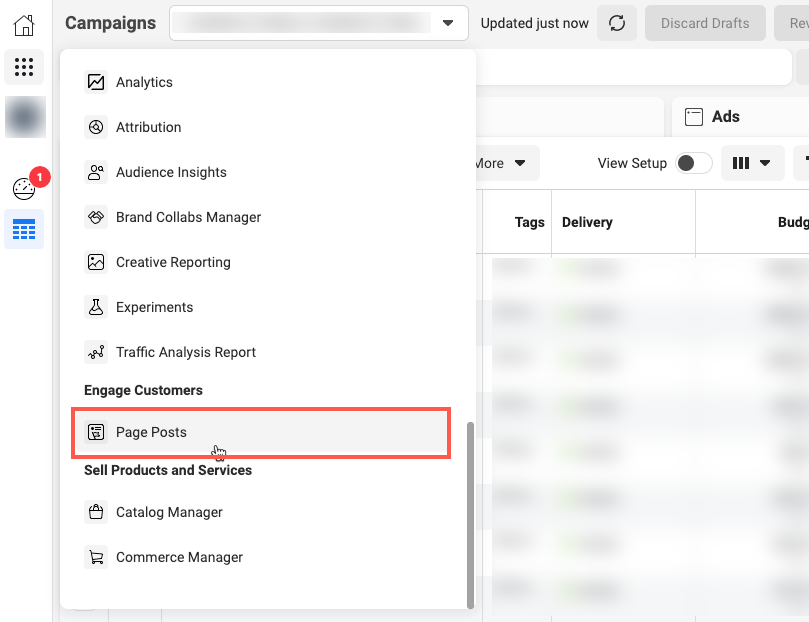
Now, you can access Published Posts, Scheduled Posts, or Ad Posts.
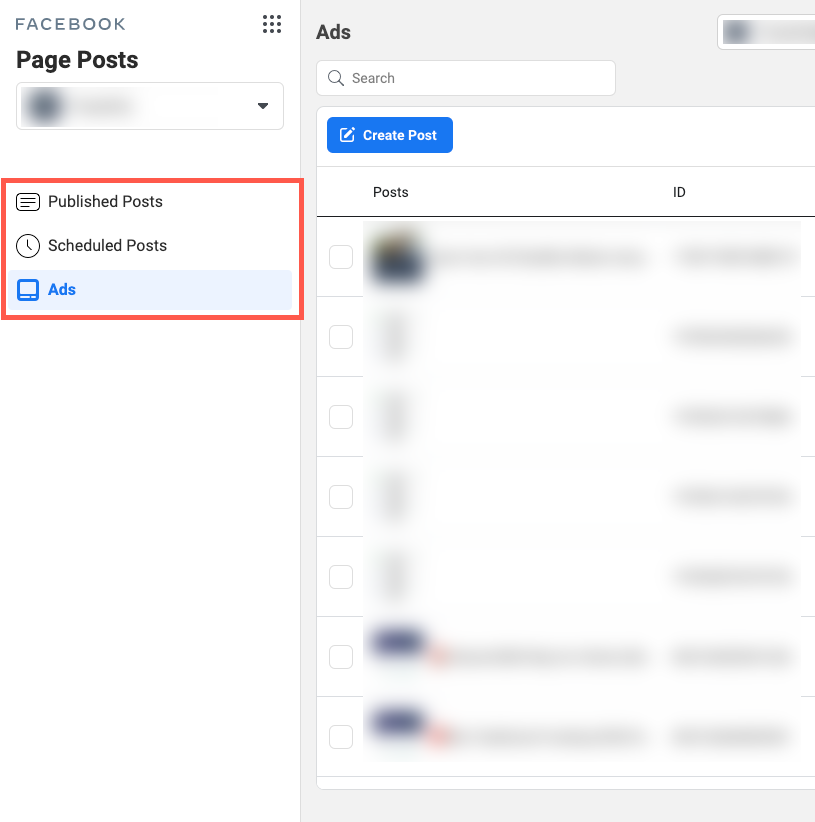
What is the purpose of the Page Posts section?
Back when Facebook Ad Posts were commonly referenced as ‘Dark Post’ this section was used to to create and manage Facebook Ads. Currently, this approach is somewhat obsolete given the use of the Facebook Ads Manager.
However, what no one tells you is that you can use the page posts section to edit Facebook Ads without losing social proof.
Although, according to Facebook, the value of measuring engagement as a persuasion to purchase signal is negligible. Facebook talks about this in Engagement on Facebook: When it matters
But, we don’t believe that is entirely true.
In our experience aggregated social proof adds a ton of value to your Facebook Ads and can give your ad a much longer shelf life.
Naturally, better performing ads tend to also aggregate social proof. You can leverage this by using the same post across campaigns and ad sets to build and grow social proof for improved performance and longer ad effectiveness.
This works well with one caveat – captions need to be kept relevant.
Fortunately, you can edit ad posts captions in the Page Posts section which is a powerful way to tweak and keep your caption relevant without losing social proof.
Click on the link below for step by step instructions 👇
✔️ Edit a Facebook ad without losing social proof 🙌
Introduction to Automated Rules
When managing multiple accounts, it’s impossible to micromanage performance all the time. This is where automated rules come in.
Automated rules take real time action on critical performance points based on pre-defined rules.
Automated rules are especially important when scaling Facebook Ads and can save you from wasting advertising spend.
Accessing Automated Rules
In the Facebook Ads Manager click Rules and select Create A New Rule
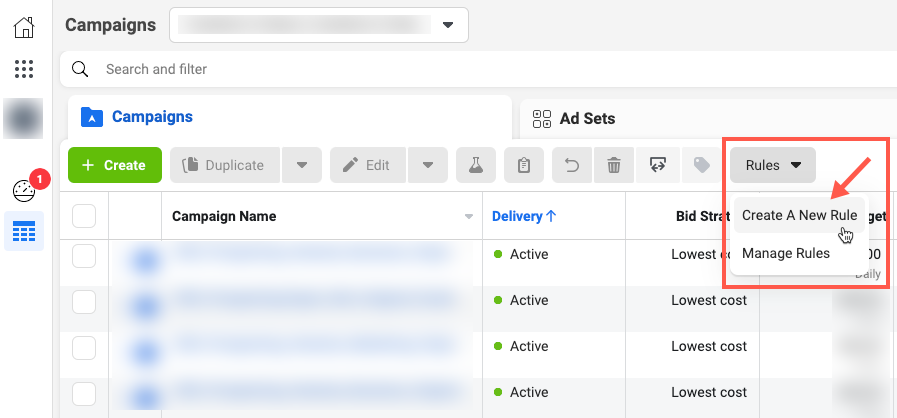
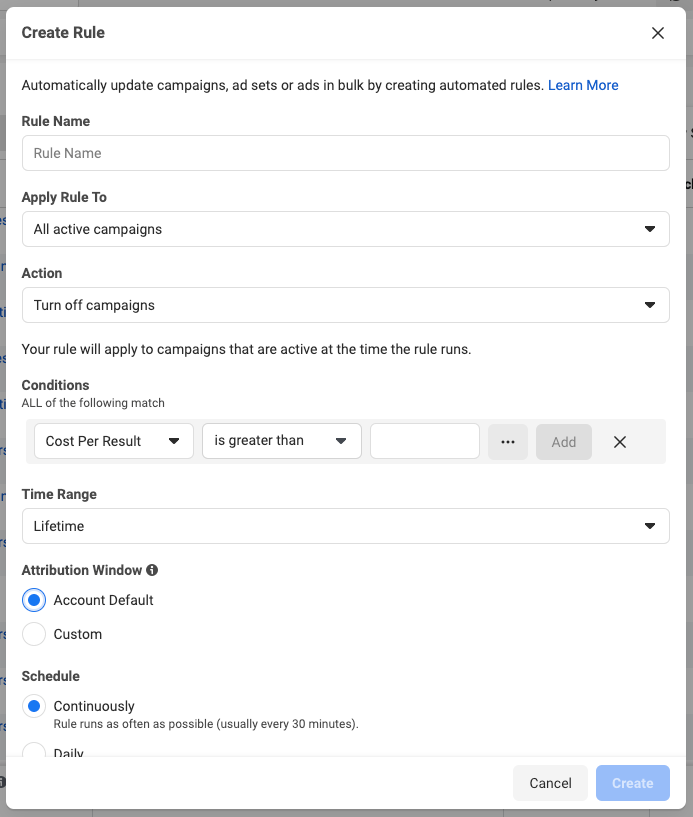
Next, after you click Create A New Rule you will get the following window:
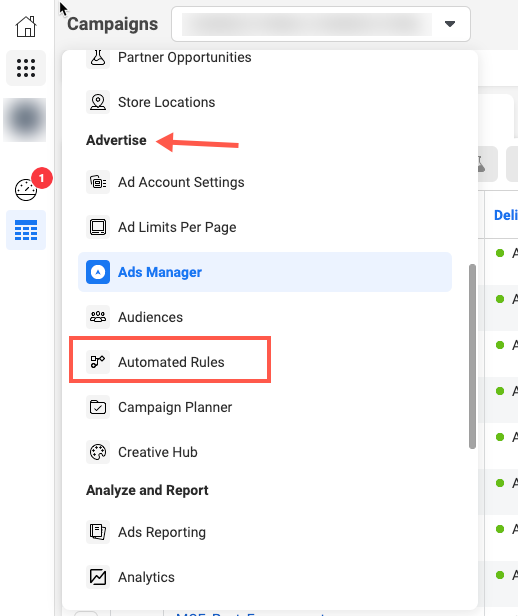
To access created rules in your account go to Automated Rules under Advertise in the left nav fly out menu.
Getting started with automated rules
Let’s go through the steps of setting up two automated rules.
1. Create an automated rule that monitors ROAS over a 7-day purchase window.
2. Create a rule that monitors campaign frequency.
Monitors ROAS over a 7-day purchase window
First, give the rule a name and define what the rule will apply to.
In this case, I want to apply the rule on the ad set level since we are running multiple ad sets in each campaign.
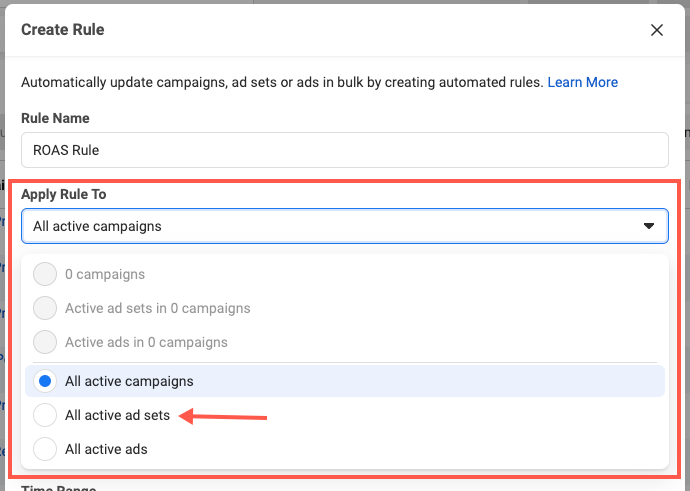
Now, we need to define what actions to take. Here, we want to scale our ad set daily budget based on a target ROAS.
This means that if a given ad set hits the target ROAS of 3X we are willing to increase the ad set budget by 25%.
To control the budget, we will set a maximum budget range and let’s leave the action Frequency set to default.
By Leaving the Action Frequency set to default it will only run once every 12 hours. You might want to change this frequency depending on how fast you are scaling.
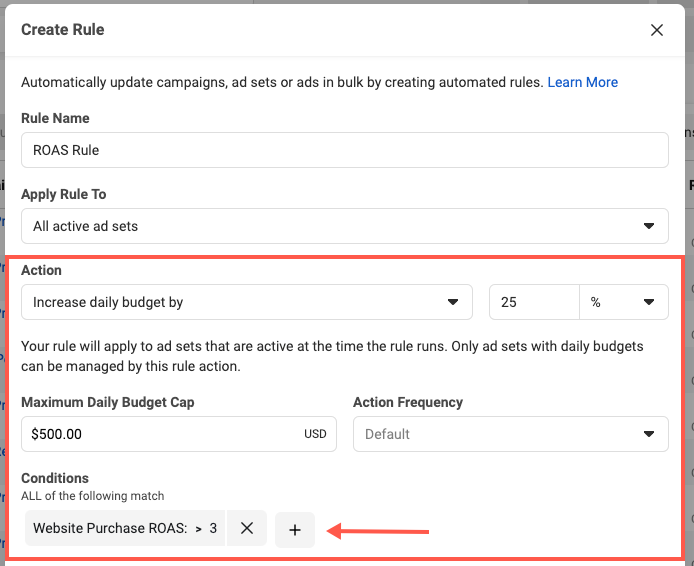
Next, we will apply Last 7 Days for the time range so that Facebook is using recent campaign performance data when applying the rule.
For the Attribution Window leave the Account Default checked and set the schedule to daily.
Lastly, we will want to define notification preferences. Then click create.
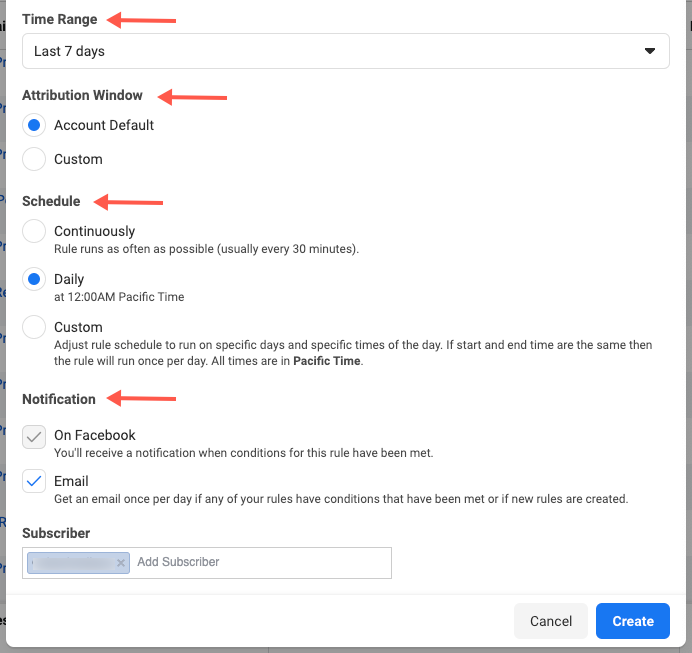
Once the rule is created you can assign it to specific campaigns in the Facebook Ads Manager.
We created the ROAS rule as an example but there is a lot more you can do.
For example, you might want to create an inverse of this rule so that Facebook will reduce budgets on days with lower performance.
Next let’s take a look at creating an automated rule that looks at campaign frequency.
Creating a rule that monitors campaign frequency
Another instance where rules can be super helpful is to monitor campaign frequency.
If the frequency gets out of control people get overexposed which in turn has a negative impact on campaign delivery as well as the brand.
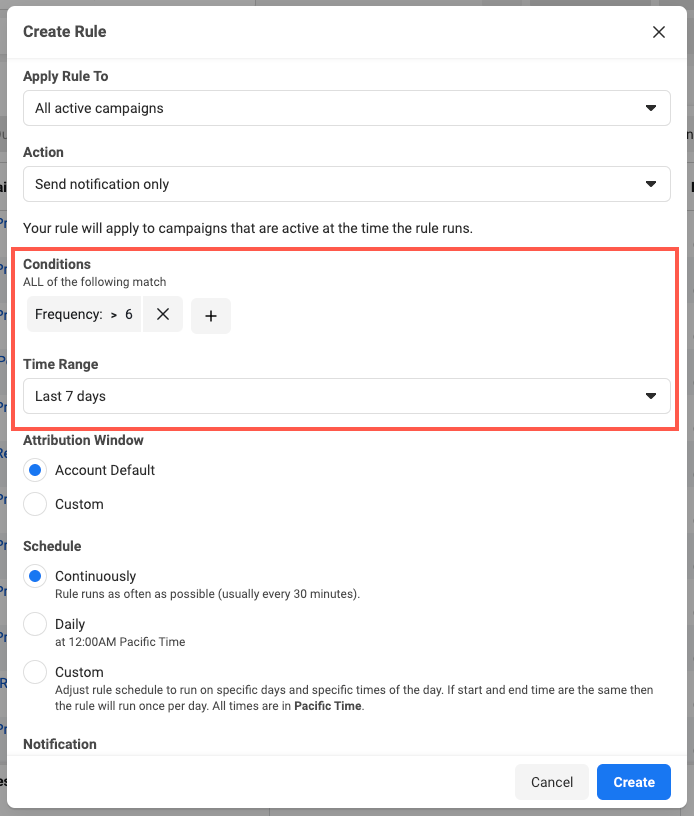
To create this rule apply it to all active campaigns and make sure to set the action to send notification only.
In other words, the goal is NOT to turn off campaigns as soon as this rule kicks in. Instead, receiving this notifications allows us to make timely campaign adjustments.
For example, rotating in new audiences and creative or adding exclusions to improve frequency.
The Facebook Pixel
One of the first things you are going to want to do when creating a new Facebook Ads Manger is install the Facebook Pixel for your app or website.
There are a few reasons for this.
First, the Facebook pixel tracks all user activity, regardless of traffic source, giving you valuable people based analytics and insights.
Second, you can build static and dynamic retargeting lists and custom audiences based off of site visitor behavior.
Third, you can set up standard and custom events as well as e-commerce conversion events which gives you detailed performance insights in the Facebook Ads Manager.
Most importantly, as soon as the Facebook Pixel is installed you can start collecting event conversion data.
Therefore, the sooner you do this the more data you have to feed the Facebook algorithm as well as collect seed data to build LAL audiences.
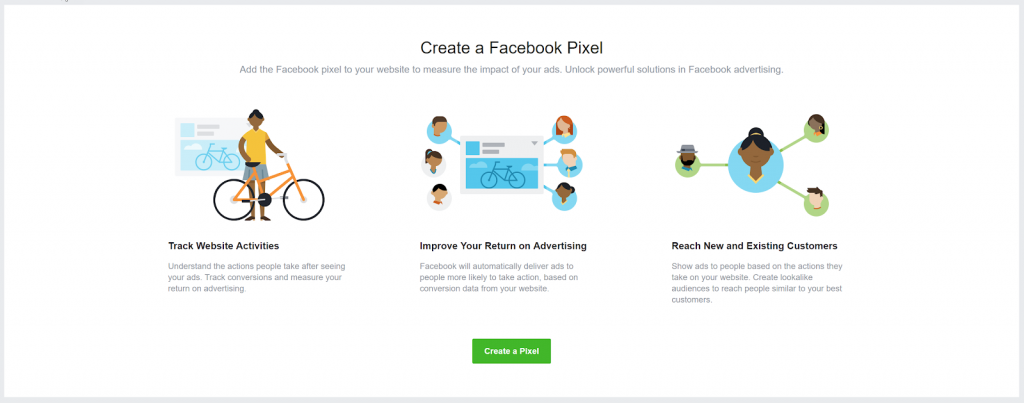
To clarify, set up is relatively simple but does involve a series of steps. Click on the link below for step by step instructions on how to set up the Facebook Pixel using the Google Tag Manager below👇
✔️ Set Up Your Facebook Pixel Using Google Tag Manager
At this point we have covered some of the key features of the Facebook Ads manager.
In the following sections we will cover some additional areas and settings as well as link out to more resources.
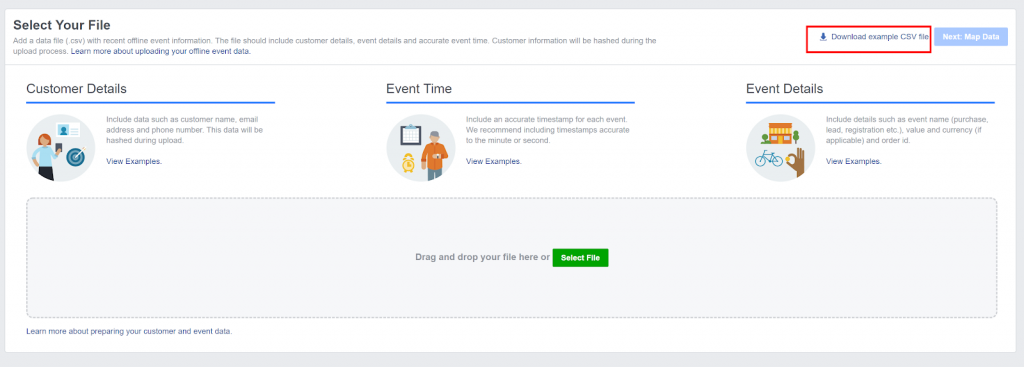
Offline Conversion Events
Offline events are events that happen IRL as opposed to online. For example, if a user makes an in-store purchase.
You can then upload your offline conversion data, and Facebook will match back [hashed] user data to see what ads assisted in driving the conversion.
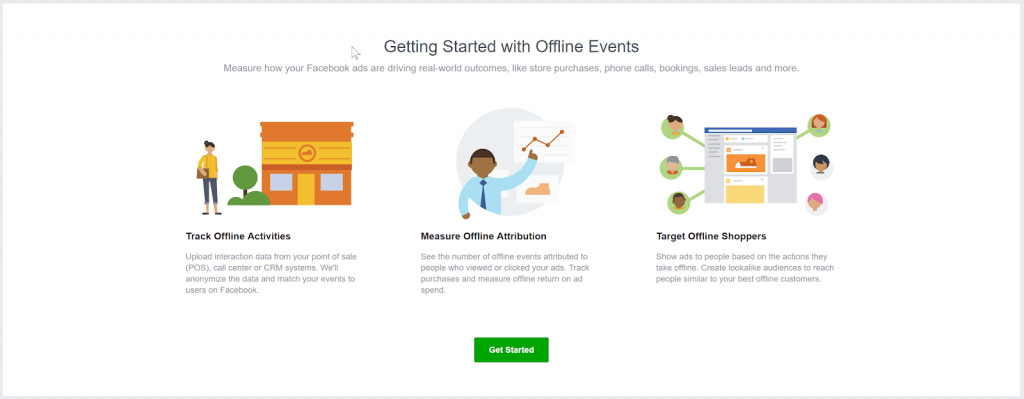
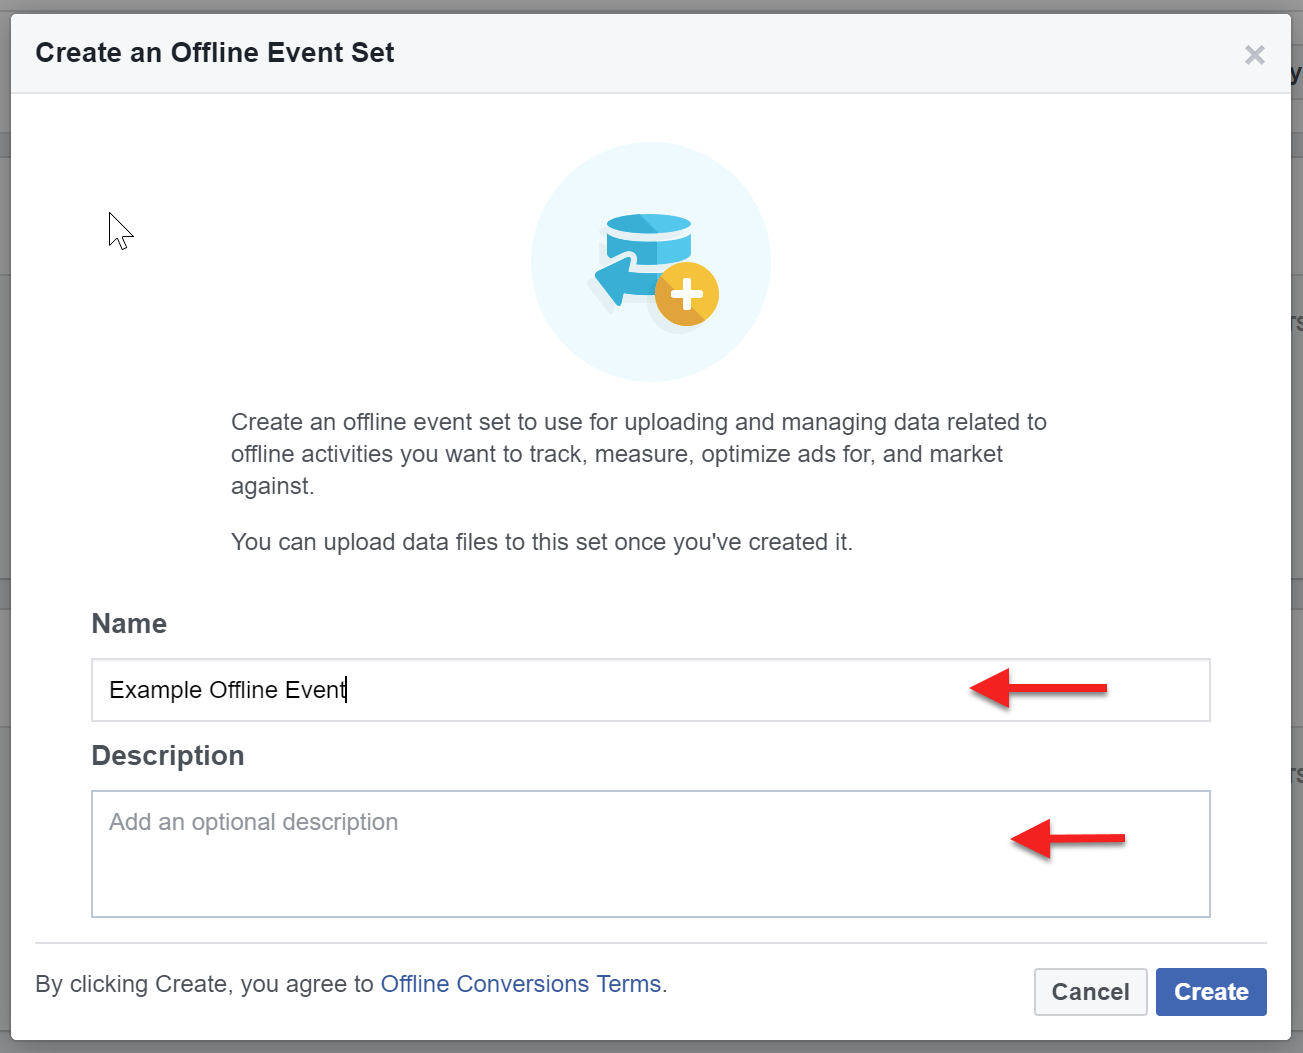
In the Events Manager select Add Data Sources and click Offline Event Set.

Next, give it a name and optional description then click create.
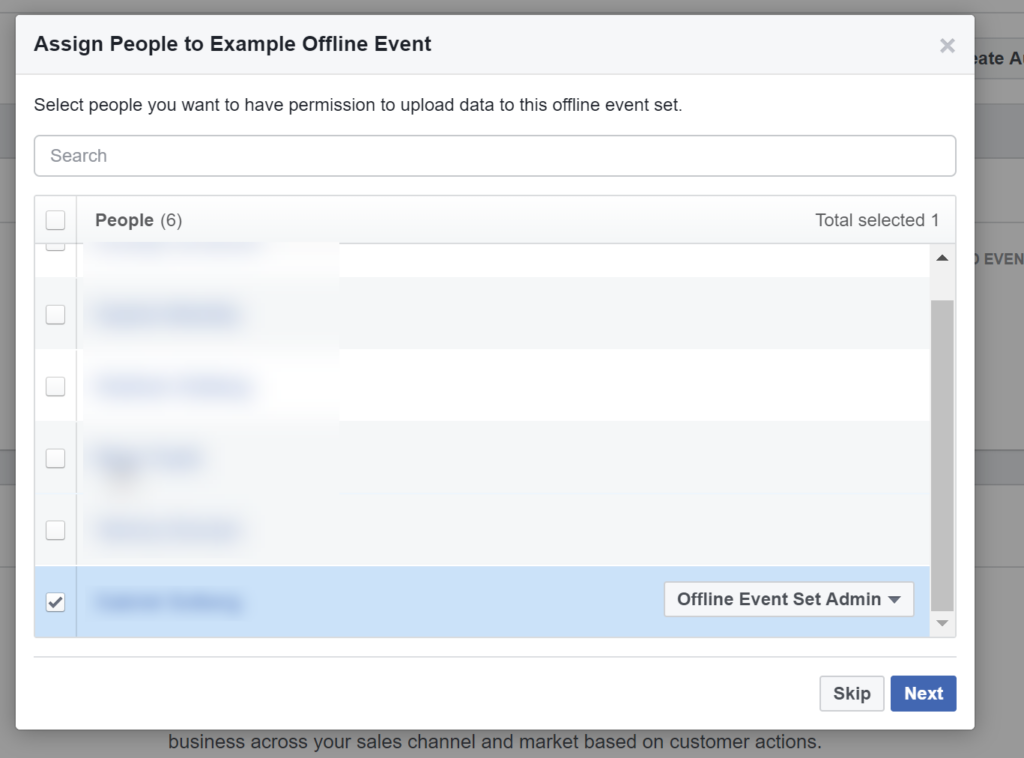
Next Assign Ad Accounts.

Then assign people.
Subsequently, download an example file to prepare your offline data for upload.
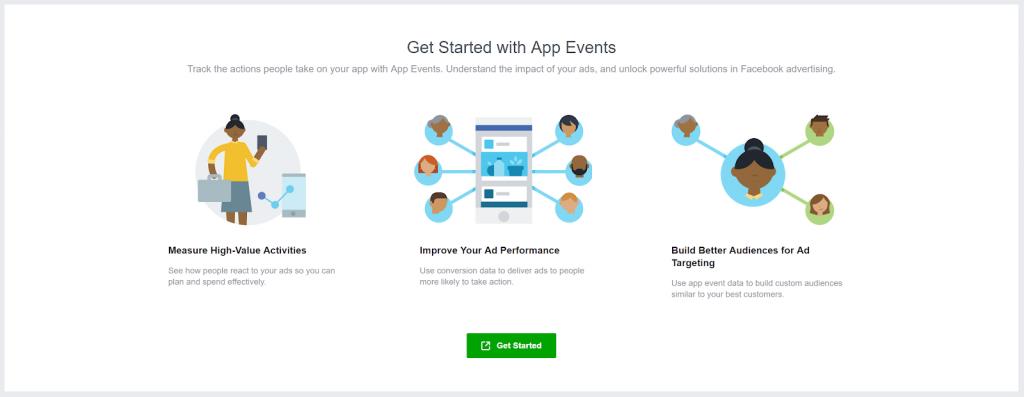
App Events
App events allow you to measure specific actions users take within your app. This is similar to events tracked on a website.
Therefore, App Events are critical understanding of how users navigate your app towards a given objective.
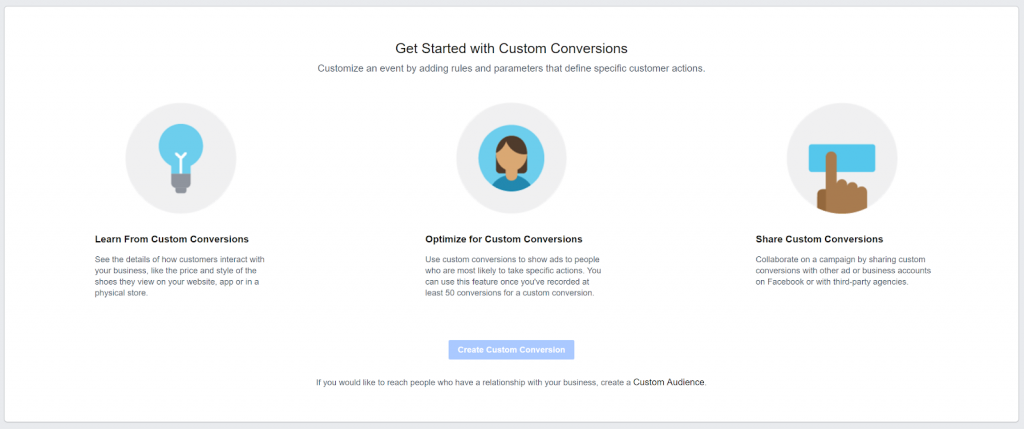
Custom Conversions
With custom conversion you can create a custom conversion using any combination of URL traffic events, standard events or custom events.
As a result, you can leverage custom conversions in any campaign running on a conversion objective.
Custom Conversions allow you to leverage the Facebook algorithm for any conversion type.
Note: You can, by default, optimize towards a standard event on the ad set level. However, for objective conversion campaigns you need to create a custom conversion off of a custom event for it to become available in the ad set.
[2021 Update] With the upcoming iOS14 update you will only be able to use a total of 8 conversion events for conversion objectives. So make sure to identify key conversion events that align with your business needs.
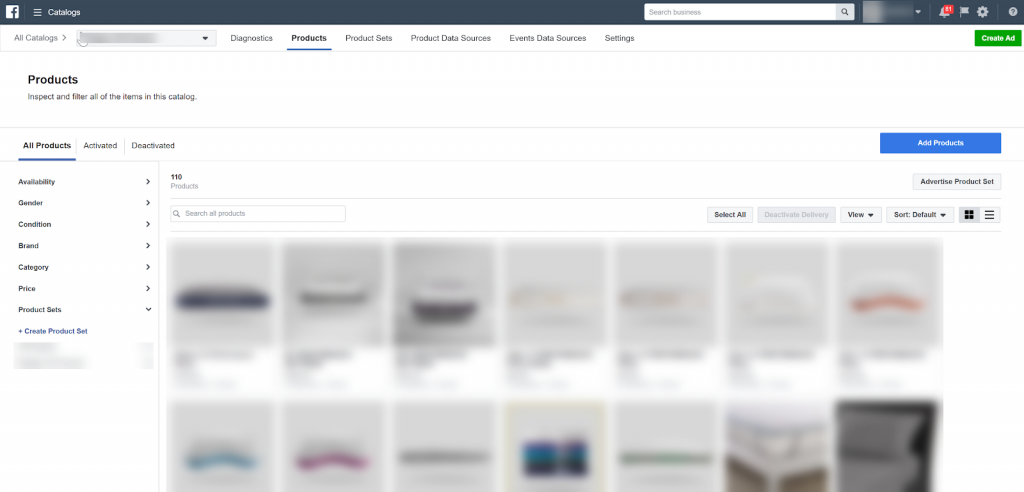
Catalogs
Product catalogs is a central location to manage product feeds for your e-commerce store.
In this section you can search products, manage your feed data sources, create product sets, review purchase events and edit catalog settings.
Block Lists
Block lists are managed through the Facebook Business Manager.
For example, controlling placements using Block Lists, is a great way to ensure pre-campaign transparency and be proactive about where your ads can appear.
To get started download a CSV file with a full list of placements. Then, filter out unwanted placements to create your custom block list.

Click on the link below for step by step instructions in the Facebook Business Manager – Brand Safety section 👇
✔️ How To Use The Facebook Business Manager [Guide]
Settings [Facebook Ads Manager]
The settings section covers general ad account setting within the Facebook Ads Manager.
Ad Accounts
Pages
Payment Settings
Notifications
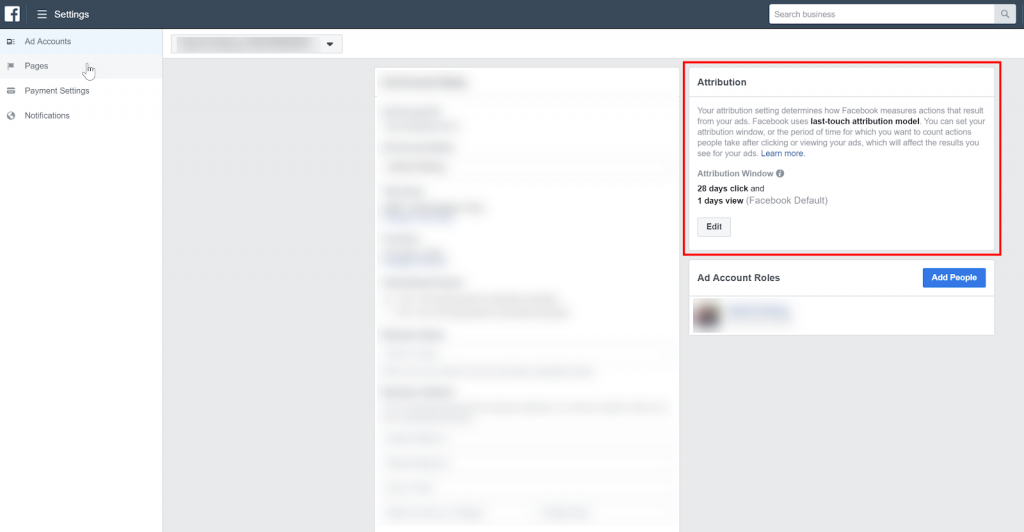
Most of these are pretty straightforward and self-explanatory. However, I would like to call out the attribution setting.
Attribution Setting
Facebook allows you to define the attribution settings for each Ad Account.
In Facebook’s words:
“The attribution window determines the actions (clicks or views) to be used for attributing results to ads and the lookback period after those actions occur during which ad results are counted. Facebooks default attribution window is 28 days after people click and 1 day after people view your ad.”
Consequently, you can set the click or view window to 1, 7 or 28 days. The default is 28-day post click and 1-day post view.

Generally speaking, we work with the default attribution settings, but this can vary based on your business needs. If you find that sales happen in a smaller purchase window, you can set it to 7 days post-click.
However, if you are working with branding and awareness campaigns reaching top funnel users, you might want to set the post view to 28 days.
But remember that this will get applied to the Facebook Ads Manager Account.
Business Settings, Billing & Invoices [Business Manager]
Business settings take you to your Facebook Business Manager to manage general business settings across accounts.
You can view and update your billing information and invoices to date, but again you will be taken to the business manager to edit these.

Conclusion
In conclusion, running Facebook ads can be a daunting task.
However, once you get familiar with the tools we covered in this Facebook Ads Manager tutorial, you can get excited about the possibilities.
Given these points, did we cover everything in this Facebook Ads Manager guide?
Let us know in the comments below.
Leave a comment